Integrating Algolia
You can quickly and easily integrate Studio with Algolia. Once configured, you can build a search page in Studio, using Studio's built-in Algolia component, enabling you to leverage Algolia's powerful search engine in your storefront.
You can sync your Commerce catalogs with the Commerce Algolia integration so that all catalog changes are synced with Studio, ensuring that your storefront's search is automatically kept up-to-date with the latest changes.
Prerequisites
You must have the following before configuring the Algolia integration.
- A published catalog in Product Experience Manager.
- A Studio storefront.
- An Algolia account.
Best Practices
Follow these steps to integrate with Algolia.
- In Commerce Manager, go to Composer, configure an Algolia integration in Integrations Hub.
- In Studio, configure the Algolia integration.
- In Algolia, configure your Algolia settings.
- In Studio, create a Search page that uses an Algolia Collection component.
Configure the Algolia Integration
Follow these steps to configure the Algolia integration in Studio.
-
Select Settings > Integrations.
-
Navigate to Payment & Storefront.
-
Select + next to Algolia.
-
Configure the Algolia settings.
Option Description Application ID Your Application ID for your Algolia account. Search only API Key key Your Admin API Key for your Algolia account. Index The Index ID of the catalog you want to use. -
Select Connect Account.
Configure your Algolia Settings
Follow these steps to configure your settings in Algolia.
- Log into Algolia.
- Select Search.
- Select your Algolia index.
- Select the Configuration tab.
- Under RELEVANCE ESSENTIALS, select Searchable attributes.
- Add the attributes you want to use.
- Select Review and Save Settings.
- Under FILTERING AND FACETING, select Facets.
- Add the attributes you want to use and set each attribute as searchable.
- Select Review and Save Settings.
- Under FILTERING AND FACETING, select Facet Display.
- Add the facets to display.
- Select Review and Save Settings.
Create a Search page
Follow these steps to create a search page that uses an Algolia Collection component in Studio.
- Select Content > Website.
- Select + New Page. A list of templates is displayed.
- Select Blank page. A list of components is displayed.
- Select Algolia Collection.
- Select the gear icon to display the page settings.

-
Configure the following settings:
Setting Description Title Search Results Studio Name Search results Page path search -
Select Save only to close page settings.
-
The Algolia Collection component allows you to specify which attributes you want to use for filtering and their order. Select the first item in the list. The item properties are displayed.
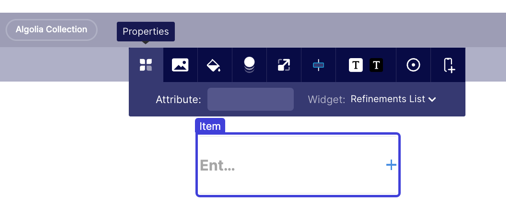
-
Select Item and enter a label for your filter. For example, if you want to use ep_categories.lvl1 to display your top-level nodes, you could label this Collections.
-
In Attribute, enter the Algolia attribute you want to use. For example, ep_categories.lvl1 to display your top-level nodes.
-
In Widget, select one of the following:
- Refinements List - Allows you to multi-select items from a data set.
- Menu - Allows you to filter by a specific hierarchy.
- Rating menu - Allows you to filter by rating values.
You can add as many attributes as you want.
-
Select + to add additional attributes.
-
When you are happy with your page, select the gear icon to display the page settings.
-
Select Save and Publish.
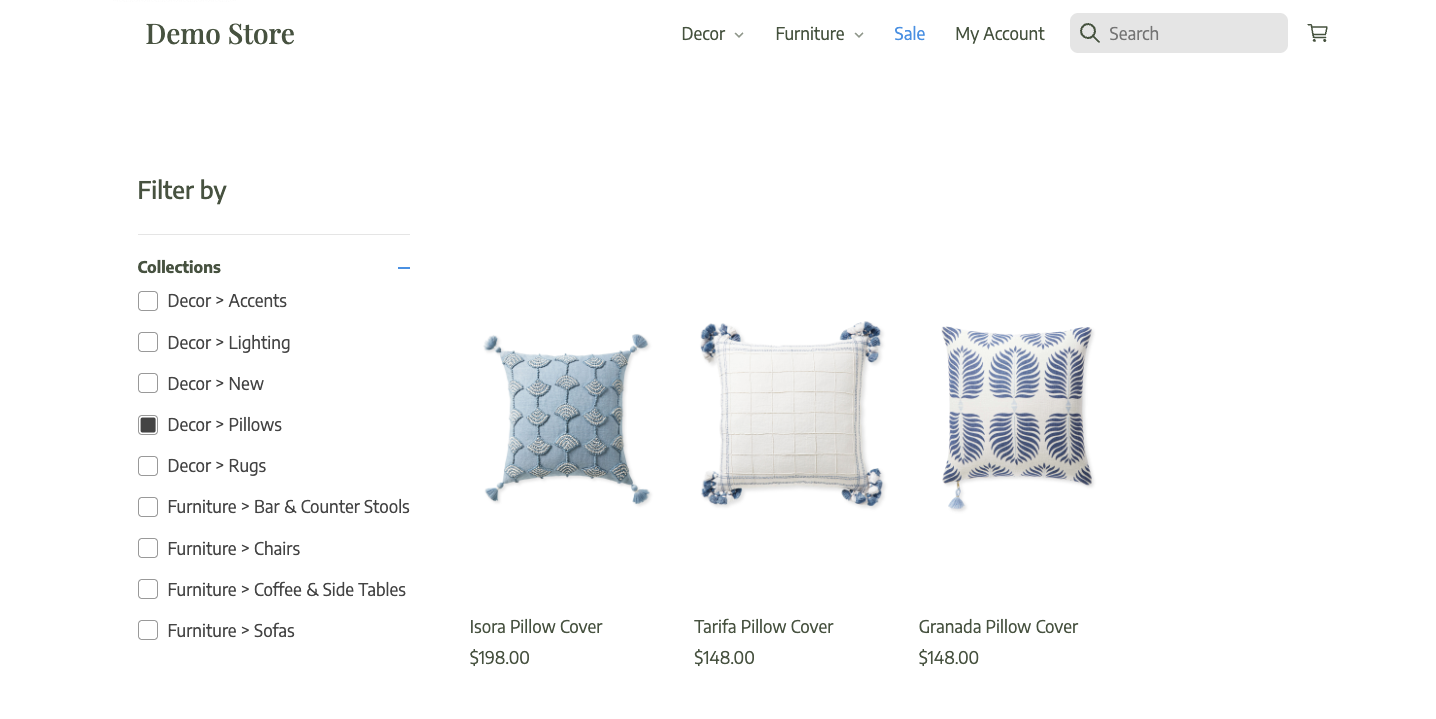
Your published Search Results looks similar to this.