How to Use Integration Triggers
Integration triggers allow you to define when an instance should run. There are several types of triggers, with schedule triggers and webhook triggers being the most commonly used. Many components include triggers that do things like validate webhook payloads, preprocess data, or return custom responses to the webhook caller. You can also configure a deploy trigger that runs when your integration is deployed to a customer.
- If you are integrating with a particular app or service, and that service has a component with a trigger, use that trigger.
- If you would like your integration to run on a predefined regular basis, you should use a schedule trigger.
- If you would like to invoke your integration from another system that can make HTTP calls, you should use a webhook trigger.
- If you have a flow that you would like to run when an instance is deployed, use a deploy trigger.
If your integration has multiple flows, each flow has its own trigger (and so its own webhook URL or schedule).
You can always change which trigger your flow uses by clicking on the trigger, and clicking the CHANGE TRIGGER button in the drawer that appears.
Scheduled triggers
Scheduled triggers allow you to create a regular schedule to dictate how often your integration should run. This is useful if you have an integration that should be triggered consistently at a specific time. You can set up your integration to run at the same time for all customers, or you can set up schedules on a per-customer basis.
To set up the same schedule for all customers, click the integration's trigger, open the Schedule tab, and enter the schedule you would like your integration to follow. You can configure your integration to run every X minutes, hours, days, or weeks:
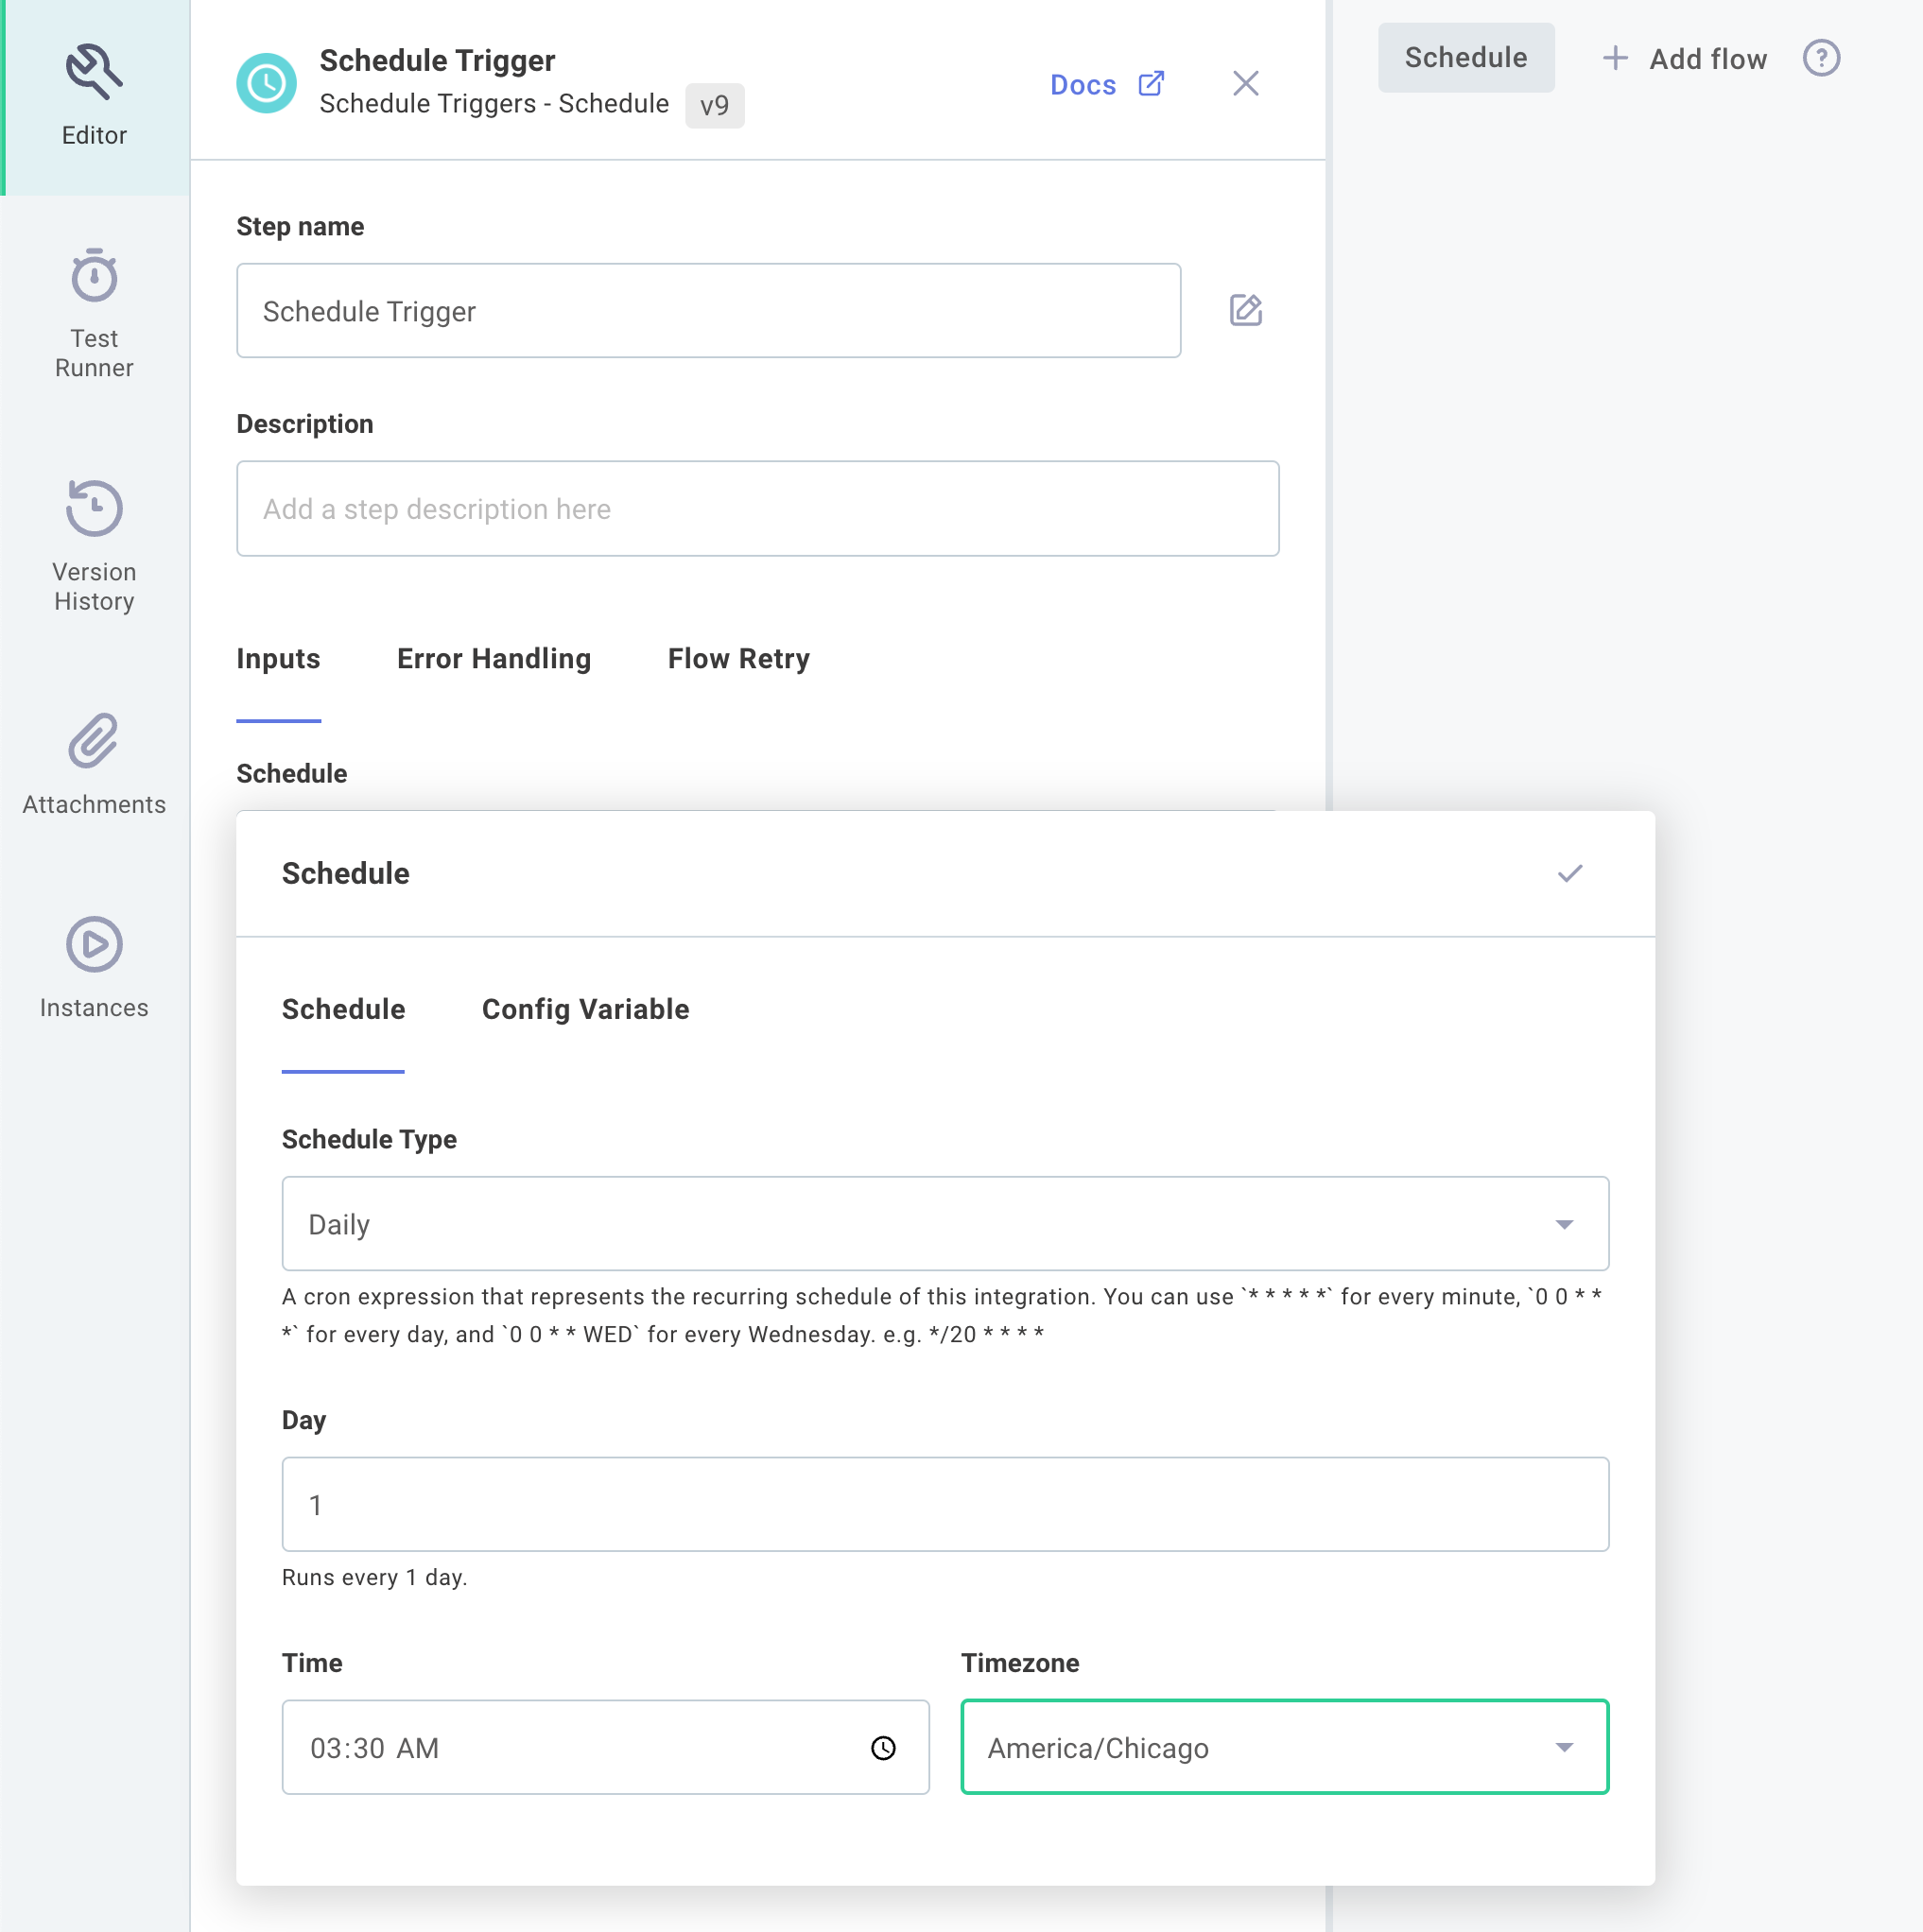
You can alternatively select Custom and provide a cron string.
For example, a trigger of */5 8-16 * * 1-5 would cause your integration to run every five minutes during business hours (8:00-16:55), Monday through Friday.
For help computing a cron schedule, see this Cron Calculator.
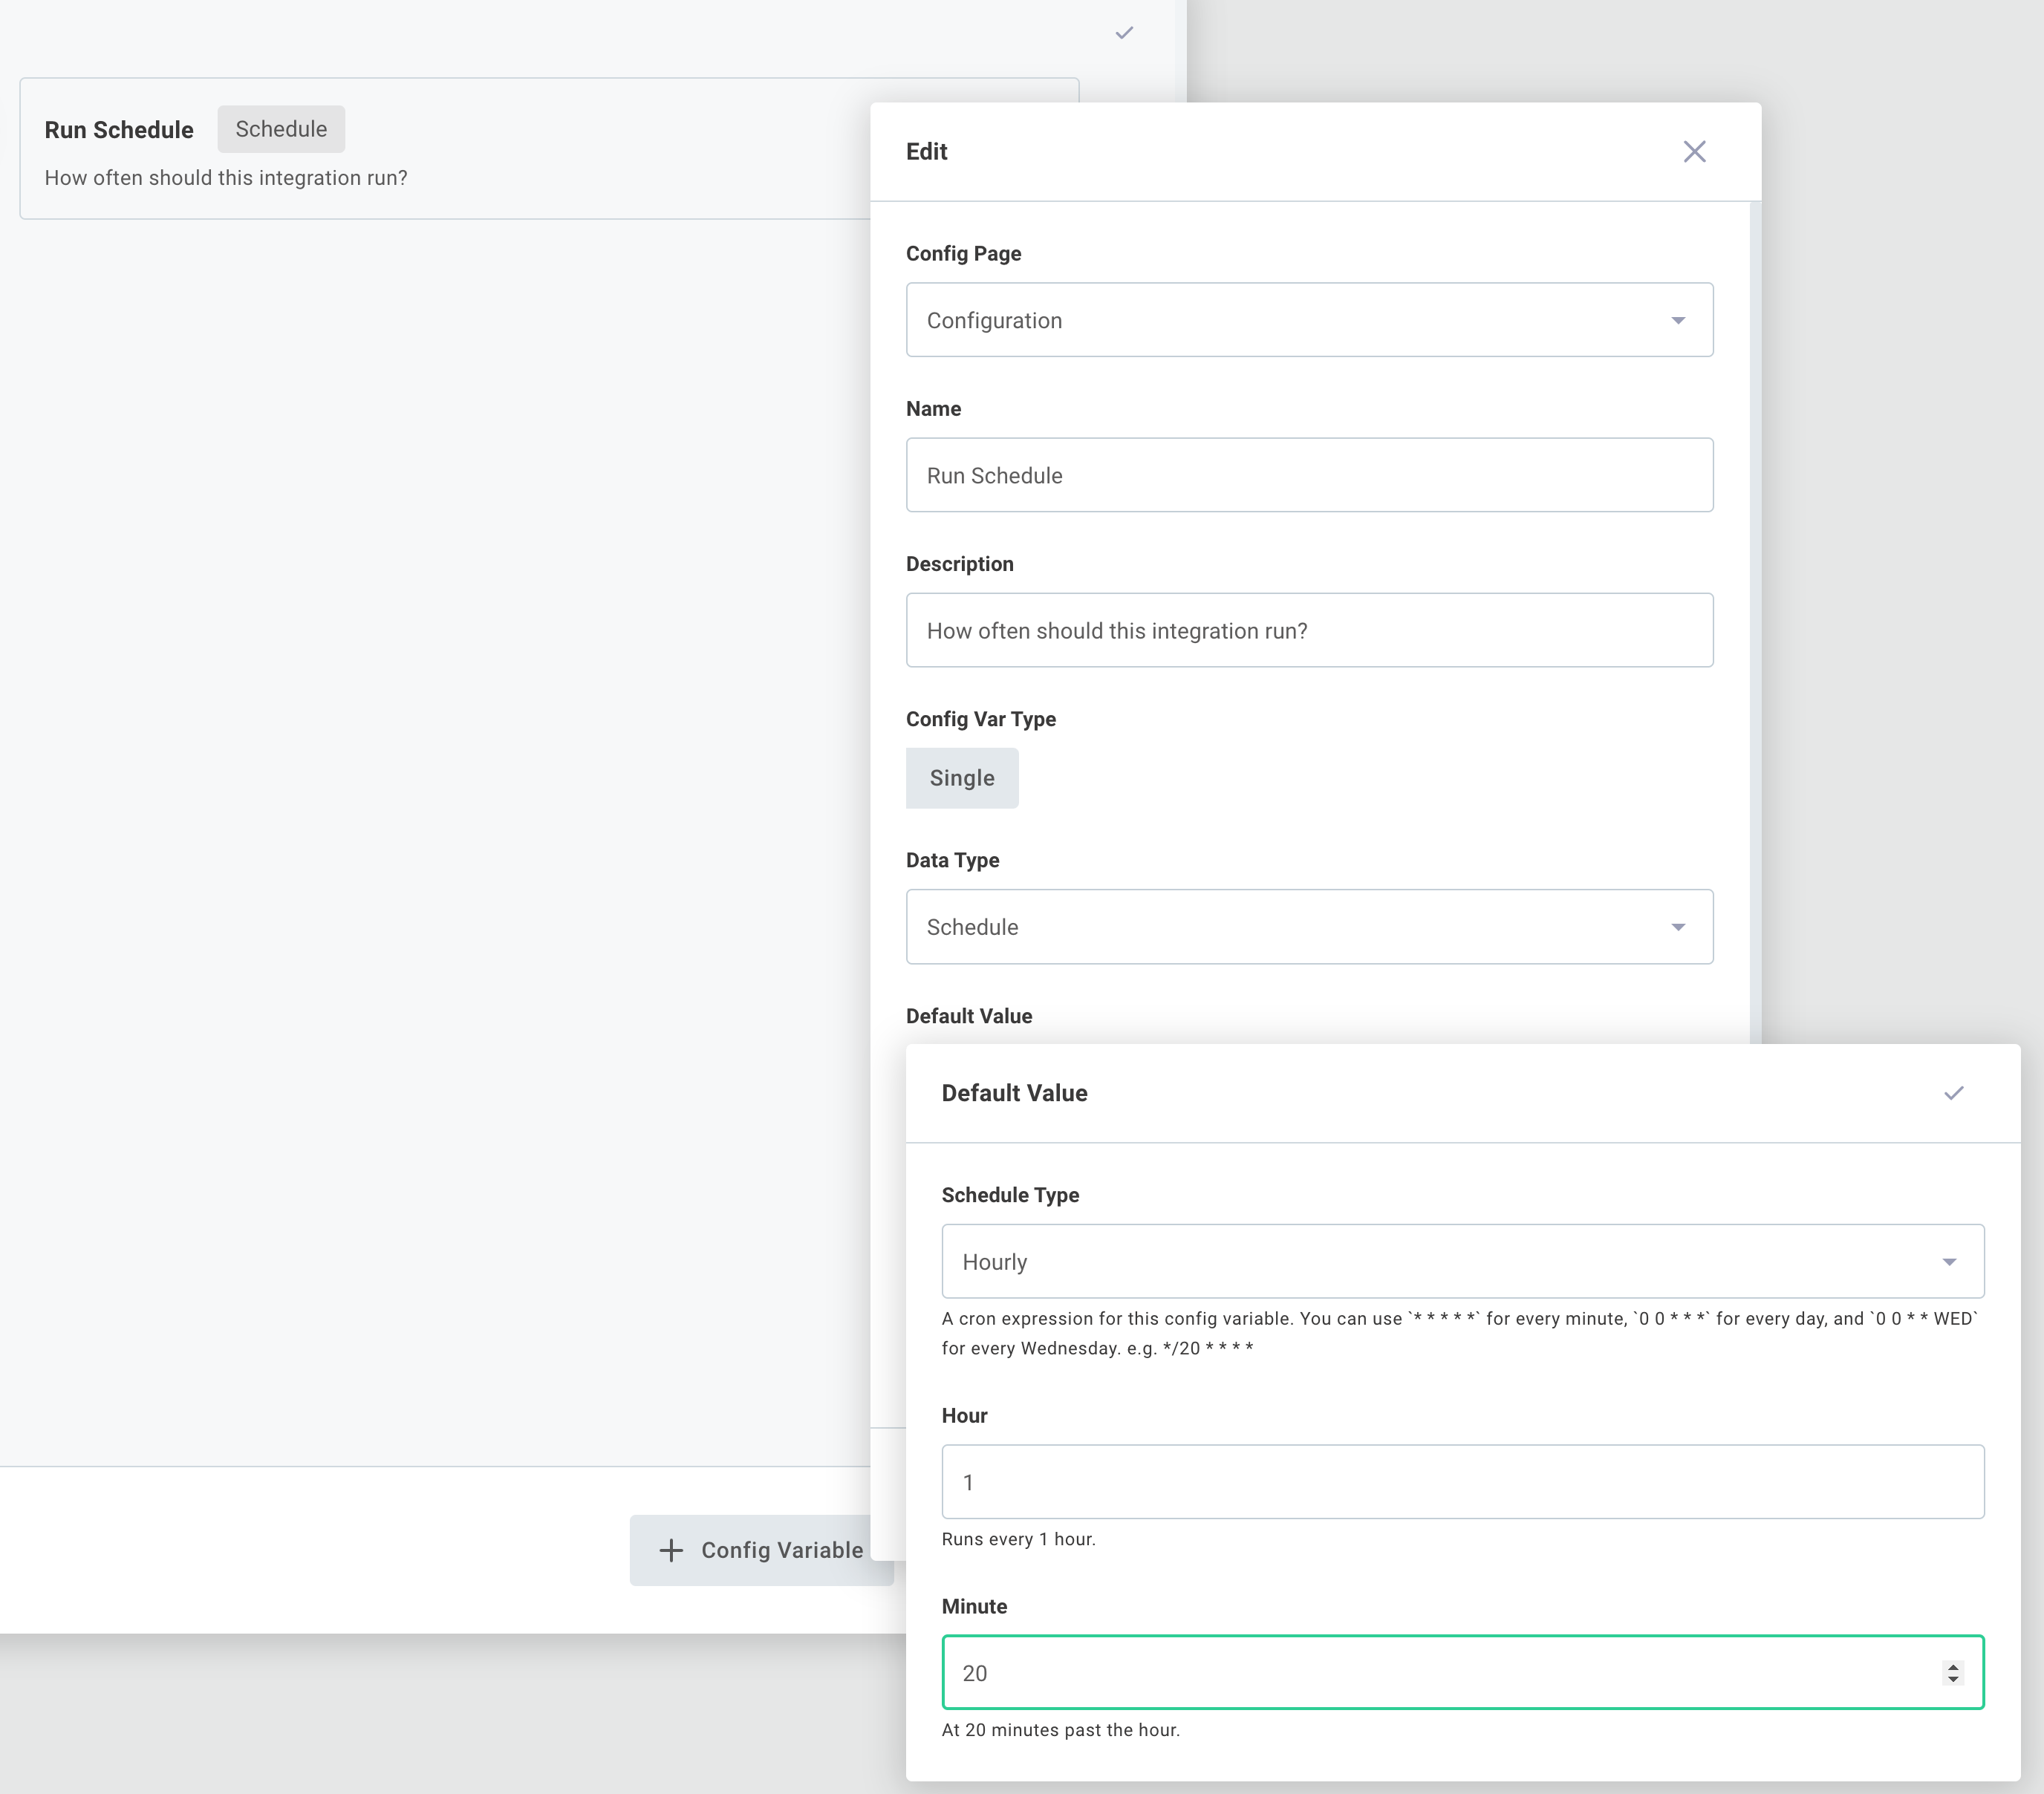
To configure schedules on a per-customer basis, first create a config variable of type Schedule by clicking the Configuration Wizard button. You can give your config variable any name you choose:
Then, click your integration trigger and reference the Config Variable you created:
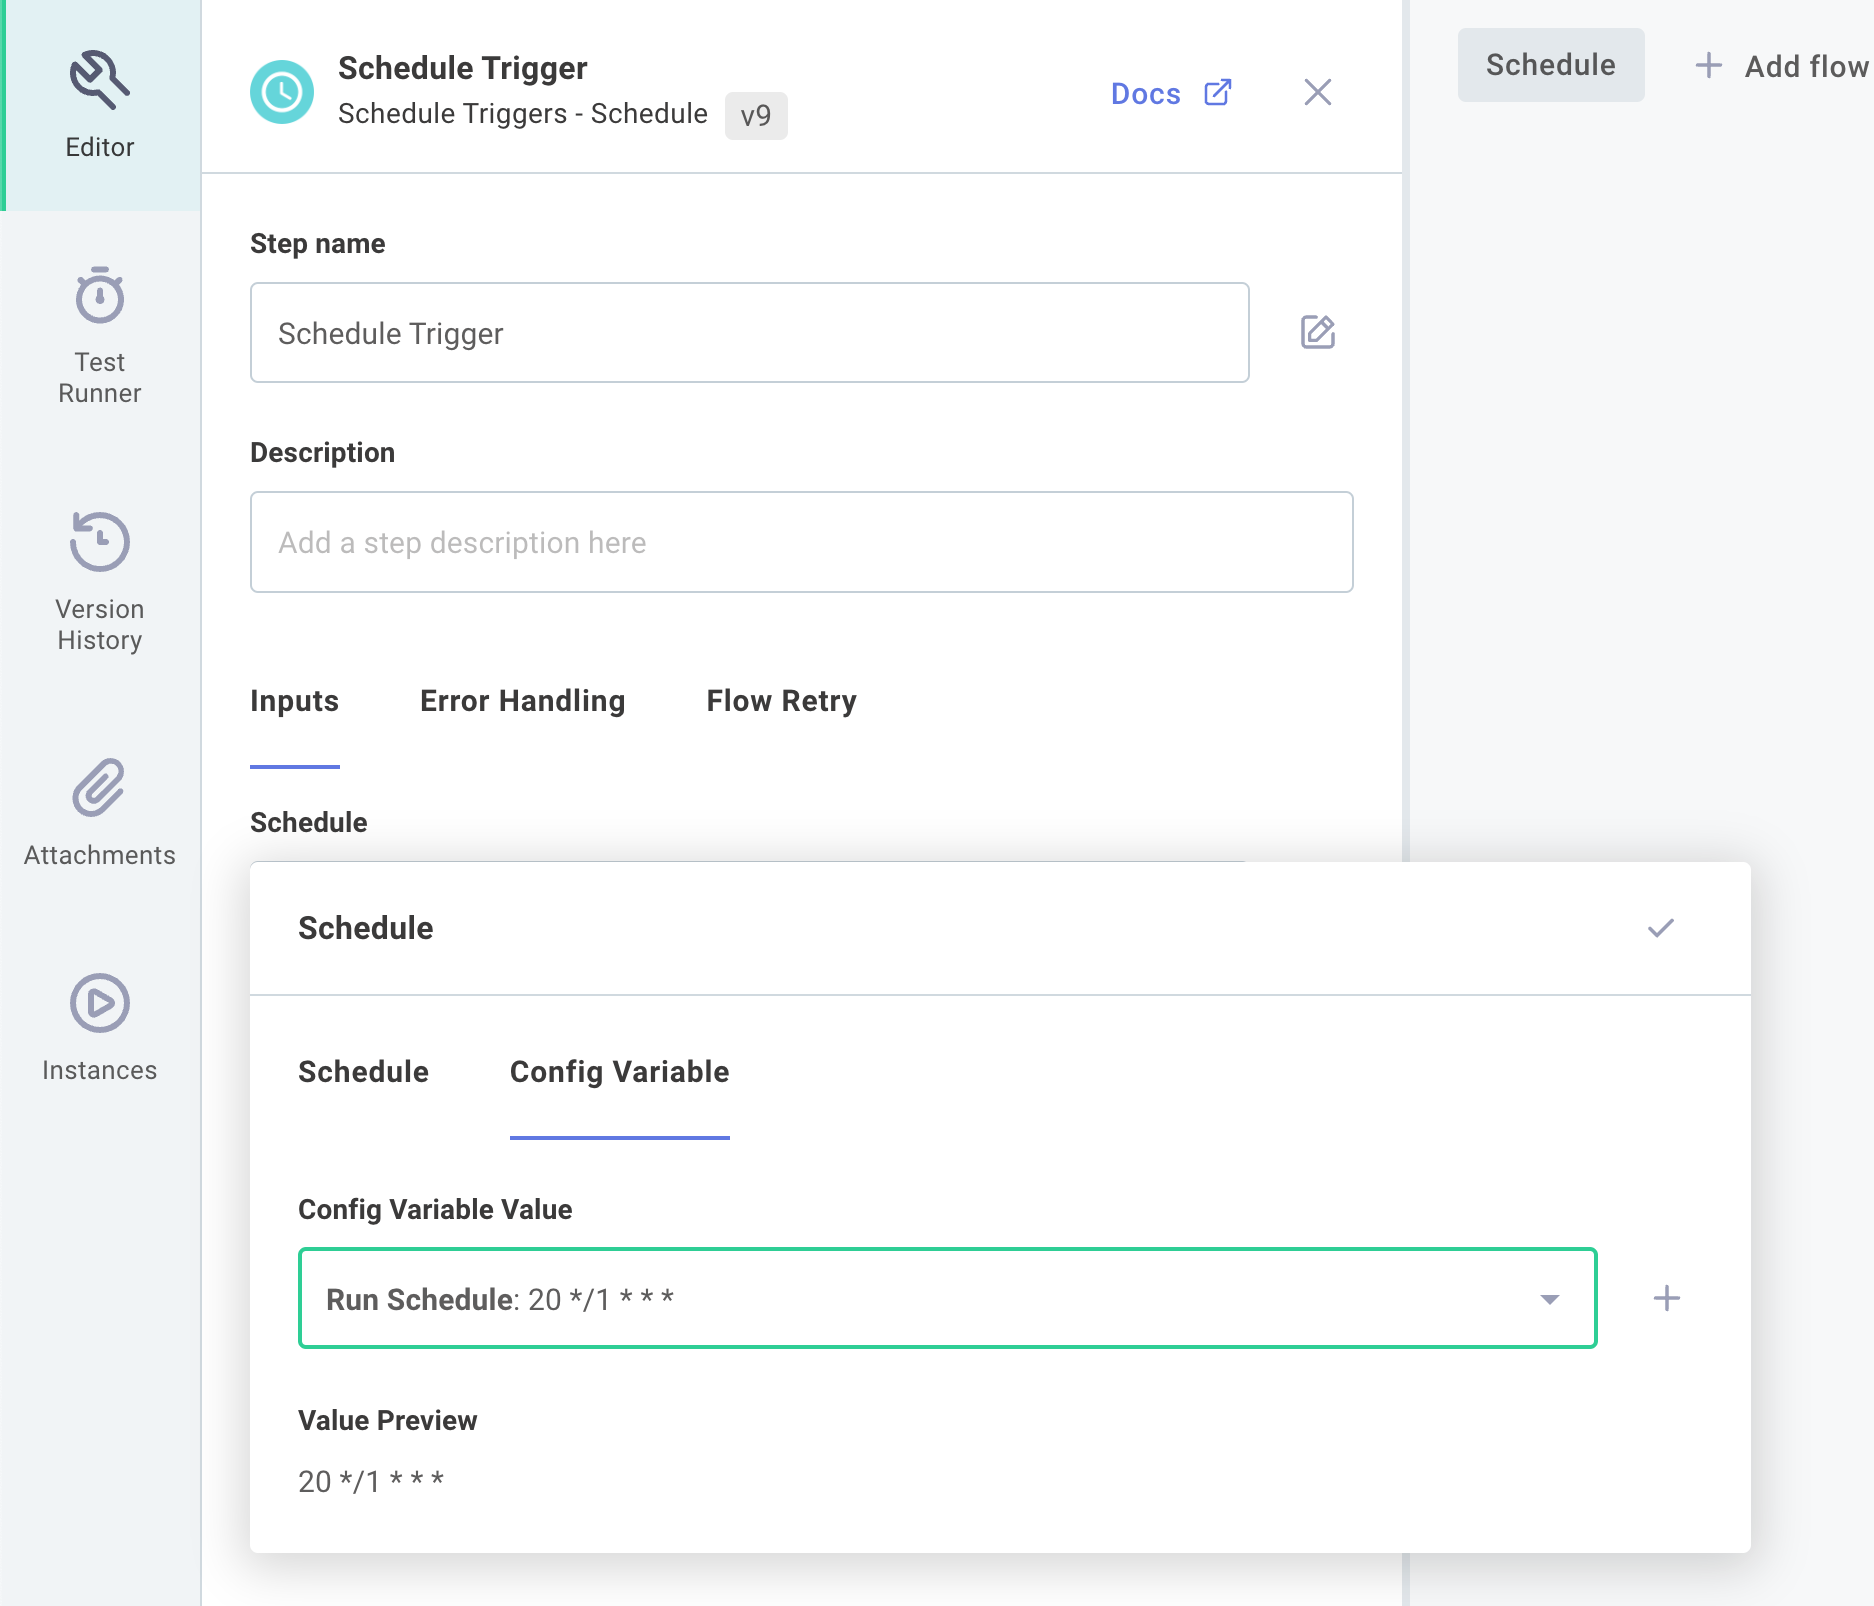
When your integration deployment team later deploys an instance of your integration, they can configure a custom schedule for that instance.
Webhook triggers
Webhook triggers allow you to run a particular instance or flow of an instance by making an HTTP POST, PUT, PATCH, DELETE or GET request to the webhook's URL. This is useful if you would like an outside application to invoke an integration when something within the outside application occurs. The outside application can assemble some data, and send that data to a Builder webhook URL via an HTTP request.
For example, third-party software could invoke an instance with a JSON payload whenever a job in the third-party application is complete, like this:
curl 'https://hooks.us-east-2.elasticpathintegrations.com/trigger/EXAMPLE==' \
  --data '{"renderId":51266,"s3Bucket":"test-customer-renders","status":"complete"}' \
  --header "Content-Type: application/json"
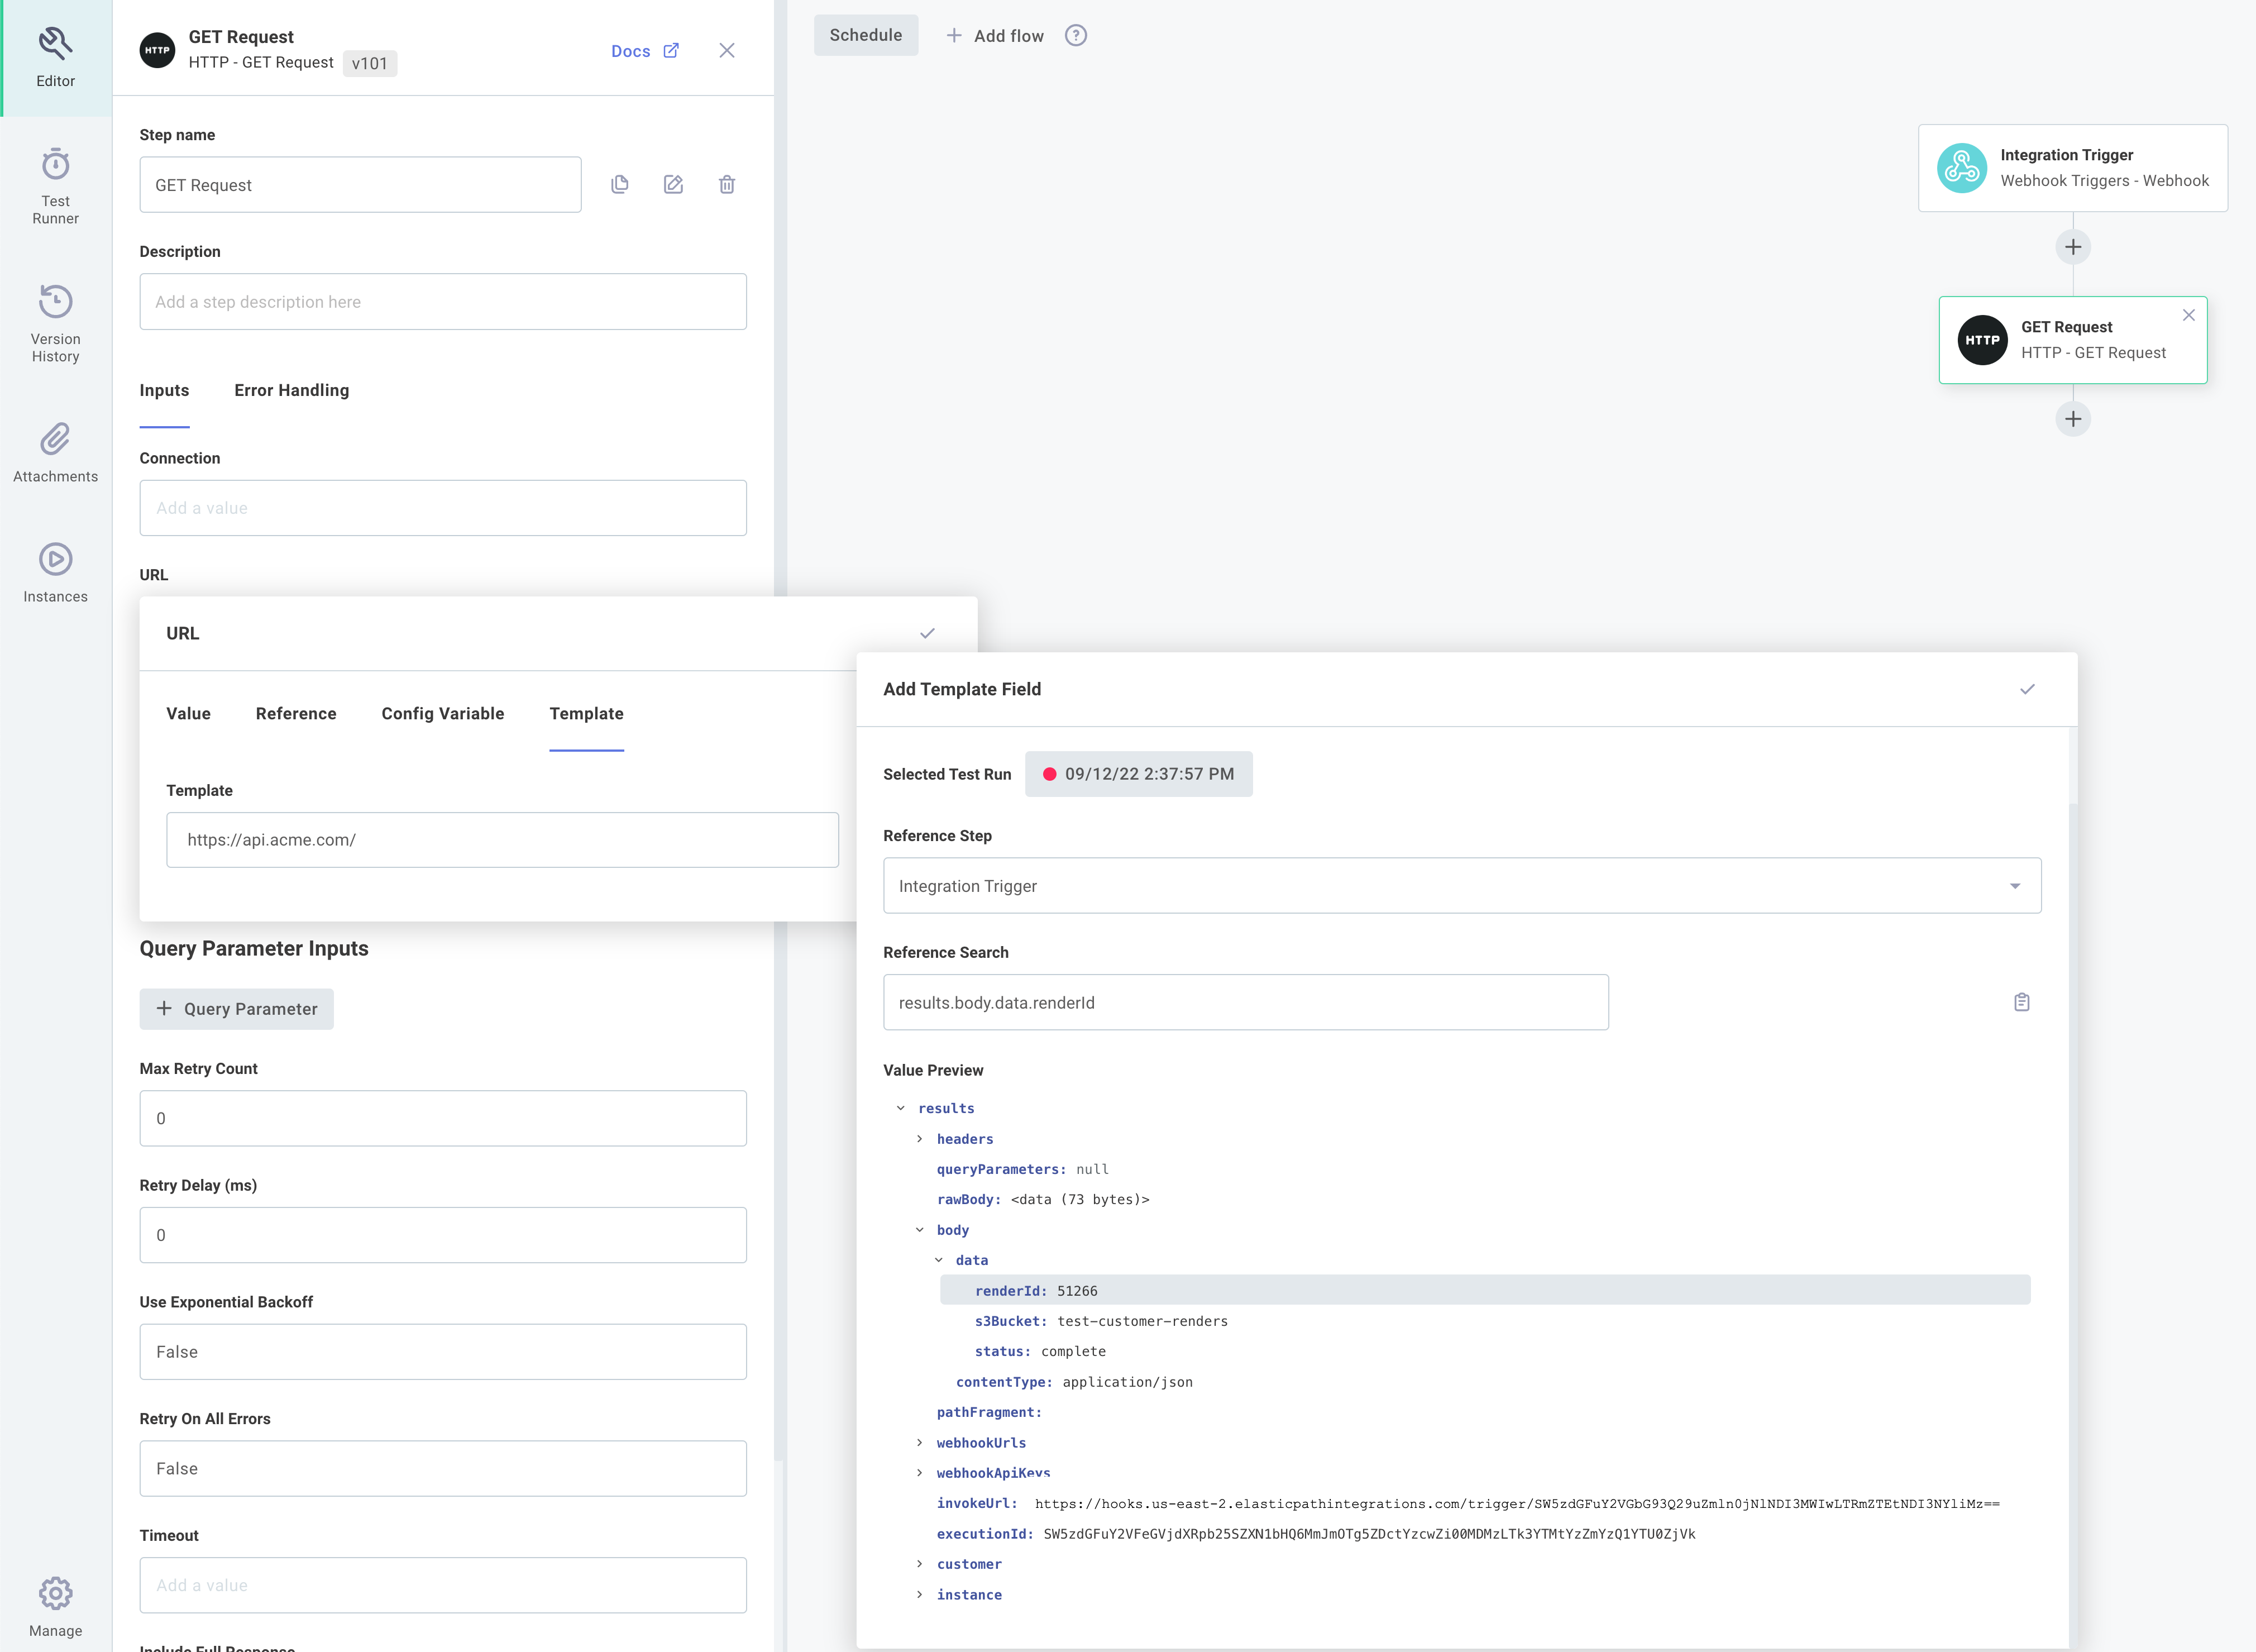
Note that the payload of the request is available by referencing the integration's trigger, shown in the screenshot below.
Steps can then reference data from the webhook payload through the trigger's results.
Headers are available through results.headers and body data is available through results.body.data:
The GET verb is supported You can use the GET verb to invoke an instance, but note that the GET verb does not allow you to send data with your request. If you need to send data with your request, use the POST, PUT, DELETE or PATCH verbs.
The GET verb was introduced because some applications send a GET request when a webhook is configured to verify that the webhook endpoint is ready to receive requests.
Webhook trigger responses
By default, webhook triggers provide an HTTP code 200 ("OK") response to callers of the webhook. The response body contains an execution ID, which can be used later to get logs and step results from the Prismatic API. The response looks like this:
curl \
  --data '{}' \
  --header "Content-Type: application/json" \
  'https://hooks.us-east-2.elasticpathintegrations.com/trigger/EXAMPLE=='

{"executionId":"SW5zdGFuY2VFeGVjdXRpb25SZXN1bHQ6OTdiNWQxYmEtZGUyZi00ZDY4LWIyMTgtMDFlZGMwMTQxNTM5"}
You can customize the response by clicking the integration webhook trigger and selecting a different HTTP code, response body, or response content type:
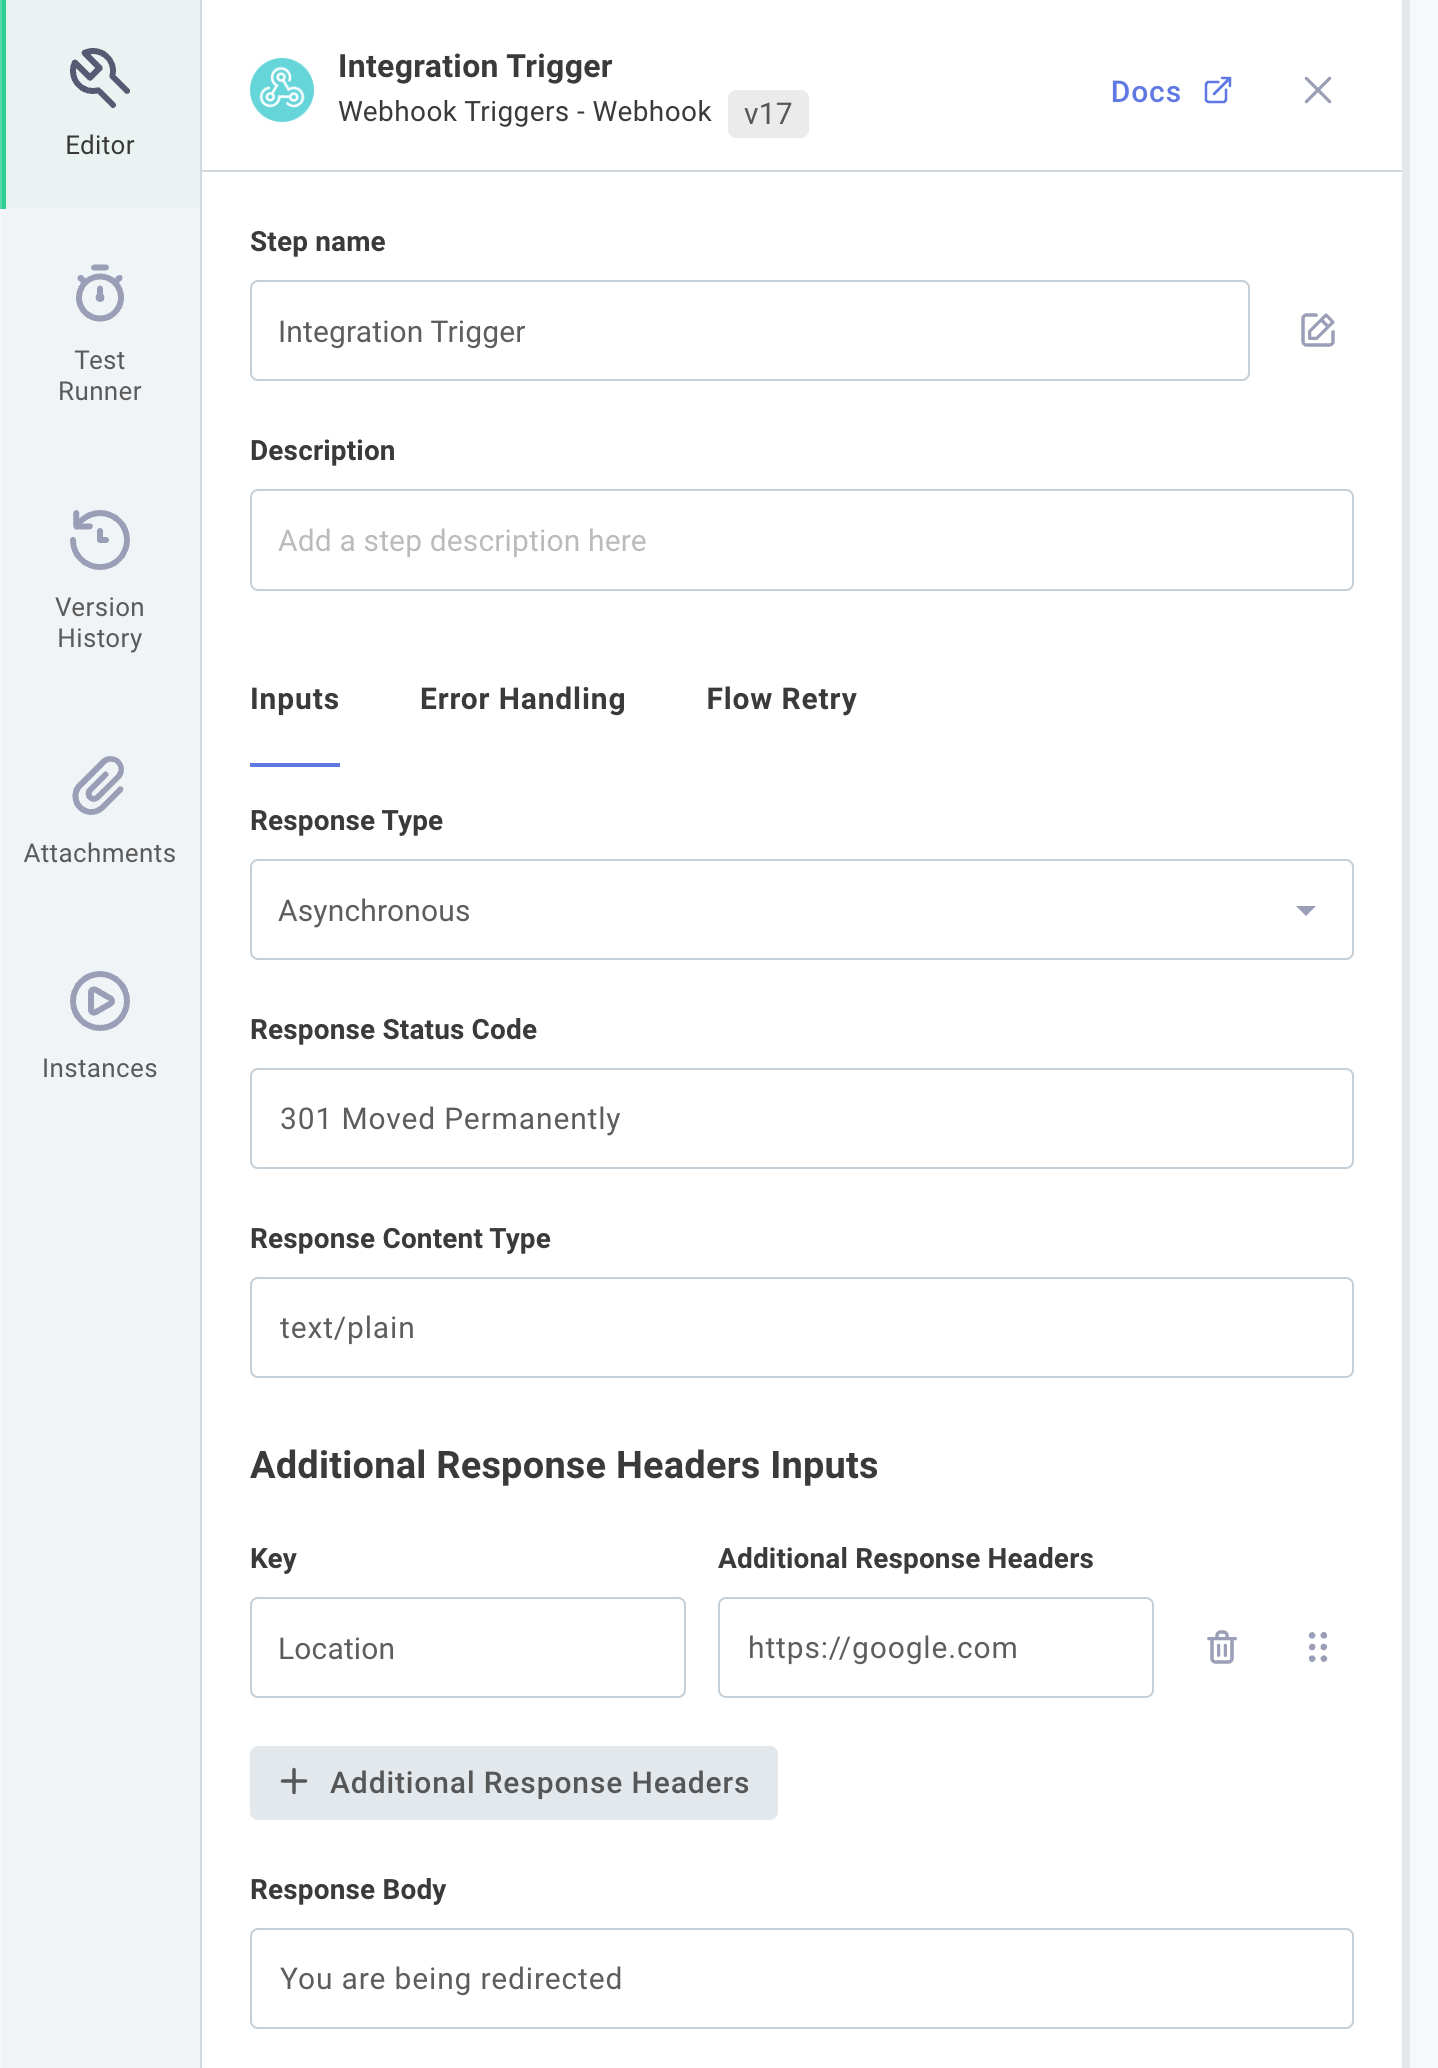
Other webhook trigger responses
You may encounter other responses to your webhook trigger request.
HTTP 303 See Other / Redirect to S3 Results Bucket
When your webhook trigger is invoked synchronously, your HTTP client sends a request and waits for the integration to finish running before closing the request. Builder responds to the request with an HTTP 303 redirect, redirecting your HTTP client to an object in an Amazon S3 bucket that contains the results of the last step of your integration.
Ensure that your HTTP client follows redirects (for curl, you add a --location flag).
$ curl 'https://hooks.us-east-2.elasticpathintegrations.com/trigger/example==' --location -v

...

< HTTP/2 303
< content-type: application/json
< content-length: 0
< location: https://example.s3.us-east-2.amazonaws.com/example
< date: Wed, 28 Sep 2022 19:42:24 GMT
< x-amzn-requestid: 4c2a5179-89a2-4351-afe0-336df2cdef11
< access-control-allow-headers: Accept,CloudFront-Forwarded-Proto,CloudFront-Is-Desktop-Viewer,CloudFront-Is-Mobile-Viewer,CloudFront-Is-SmartTV-Viewer,CloudFront-Is-Tablet-Viewer,CloudFront-Viewer-ASN,CloudFront-Viewer-Country,Host,User-Agent,Via,X-Amz-Cf-Id,X-Amzn-Trace-Id,X-Forwarded-For,X-Forwarded-Port,X-Forwarded-Proto
< x-amz-apigw-id: ZL6A7GegCYcF5Ew=
< prismatic-executionid: SW5zdGFuY2VFeGVjdXRpb25SZXN1bHQ6NGVjMTJiNWMtODk2ZC00ZGJiLThjZDgtZWUwYzNlMDE4OTBh
< access-control-allow-methods: GET
< x-amzn-trace-id: Root=1-6334a39f-0f975a9a7bb343c768645c36;Sampled=1
< x-cache: Miss from cloudfront
< via: 1.1 d67353af1bc95b93fa6102d888271954.cloudfront.net (CloudFront)
< x-amz-cf-pop: ORD58-P7
< x-amz-cf-id: xraa6hPBPc_texazIJXdKgavfwVRMW2oV85GqwCx6xUkUck7MxGKPg==
<

...

* Connection #0 to host hooks.us-east-2.elasticpathintegrations.com left intact
* Issue another request to this URL: 'https://example.s3.us-east-2.amazonaws.com/example'

...

< HTTP/1.1 200 OK
< x-amz-id-2: zx2ZHsGlC/Szu3HCp7xjRAVDALsEdQ/TJ5x/MkcbFkAB8DjLmRJOWCyTGmpI93UhdpqeYxt7hVo=
< x-amz-request-id: SE5KV3CJ5AXCYGZA
< Date: Wed, 28 Sep 2022 19:42:25 GMT
< Last-Modified: Wed, 28 Sep 2022 19:42:25 GMT
< x-amz-expiration: expiry-date="Sat, 29 Oct 2022 00:00:00 GMT", rule-id="expire-old-step-results"
< ETag: "083be81885a78809b54f4deead0e6c24"
< x-amz-server-side-encryption: AES256
< x-amz-version-id: 7bc_zpEQGmpc_stsaC.9vcF1DqxzXWx.
< Accept-Ranges: bytes
< Content-Type: application/octet-stream
< Server: AmazonS3
< Content-Length: 11
<
* Connection #1 to host payload-bucket20200616192411543900000009.s3.us-east-2.amazonaws.com left intact
{"item":"Widgets","quantity":5}
Combining --location and an explicit --request POST (or -X POST) flag in the same curl command can have unintended consequences.
curl will be redirected to an S3 bucket, but will attempt to make a POST request (rather than a GET request) to the S3 bucket.
This results in S3 responding with a SignatureDoesNotMatch error.
You will see the S3 error within Postman if you enable Follow original HTTP method. Keep that option unchecked.

HTTP 400 Bad Request
You'll see an HTTP 400 response for one of two reasons:
-
If your request was malformed (for example, you have a header
content-type: application/json, but the data you sent wasn't valid JSON).Malformed payload$ curl 'https://hooks.us-east-2.elasticpathintegrations.com/trigger/example==' -v \
--data "{bad-data" \
--header "content-type: application/json"
...
< HTTP/2 400
< content-type: application/json
< content-length: 44
< date: Wed, 28 Sep 2022 19:47:09 GMT
< x-amzn-requestid: 64a06065-c2d5-4d1b-8188-1513f072cb8e
< access-control-allow-headers: Accept,CloudFront-Forwarded-Proto,CloudFront-Is-Desktop-Viewer,CloudFront-Is-Mobile-Viewer,CloudFront-Is-SmartTV-Viewer,CloudFront-Is-Tablet-Viewer,CloudFront-Viewer-ASN,CloudFront-Viewer-Country,content-type,Host,User-Agent,Via,X-Amz-Cf-Id,X-Amzn-Trace-Id,X-Forwarded-For,X-Forwarded-Port,X-Forwarded-Proto
< x-amz-apigw-id: ZL6tYEjPCYcFmMA=
< prismatic-executionid: SW5zdGFuY2VFeGVjdXRpb25SZXN1bHQ6YmIwZmQwMjgtYmRlOS00NDFhLTg4ZTYtNjcwZDlkMDY2NjZm
< access-control-allow-methods: POST
< x-amzn-trace-id: Root=1-6334a4bb-5a02f67725c134b505472c11;Sampled=1
< x-cache: Error from cloudfront
< via: 1.1 ee57d6770700357db4b696b4c5250b82.cloudfront.net (CloudFront)
< x-amz-cf-pop: ORD58-P7
< x-amz-cf-id: qSGjLnZJNDjUkUGU2Wl297s6eezPSFs5UEF58H_hceHj9JokJkfB3A==
<
* Connection #0 to host hooks.us-east-2.elasticpathintegrations.com left intact
{"error":"Received malformed JSON payload."} -
When your webhook trigger is invoked synchronously and stops because an error is thrown, your request will receive an HTTP 400 response with the error that was thrown.
Error thrown in synchronous executioncurl 'https://hooks.us-east-2.elasticpathintegrations.com/trigger/example==' -v
...
* We are completely uploaded and fine
* Connection state changed (MAX_CONCURRENT_STREAMS == 128)!
< HTTP/2 400
< content-type: application/json
< content-length: 55
< date: Wed, 28 Sep 2022 19:53:33 GMT
< x-amzn-requestid: 8e46051e-2783-4e25-b95d-35ee323ce523
< access-control-allow-headers: Accept,CloudFront-Forwarded-Proto,CloudFront-Is-Desktop-Viewer,CloudFront-Is-Mobile-Viewer,CloudFront-Is-SmartTV-Viewer,CloudFront-Is-Tablet-Viewer,CloudFront-Viewer-ASN,CloudFront-Viewer-Country,content-type,Host,User-Agent,Via,X-Amz-Cf-Id,X-Amzn-Trace-Id,X-Forwarded-For,X-Forwarded-Port,X-Forwarded-Proto
< x-amz-apigw-id: ZL7paEZjiYcFU4A=
< prismatic-executionid: SW5zdGFuY2VFeGVjdXRpb25SZXN1bHQ6NTM5ZGE0YjItNDViMC00MDQxLTg3MTgtMzFhZDkwMDg1Y2Iw
< access-control-allow-methods: POST
< x-amzn-trace-id: Root=1-6334a63c-0d58198b7c2e26d11f4331f3;Sampled=1
< x-cache: Error from cloudfront
< via: 1.1 26c731836eb716e46fe9852a7aaeb508.cloudfront.net (CloudFront)
< x-amz-cf-pop: ORD58-P7
< x-amz-cf-id: ZKCbTC07GI90gLLyeRNmGaHub0gpULRK45_GZ7d7uGM3njGFYKaPkw==
<
* Connection #0 to host hooks.us-east-2.elasticpathintegrations.com left intact
{"error":"The widget requested is not in the database"}
HTTP 429 Too Many Requests / Rate Limiting
A webhook endpoint URL can be invoked up to 50 times per second. If a request is received for an endpoint URL that has already received 50 requests in the last second, the request will receive a 429 "too many requests" response.
$ curl 'https://hooks.us-east-2.elasticpathintegrations.com/trigger/example==' -v

...

< HTTP/2 429
< content-type: application/json
< content-length: 200
< date: Wed, 28 Sep 2022 19:36:55 GMT
< x-amzn-requestid: f53fbf8c-9ce6-4c4a-80a6-84edbc29fdeb
< x-amz-apigw-id: ZL5NtH82CYcFbFg=
< x-amzn-trace-id: Root=1-6334a257-1ca7ad23574a8c3255b24776;Sampled=1
< x-cache: Error from cloudfront
< via: 1.1 a044221a7cde0fa9b5dc69d5ceb4439a.cloudfront.net (CloudFront)
< x-amz-cf-pop: ORD58-P7
< x-amz-cf-id: BoOs_sbk7gB-t16ZCR4uVtD8NcPnmD40rGUPwgaouVe2hiHu60Rcjw==
<
* Connection #0 to host hooks.us-east-2.elasticpathintegrations.com left intact
{"error":"Endpoint with id: example== has exceeded maximum allowed throughput of 50 requests/second. Please throttle your requests."}
Webhook endpoint configuration
Webhook triggers can be configured for in integration in one of three ways:
- Instance and Flow Specific: Each flow on each instance gets its own unique endpoint. This is the default configuration.
- Instance Specific: Each instance gets a unique endpoint, and the integration determines which flow to run based on header or payload data.
- Shared: All customers' instances of the integration share an endpoint. Data in the header or payload determines which customer and flow should run.
For information on configuring and troubleshooting webhook endpoints, see our Endpoint Configuration article.
Sending data to webhook triggers
A webhook parses data from the following sources:
- The request body - the JSON (or other) data that is sent to the webhook as an HTTP request body.
- The request headers - the HTTP headers.
- The URL path - The path to resource that follows the integration webhook URL.
- The URL parameters - The parameters that follow the
?in a URL..
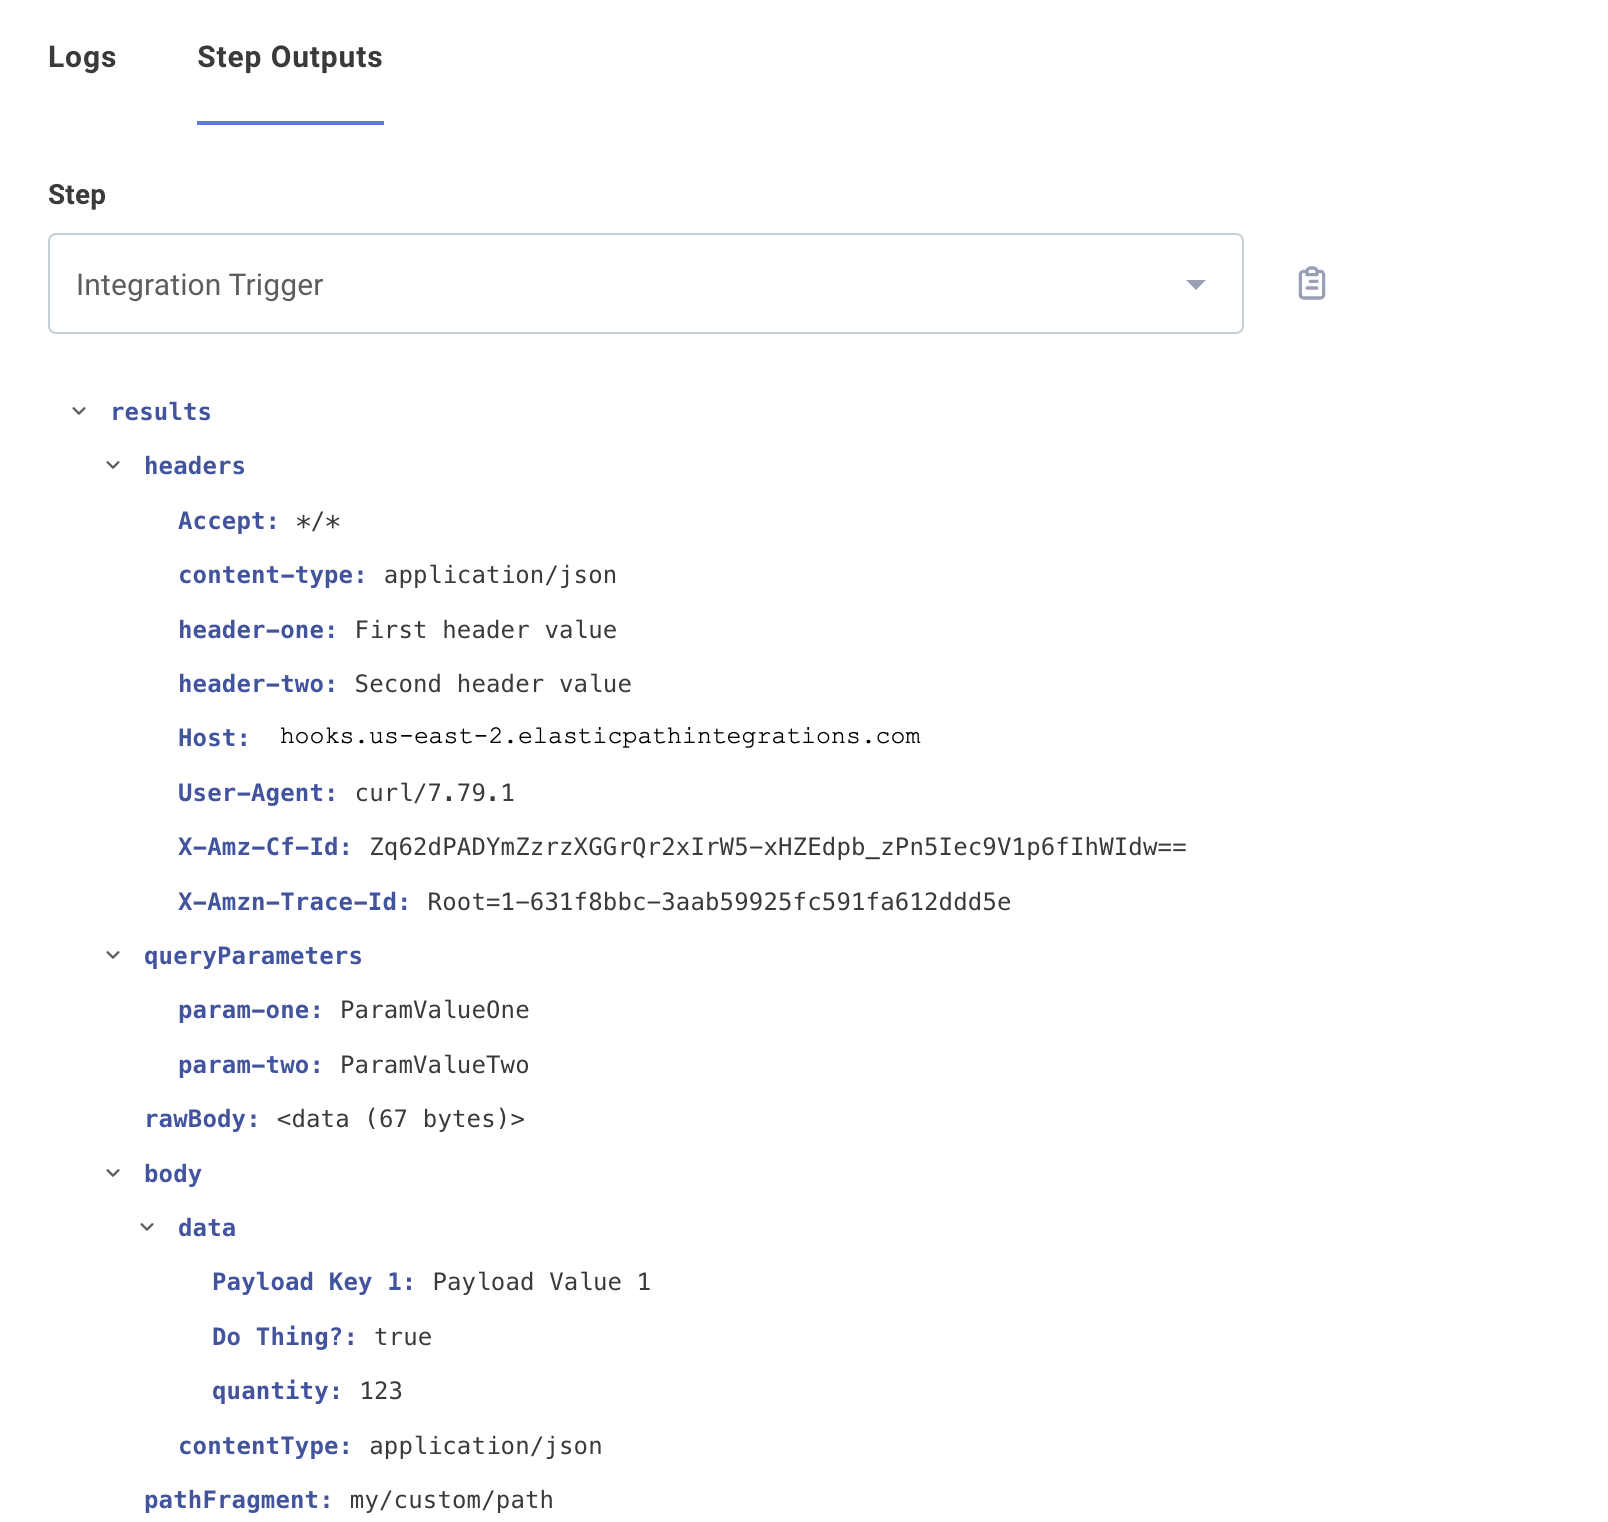
Take, for example, this curl invocation:
curl \
'https://hooks.us-east-2.elasticpathintegrations.com/trigger/EXAMPLE==/my/custom/path?param-one=ParamValueOne¶m-two=ParamValueTwo' \
--header "header-one: First header value" \
--header "header-two: Second header value" \
--header "Content-Type: application/json" \
--data '{"Payload Key 1":"Payload Value 1","Do Thing?":true,"quantity":123}'
- The request body -
{"Payload Key 1":"Payload Value 1","Do Thing?":true,"quantity":123}- is parsed (if JSON) and is accessible to the integration by referencing the trigger'sresults.body.data.KEY-NAME. Non-JSON payloads (like XML, images, etc) are accessible throughresults.rawBodyand can be parsed in subsequent steps that handle that type of data. - The request headers are accessible through the trigger's
results.headers.HEADER-NAME. - The url path -
my/custom/path- is accessible through the trigger'sresults.pathFragment. You can pass that data into the built-in split string action and split on the/character to split the URL path into an array['my','custom','path']. - The url parameters -
?param-one=ParamValueOne¶m-two=ParamValueTwoare parsed and accessible through the trigger'sresults.queryParameters.PARAMETER-NAME.
Posting binary data with webhook triggers
If you have binary data (like an image or PDF) that you would like to post as part of your webhook invocation, you can pass that binary data in as part of your request.
For example, if you have an image, my-image.png, you could invoke a test of an integration with:
curl 'https://hooks.us-east-2.elasticpathintegrations.com/trigger/EXAMPLE==' \
  --request POST \
  --header 'Content-Type: image/png' \
  --data-binary '@/path/to/my-image.png'
The binary file can be accessed by subsequent steps by referencing integrationTrigger.results.body.data.
Posting multipart data with webhook triggers
It's useful to be able to post a combination of binary and text data to a Prismatic webhook.
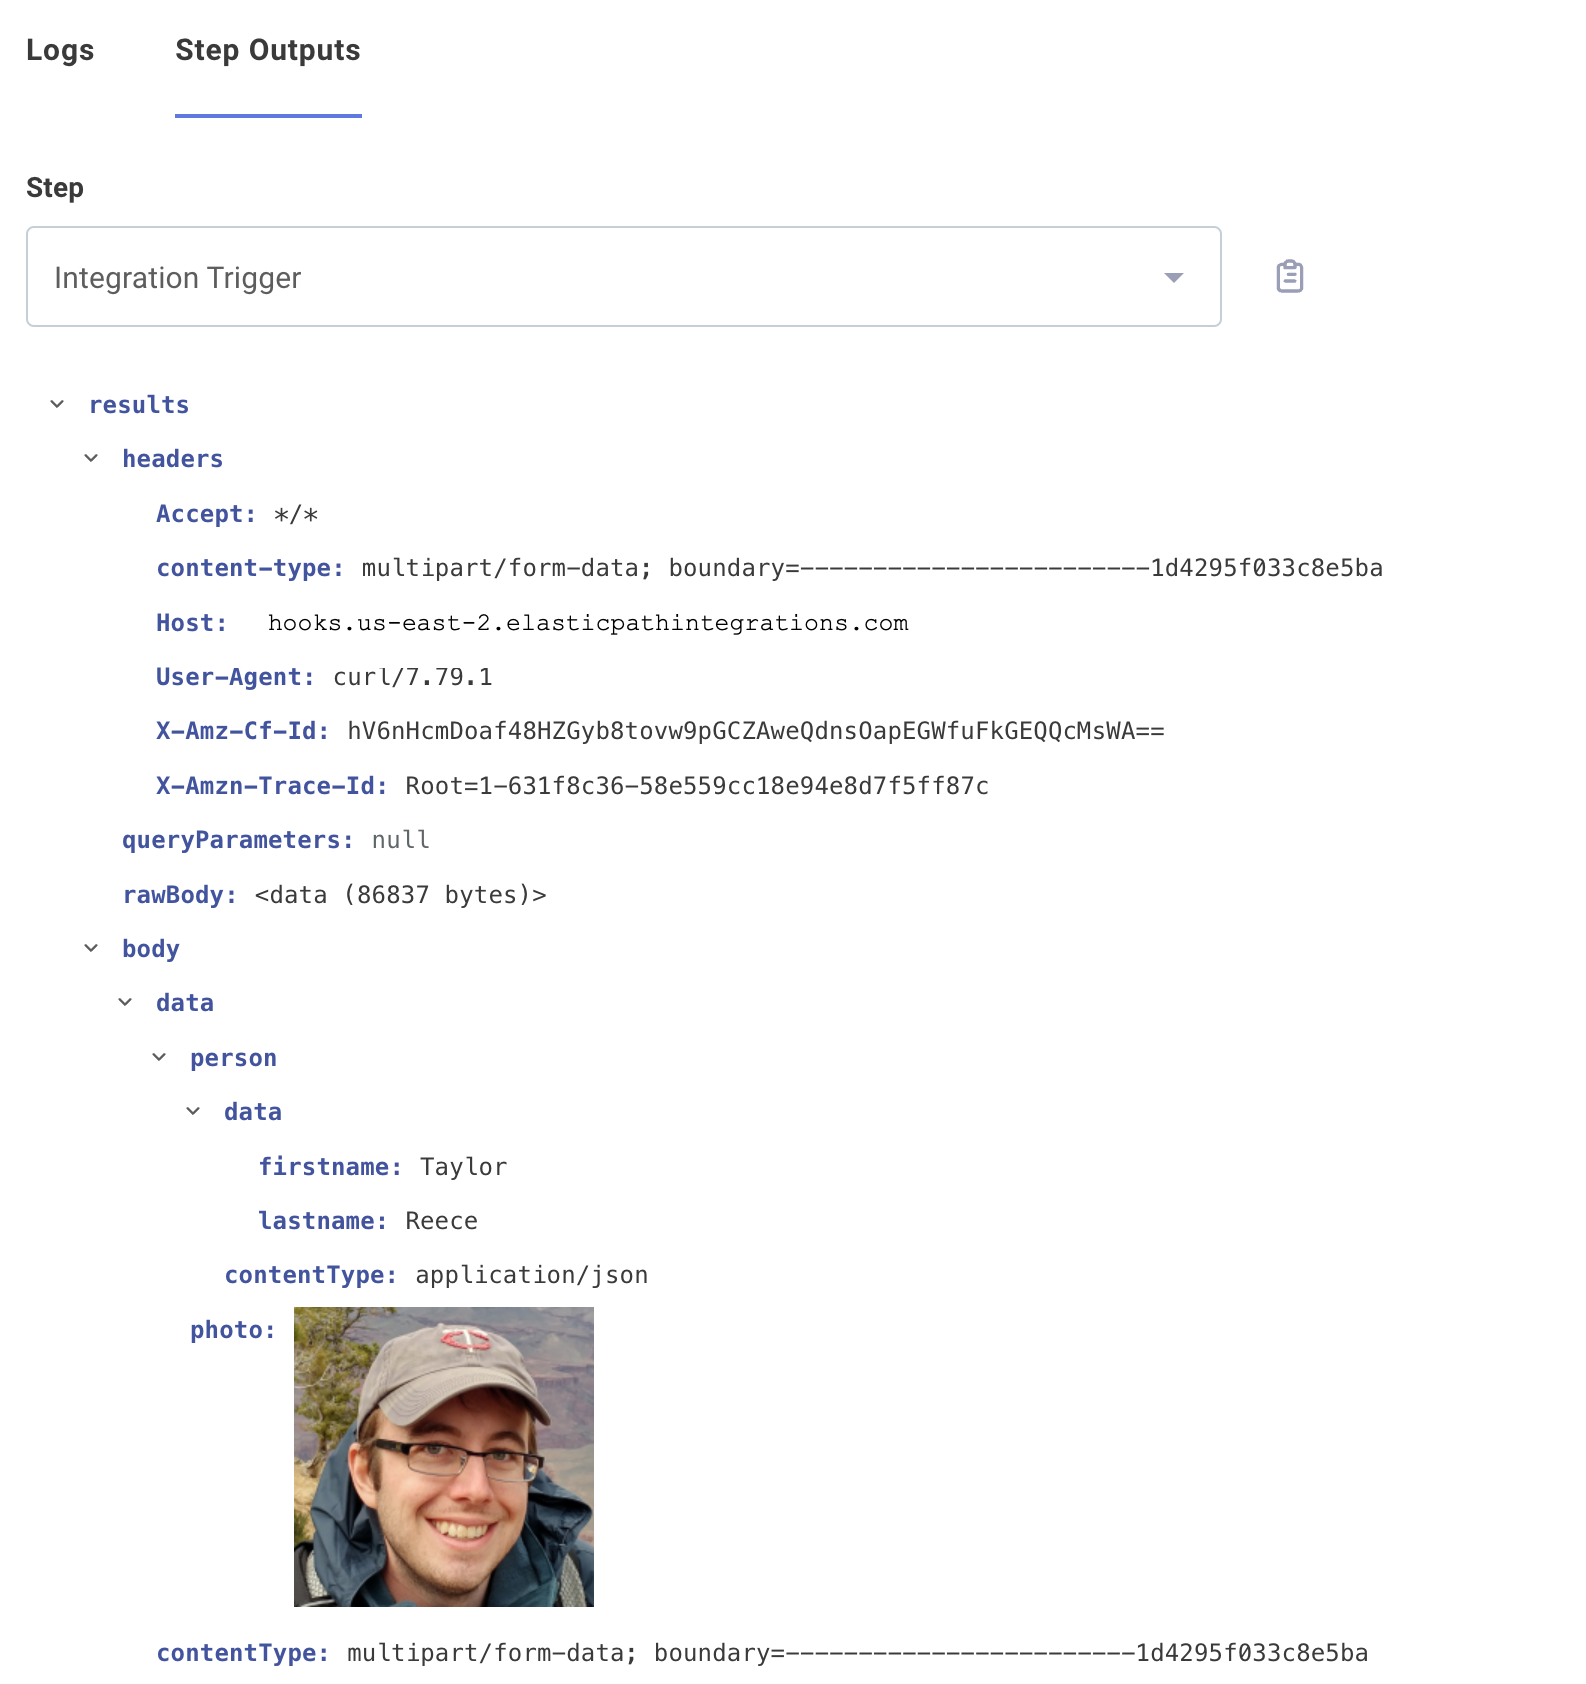
For example, you might want to post information about a person, as well as an avatar image of the person, to be processed by an integration.
To do that, use a content type of multipart/form-data with your webhook invocation:
curl 'https://hooks.us-east-2.elasticpathintegrations.com/trigger/EXAMPLE==' \
  --request POST \
  --header "Content-Type: multipart/form-data" \
  --form person='{"firstname":"Taylor","lastname":"Reece"};type=application/json' \
  --form photo=@taylor.png
The first name in this example is accessible by referencing the trigger's results.body.data.person.data.firstname, and the avatar image is accessible by referencing results.body.data.photo:
Accessing webhook URLs in an integration
An integration is aware of its own webhook URLs, and those URLs are accessible by referencing the trigger's results.webhookUrls object:
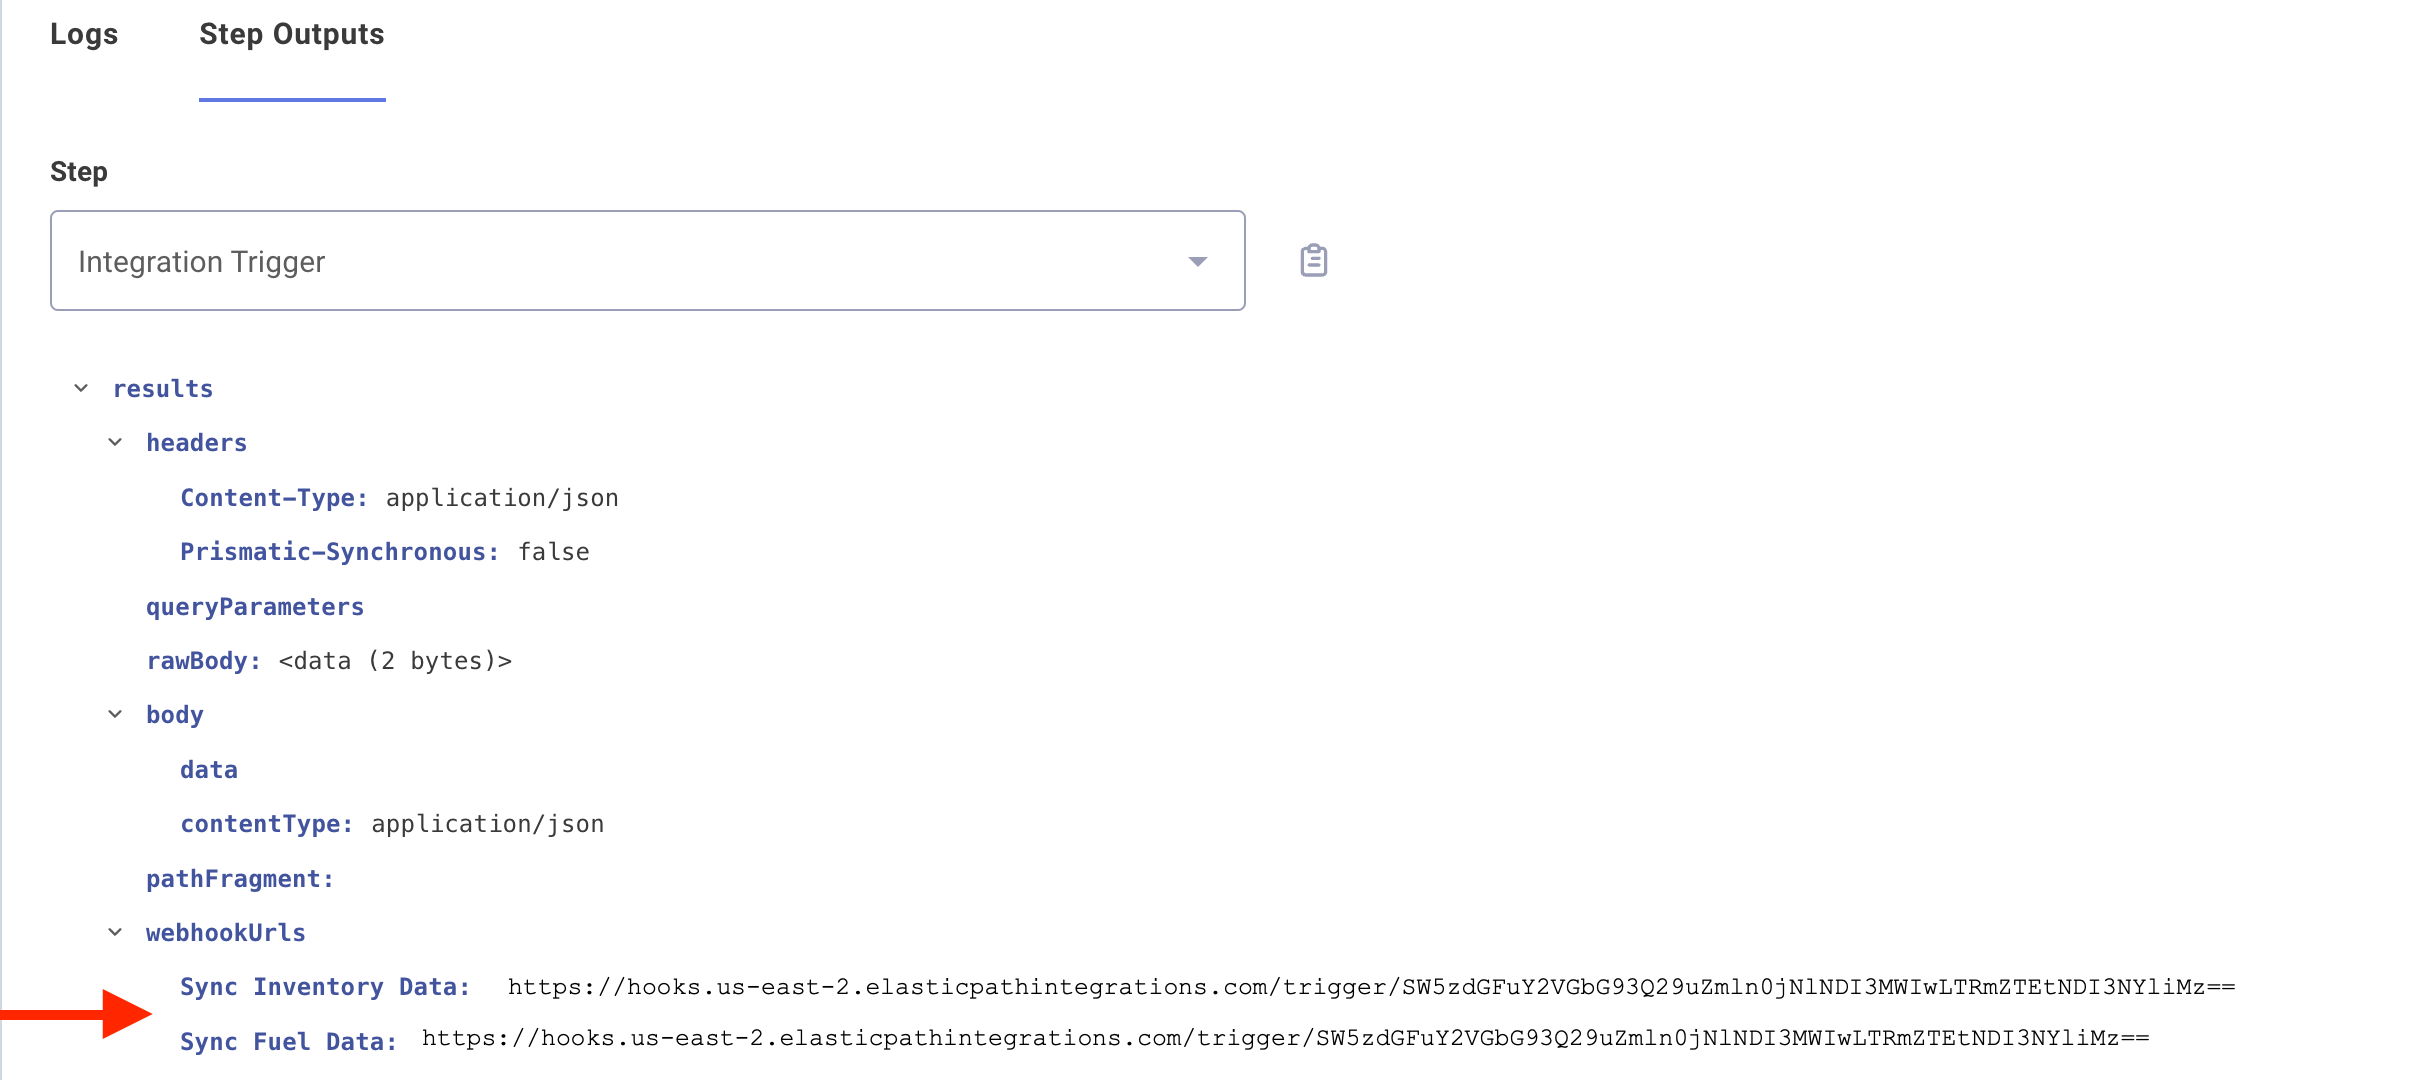
This comes in handy if you need to configure a third-party service to send data to your webhooks.
A common pattern is for one flow of your integration to be run when an instance is deployed using a deploy trigger.
That deploy-time flow can set up webhooks in a third-party app by referencing its trigger's results.webhookUrls values.
Then, the third-party app will invoke the other flows of the integration when it needs to.
If you set up API keys for your deployed instances, you can access results.webhookApiKeys similarly.
An instance's flow can have multiple API keys assigned to it, so each results.webhookApiKeys.MY FLOW NAME is an array.
You will likely reference the first API key, results.webhookApiKeys.MY FLOW NAME.0.
Validating webhook payloads with HMAC
Hash-Based Message Authentication Code (or HMAC) is an authentication mechanism often used by webhook providers to verify that a webhook message is legitimate. It helps to ensure that messages sent to a webhook endpoint originated from a particular third-party, and not from some bad actor on the internet.
How does HMAC work?
HMAC implementations can differ slightly from one another, but generally speaking when a webhook request is sent to an endpoint, the request's body is hashed using a secret key and hash function. The resulting hash is sent with the webhook HTTP request as an HTTP header.
When the webhook endpoint receives the HTTP request, it also generates a hash using same secret key and hash function. If the hash the receiver generates matches the hash that the sender sent, the webhook request is processed. If they don't match, the request is rejected.
In order to spoof a webhook request, someone would need to know the secret key that only the sender and receiver know. Without the secret key (even if a bad actor intercepted the webhook request), it'd be nearly impossible for a bad actor to reverse engineer the hash and send spoofed requests to a webhook endpoint.
Generating an HMAC hash
You can configure your app to compute HMAC hashes and send them alongside your webhook requests. To generate a hash, you need three things:
- A request's body to hash.
The body can be any format (JSON, XML, CSV, etc).
For our example, let's say we have a JSON message that reads
{"item":"widget","quantity":5,"customer":"abc-123"}. - A secret key that only the third-party and Prismatic knows.
For our example, we'll generate a random UUID string -
"AC49CB66-511F-4085-9119-360B1B142F4B" - A hash function to use (like MD5, SHA1, etc.).
The industry standard (which APIs like Dropbox, Shopify, Slack, etc. all use) is
SHA256- we'll use that for our example, too.
Next, reach for an HMAC library for the language that your app is written in (most modern languages have an HMAC or crypto library). Here's a few examples in a variety of languages:
Python
import hmac
import hashlib

secret = bytes("AC49CB66-511F-4085-9119-360B1B142F4B", "UTF-8")
message = '{"item":"widget","quantity":5,"customer":"abc-123"}'.encode();

hash = hmac.new(secret, message, hashlib.sha256)

print(hash.digest().hex()) # dc838d5b2ee53f55b5bcd77271505f52cd4c6c5123a867d9088fb70ac580f5bf
NodeJS
const { createHmac } = require("crypto");

const secret = "AC49CB66-511F-4085-9119-360B1B142F4B";
const message = '{"item":"widget","quantity":5,"customer":"abc-123"}';

const hash = createHmac("sha256", secret).update(message, "utf-8");

console.log(hash.digest("hex")); // dc838d5b2ee53f55b5bcd77271505f52cd4c6c5123a867d9088fb70ac580f5bf
PHP
<?php
  $message   = '{"item":"widget","quantity":5,"customer":"abc-123"}';
  $secret    = 'AC49CB66-511F-4085-9119-360B1B142F4B';

  $hash = hash_hmac('sha256', $message, $secret);

  echo ($hash); // dc838d5b2ee53f55b5bcd77271505f52cd4c6c5123a867d9088fb70ac580f5bf
?>
GO
package main

import (
  "crypto/hmac"
  "crypto/sha256"
  "encoding/hex"
  "fmt"
)

func main() {
  secret := []byte("AC49CB66-511F-4085-9119-360B1B142F4B")
  message := []byte("{\"item\":\"widget\",\"quantity\":5,\"customer\":\"abc-123\"}")

  h := hmac.New(sha256.New, secret)
  h.Write(message)
  hash := hex.EncodeToString(h.Sum(nil))

  fmt.Println(hash) // dc838d5b2ee53f55b5bcd77271505f52cd4c6c5123a867d9088fb70ac580f5bf
}
Regardless of which language you use to generate the HMAC hash, you get the same result for our example - dc838d5b2ee53f55b5bcd77271505f52cd4c6c5123a867d9088fb70ac580f5bf.
You can then pass the hash as an HTTP header to our Builder webhook URL.
curl https://hooks.us-east-2.elasticpathintegrations.com/example-uuid \
  --request POST \
  --header "my-hmac-header: dc838d5b2ee53f55b5bcd77271505f52cd4c6c5123a867d9088fb70ac580f5bf" \
  --header "content-type: application/json" \
  --data '{"item":"widget","quantity":5,"customer":"abc-123"}'
Can I include the HMAC hash in the body instead? That's a common question, and the answer is a resounding no. By adding the HMAC hash to the body, you change the body... so a different body hash is computed... which requires you to change the body... (GOTO 10). An HMAC hash should be sent via a header.
Validating HMAC hashes in a trigger
If your HMAC hash is generated from the HTTP payload's body, the secret signing key is a string, and the hash is included as a header, you can use the built-in HMAC Webhook Trigger to validate payloads.
Configure the trigger by setting the name of the header that contains the HMAC hash (e.g. x-hmac-sha256), the hashing function you used (e.g. sha256), and the secret key you used, and the trigger will accept payloads that are properly signed, and throw an error when payloads are not signed correctly.
The trigger otherwise operates like the standard built-in webhook trigger.
If the app you're integrating with deviates from standard HMAC signing practices, or if you need to respond to webhook requests with dynamic responses, you can build your own custom trigger that handles HMAC validation. Slack, for example, includes an additional parameter (a timestamp) in its HMAC computation, and expects a custom response from the webhook endpoint.
Instance deploy trigger
An integration flow can be configured to be run when an instance of the integration is deployed. To do that, click your trigger and then click CHANGE TRIGGER. Choose to replace your trigger with an Instance Deploy Trigger trigger. This will cause your current flow to run whenever the integration is deployed as an instance to a customer.
This is handy if your integration needs to complete a series of tasks when its deployed. For example, your integration might need to configure a third-party app to send data to the other flows' webhooks. Or, your integration might need to enable features in a third-party app or create a series of directories in a file share before the integration is invoked.
If there are tasks that need to occur when an instance is deployed, set up those tasks as a flow and configure the trigger to run at deploy time.
For More Information: Multiple Flows with a Deploy Trigger
Instance remove trigger
The opposite of an instance deploy trigger is an instance remove trigger. Flows with this trigger run when an instance is removed (deleted), and can be used to clean up webhooks and other configuration that an instance deploy trigger created.
Synchronous and asynchronous integrations
Integrations are configured by default to run asynchronously. That means that whenever an integration is invoked by trigger webhook URL, the integration begins to run and the system that invoked the integration can go on to complete other work. This is the most common case for integrations - you want to start up an instance when some certain event occurs, but you don't want to wait around while the instance runs.
Sometimes, though, it's handy for an application to get information back from the instance that was invoked. For example, you might want your proprietary software to wait until an instance runs to completion before completing other work. In that case, you can choose to run your integration synchronously. Then, when your software makes a call to the instance's webhook trigger URL the HTTP request is held open until the instance run is complete.
When you choose to run your integrations synchronously, the HTTP request that invokes an instance returns a redirect to a URL containing the output results of the final step of the integration. For example, if the final step of your integration pulls down JSON from https://jsonplaceholder.typicode.com/users/1, you will see this when you invoke the integration synchronously:
curl 'https://hooks.us-east-2.elasticpathintegrations.com/trigger/EXAMPLE==' \
  --data '{}' \
  --header "Content-Type: application/json" \
  --header "prismatic-synchronous: true" \
  --location

{"id":1,"name":"Leanne Graham","username":"Bret","email":"Sincere@april.biz","address":{"street":"Kulas Light","suite":"Apt. 556","city":"Gwenborough","zipcode":"92998-3874","geo":{"lat":"-37.3159","lng":"81.1496"}},"phone":"1-770-736-8031 x56442","website":"hildegard.org","company":{"name":"Romaguera-Crona","catchPhrase":"Multi-layered client-server neural-net","bs":"harness real-time e-markets"}}
You can toggle if your integration is synchronous or asynchronous by clicking the trigger and selecting a Response Type.
You can also pass in a header, prismatic-synchronous with a webhook invocation to instruct your instance to run synchronously or asynchronously:
curl 'https://hooks.us-east-2.elasticpathintegrations.com/trigger/EXAMPLE==' \
  --header "prismatic-synchronous: false" \
  --request POST
Synchronous invocations and redirects
When you invoke an instance synchronously, the output of the final step of your integration is written to Amazon S3. The HTTP request that invoked the integration execution then receives a response that redirects them to the file in Amazon S3. We do this because Amazon's API Gateway has a 10MB limit on HTTP responses, and step results may exceed 10MB - S3 has no such size limit.
Because of this redirection, you should make sure that your request library is configured to follow HTTP status code 303 redirects.
For curl, for example, include a -L / --location flag so it follows redirects.
If the party initiating the instance execution request does not support following redirects, they can pass an optional header, prismatic-prefer-direct-sync-response: true with their request to skip the redirect to S3, and return the response directly.
Note that this only works for step results less than 5MB in size, and your last step's results must be text-like (i.e. JSON, XML, plain text, etc - not a binary file).
If your final step's output is greater than 5MB, they'll be redirected to S3.
This works well if your final step's result is text.
curl 'https://hooks.us-east-2.elasticpathintegrations.com/trigger/EXAMPLE==' \
  --request POST \
  --data "{}"
If the third-party also doesn't support custom headers, you can append prismatic-prefer-direct-sync-response=true as a search parameter:
curl 'https://hooks.us-east-2.elasticpathintegrations.com/trigger/EXAMPLE==?prismatic-prefer-direct-sync-response=true'
Response content type
You can control the content-type of the response by adding a contentType property to your last step's result.
For example,
const returnData = `<note>
    <to>Tove</to>
    <from>Jani</from>
    <heading>Reminder</heading>
    <body>Don't forget me this weekend!</body>
</note>`;

return {
  data: returnData,
  contentType: "application/xml",
};
HTTP status codes for synchronous integrations
When an instance is configured to run synchronously or is invoked synchronously with the prismatic-synchronous header, the HTTP response returns a status code 200 - OK by default.
It's sometimes useful, though, to return other HTTP status codes.
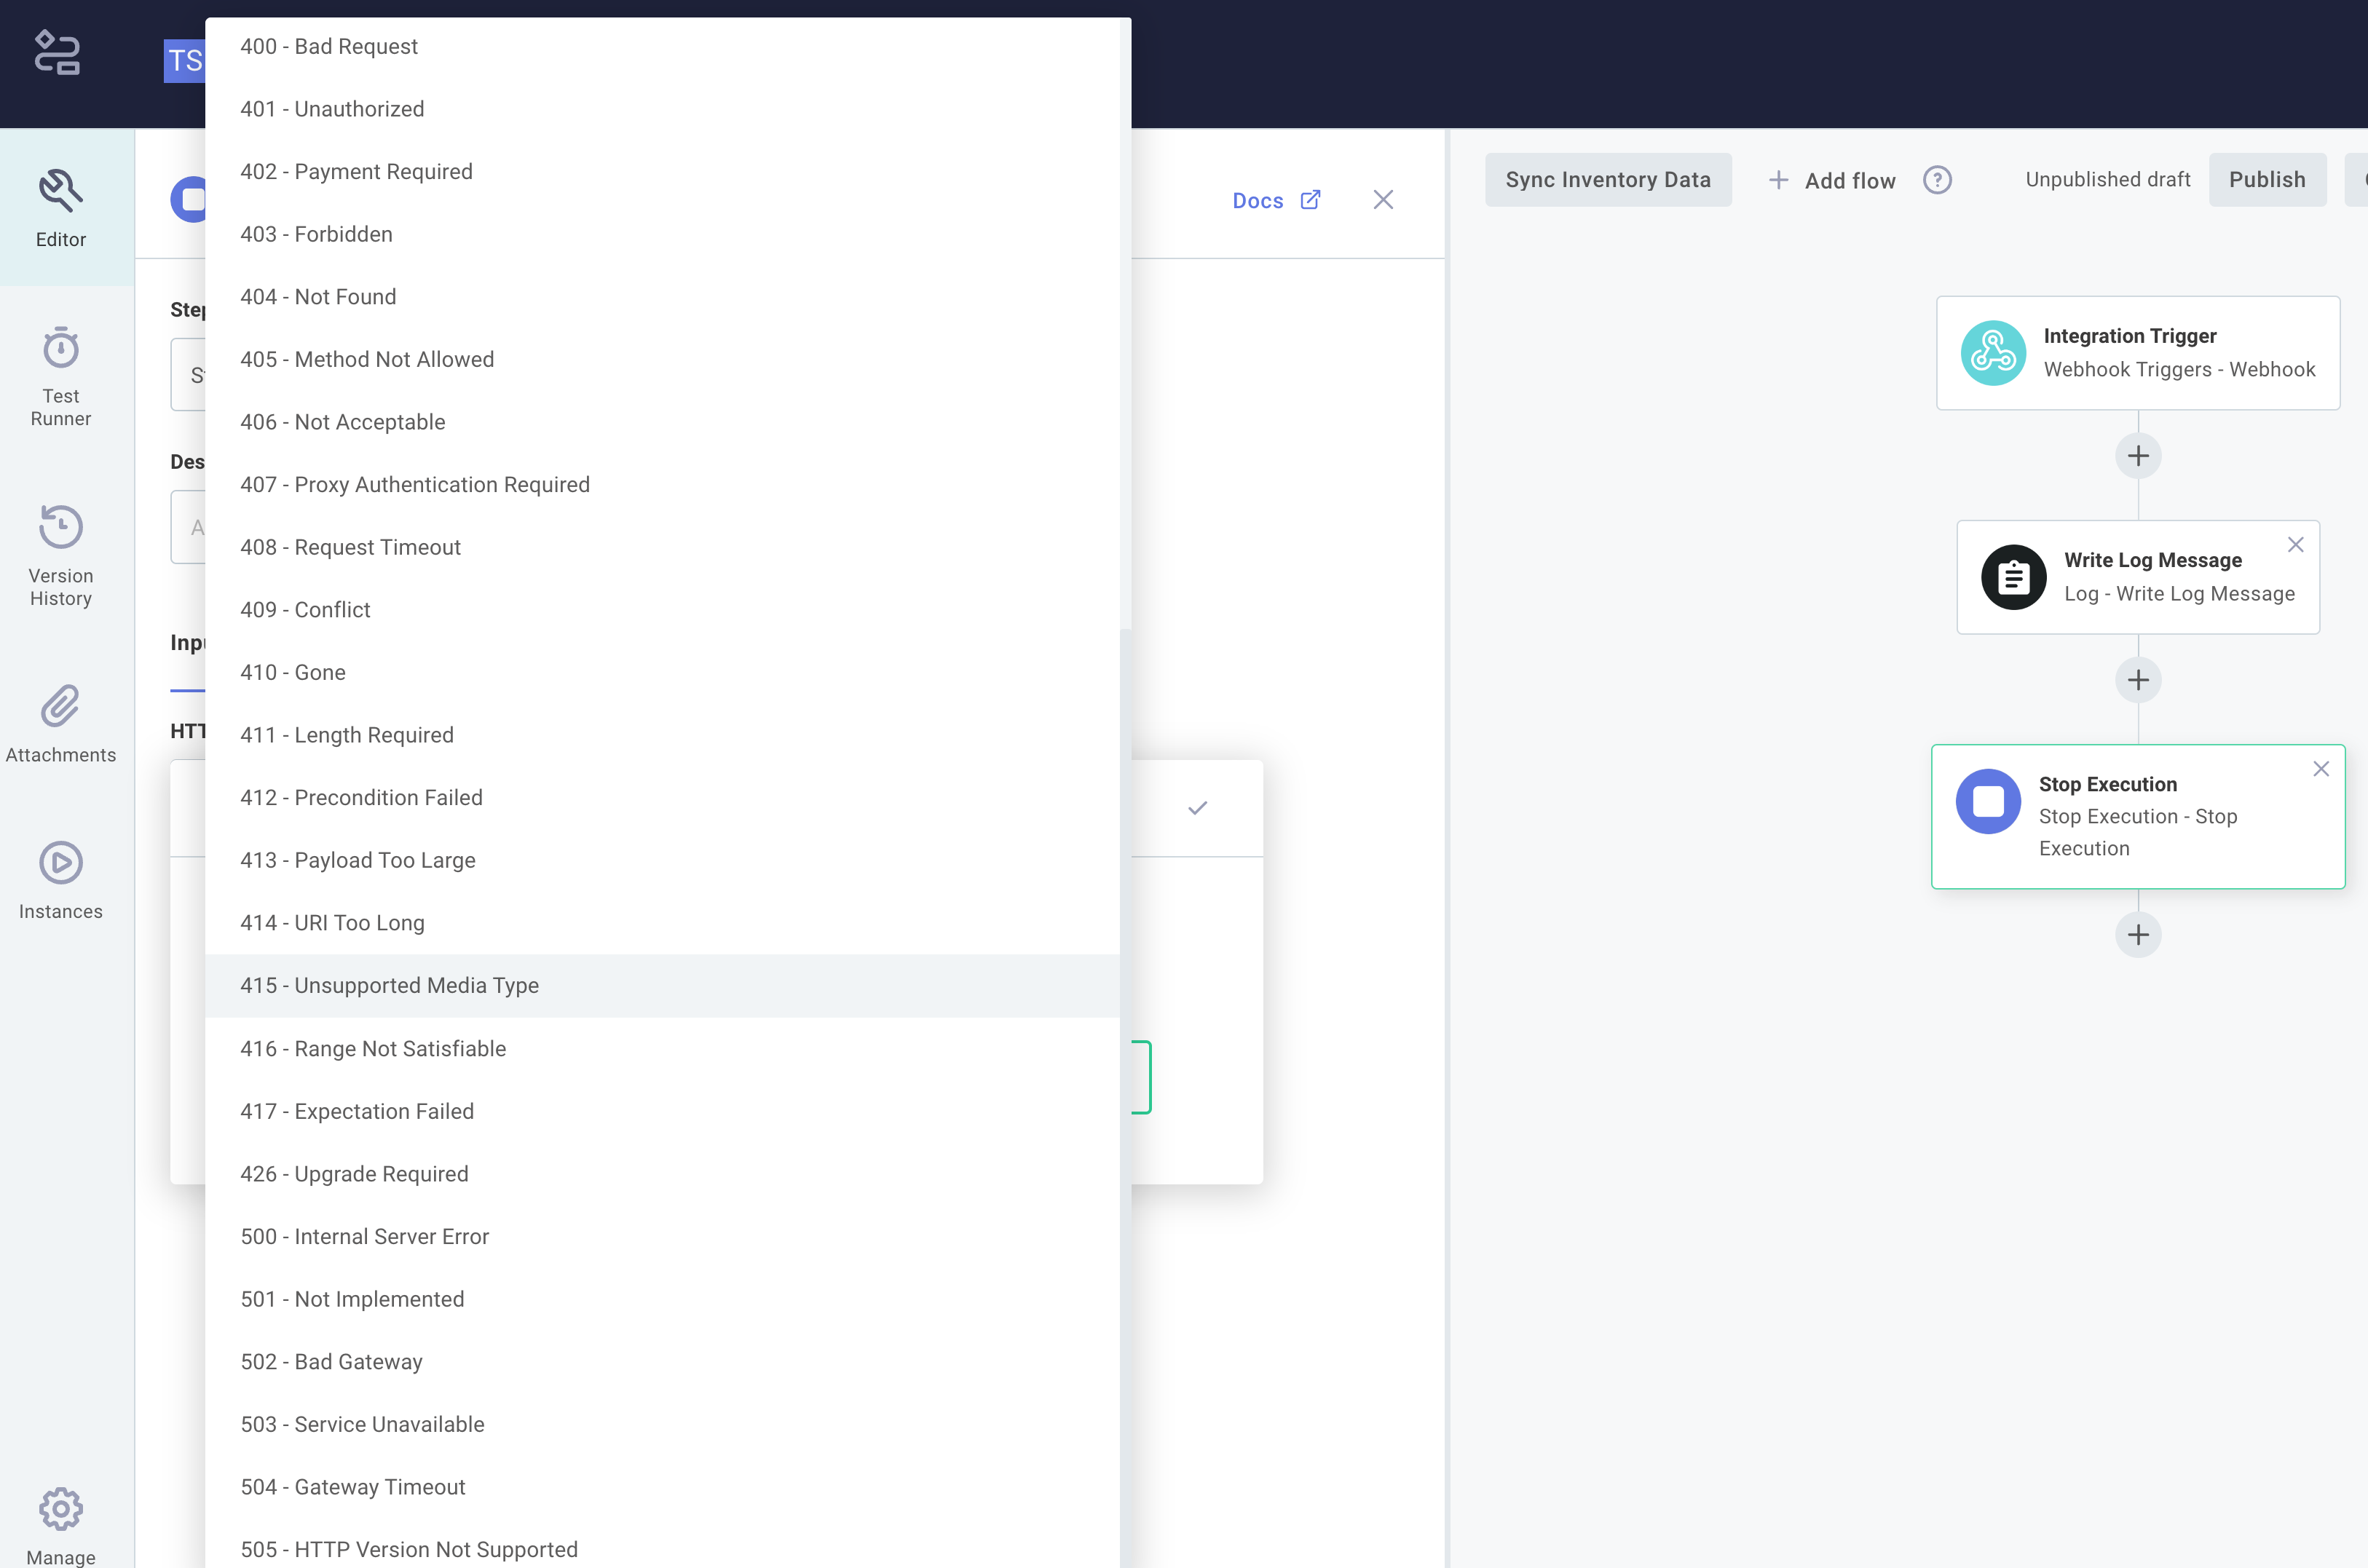
For example, if a client submits wrongly formatted data to be processed by an instance, it might be helpful to return a 406 - Not Acceptable or 415 - Unsupported Media Type.
To accomplish this, you can configure the final step of your integration to return a different status code. Most commonly, you can add a Stop Execution step to the end of your integration, and specify an HTTP response that it should return.
$ curl 'https://hooks.us-east-2.elasticpathintegrations.com/trigger/EXAMPLE==' \
   --verbose \
   --location \
   --header "prismatic-synchronous: true"

* TCP_NODELAY set
* Connected to hooks.us-east-2.elasticpathintegrations.com (13.227.37.2) port 443 (#0)

...

< HTTP/2 415
If you would like to return HTTP status codes from a custom component at the end of your integration instead, return an object with a statusCode attribute instead of a data attribute:
return { statusCode: 415 };
Synchronous call limitations
Response body and status code limitations
When an integration is invoked synchronously, the integration redirects the caller to a URL containing the output results of the final step of the integration.
If the final step of the integration is a Stop Execution action, or any custom component action that returns a statusCode, the redirect does not occur and the caller receives a null response body instead.
API gateway size and time limitations
AWS API Gateway times out requests after 29 seconds, and our maximum response size is 500MB. So, to get a response from an instance that is invoked synchronously, please ensure that your integration runs in under 29 seconds and produces a final step payload of less that 500MB.
If your integration regularly takes over 29 seconds to run, or produces large responses, we recommend that you run your integrations asynchronously instead.
When you invoke an integration asynchronously you receive an executionId:
curl 'https://hooks.us-east-2.elasticpathintegrations.com/trigger/EXAMPLE==' \
  --data '{}' \
  --header "Content-Type: application/json"

{"executionId":"SW5zdGFuY2VFeGVjdXRpb25SZXN1bHQ6OTdiNWQxYmEtZGUyZi00ZDY4LWIyMTgtMDFlZGMwMTQxNTM5"}