Building Integrations
After creating a new integration or selecting one from your list of integrations, you can build, test, and publish integrations.
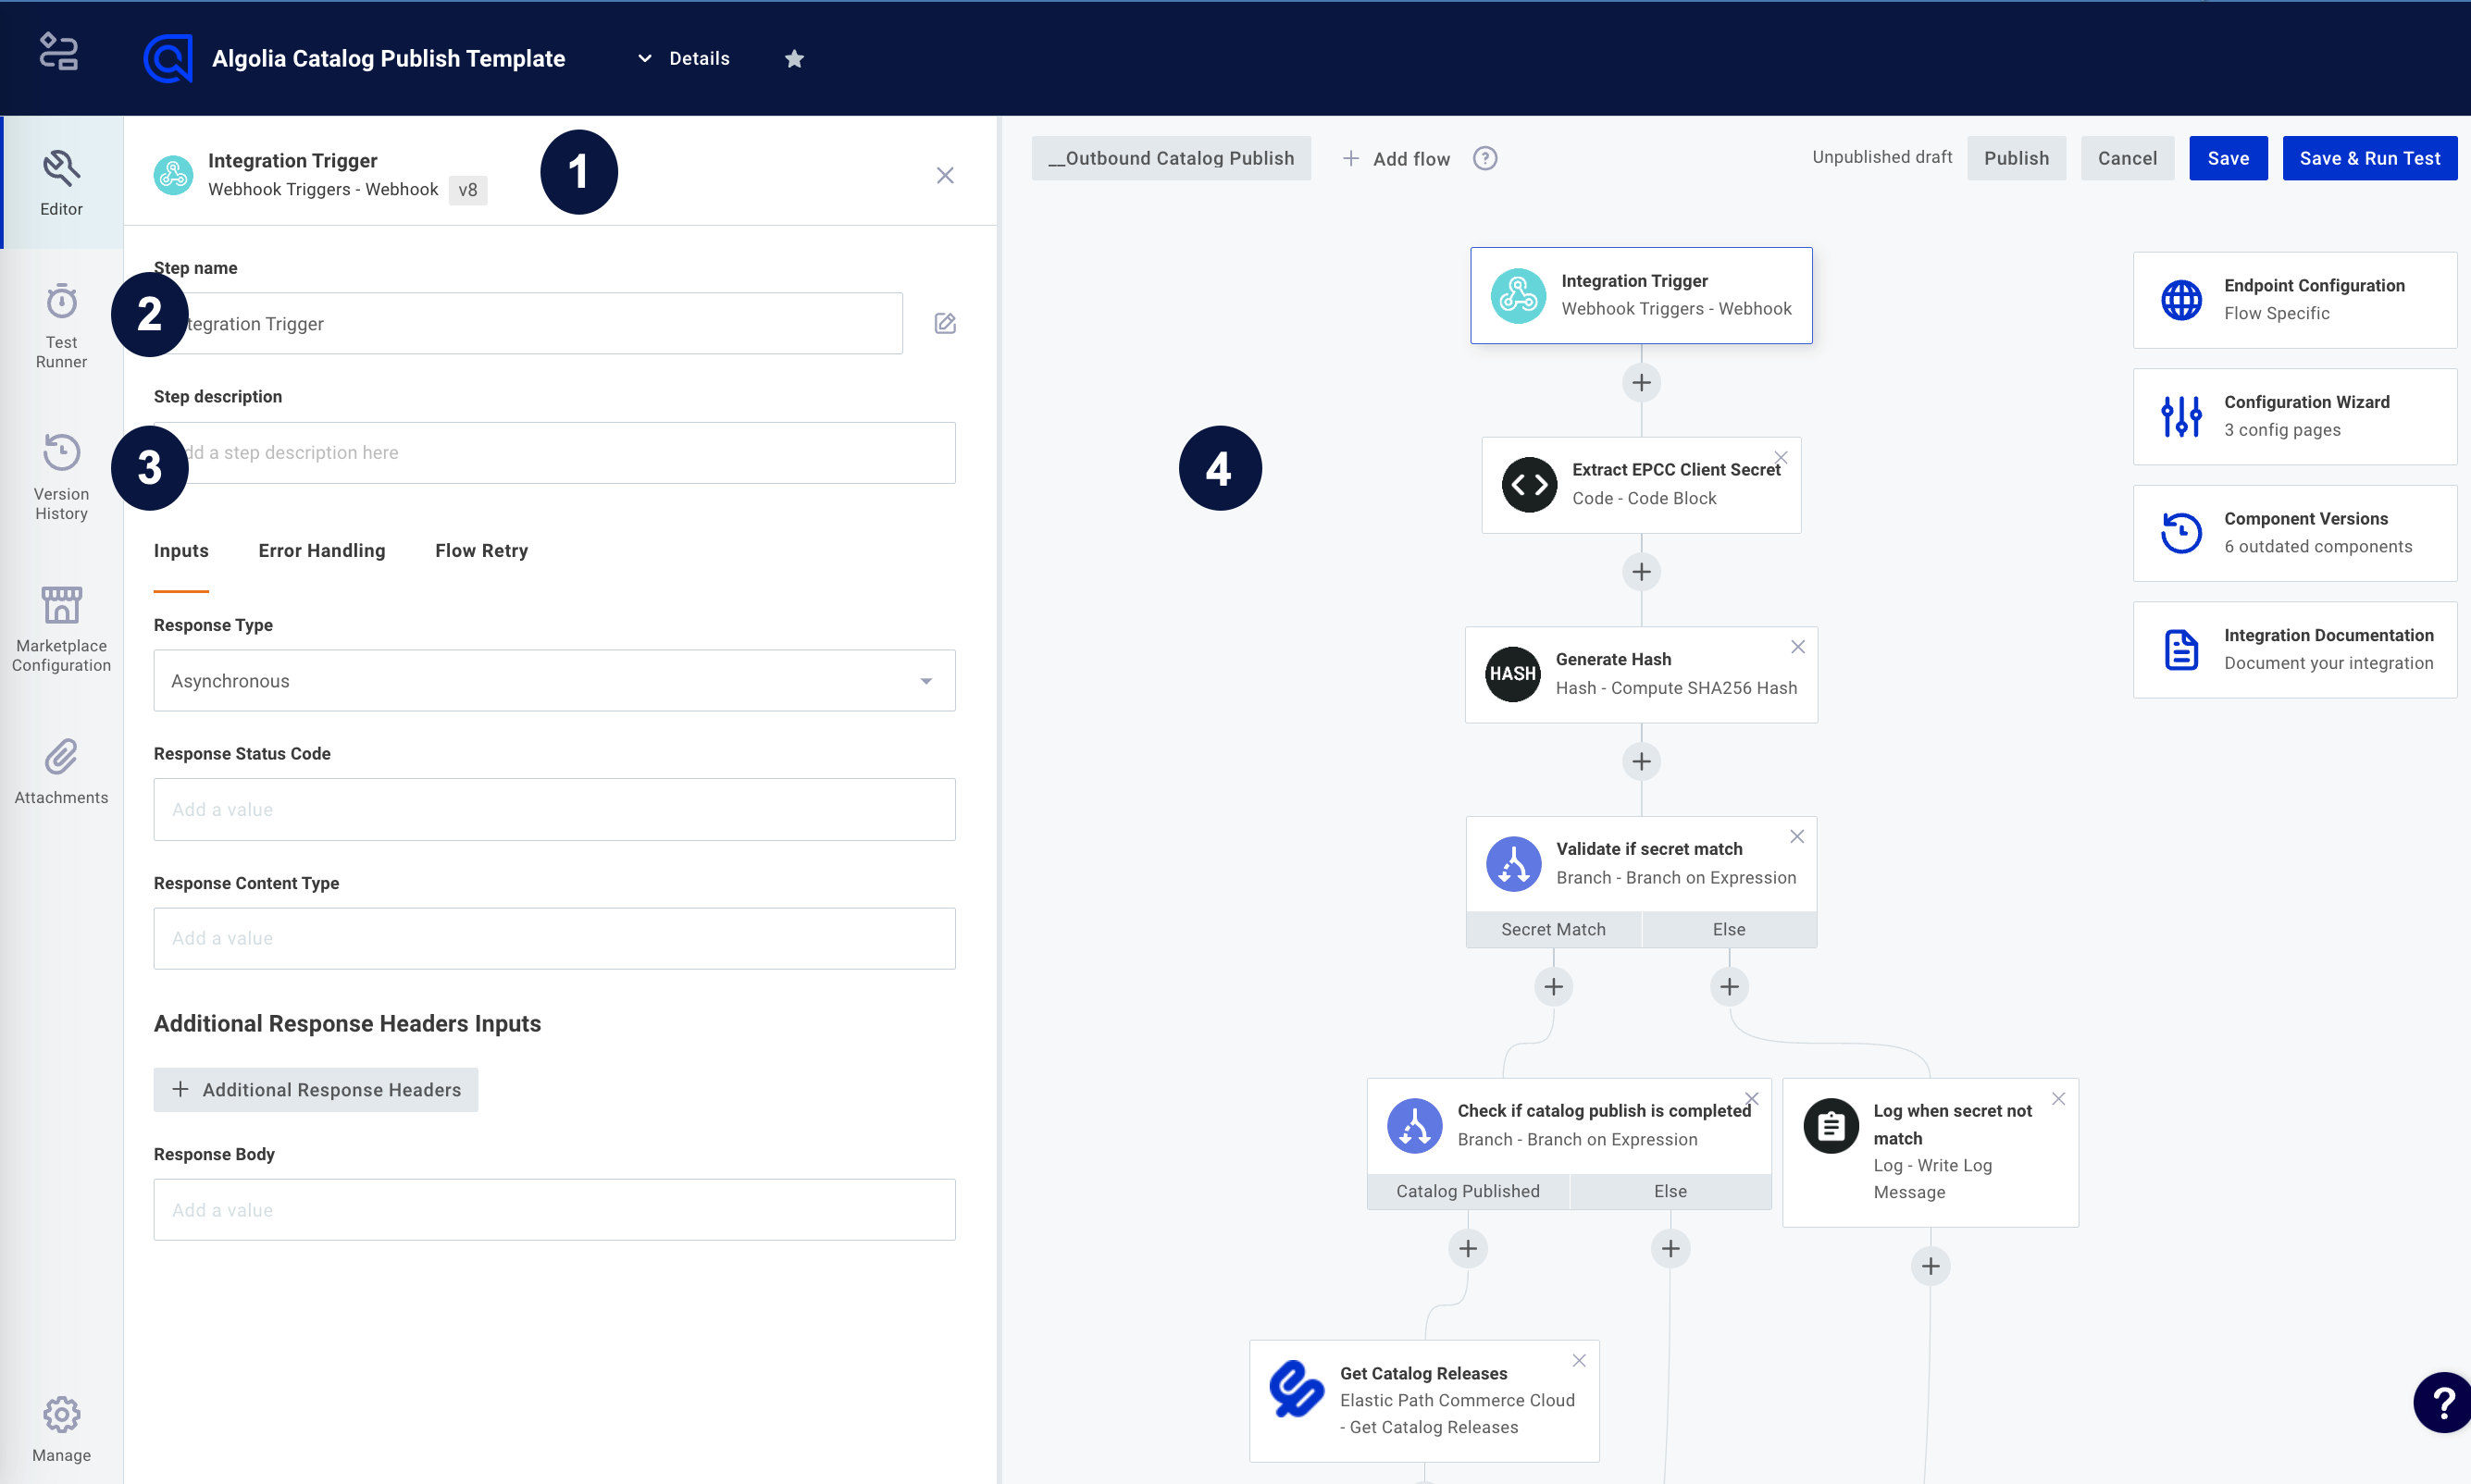
Builder contains four important features:
- The configuration drawer lets you configure steps of your integration, change runtime/webhook configuration, etc.
- The testing drawer lets you run tests of your integration, supply your integration with sample payloads, and see results of your integration test runs.
- The version history drawer lets you publish a version of your integration, so it can be deployed to Integrations Hub.
- The majority of the page is taken up by the integration editor pane. Here, you can add steps to your integration, create branches and loops, and generally arrange the flow of your integration. You can also create multiple flows - each flow has a trigger and series of steps to be executed.
Integration steps
Actions, like downloading a file from an SFTP server or posting a message to Slack, are added as steps of an integration. Steps are executed in order, and outputs from one step can be used as inputs for subsequent steps.
Steps are run in order from top to bottom, and you can add conditional logic to your integration with a branch, or run a series of steps on a data set in a loop. If one step throws an error, the integration stops running.
The trigger step
The first step of your integration is the trigger step, which determines when instances of your integration will run. Integration triggers describes how triggers work, and how to invoke your integration.
Adding steps to integrations
To add a step to an integration, click + underneath the trigger or another action.
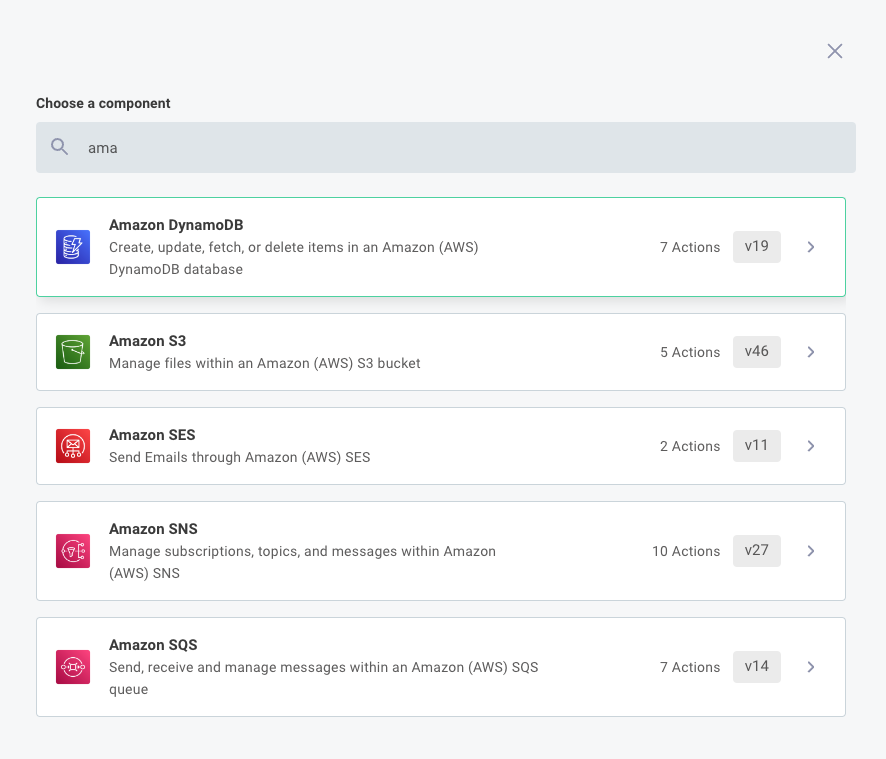
Select the component and action you would like to add to your integration. For example, you can choose the Amazon DynamoDB component, and then select the Create Item action. You can begin to type the name of the component or action you would like to add to filter the list of components and actions available.
Cloning steps
If you would like to make a copy of a step in your integration, open the step's configuration drawer by clicking on the step, and then select the clone step button.
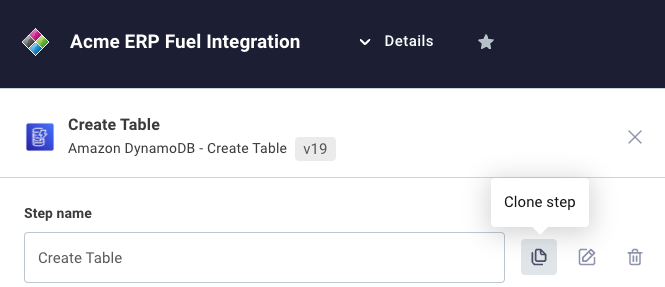
This will copy the step, including any inputs you've configured for the action.
Changing step actions
If you would like to change the action that a step uses, open the step's configuration drawer by clicking on the step and then select the change step button.
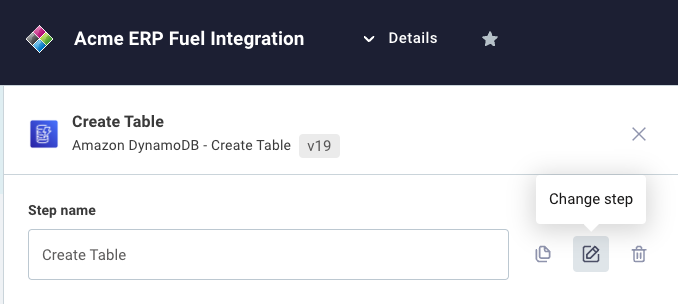
You will be prompted to select a different action, and then will be prompted to fill in that new action's inputs.
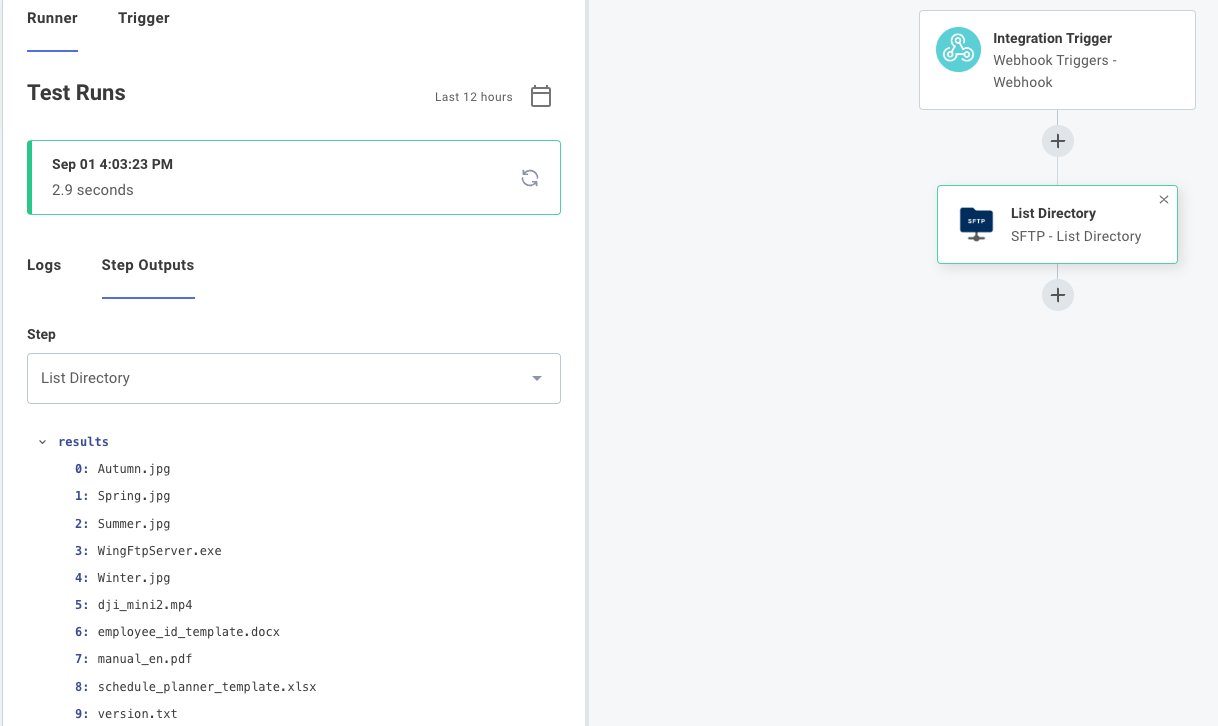
Step outputs
When a step runs, it optionally outputs data that can be used as input for subsequent steps. For example, an SFTP List Files step will output an array of file names:
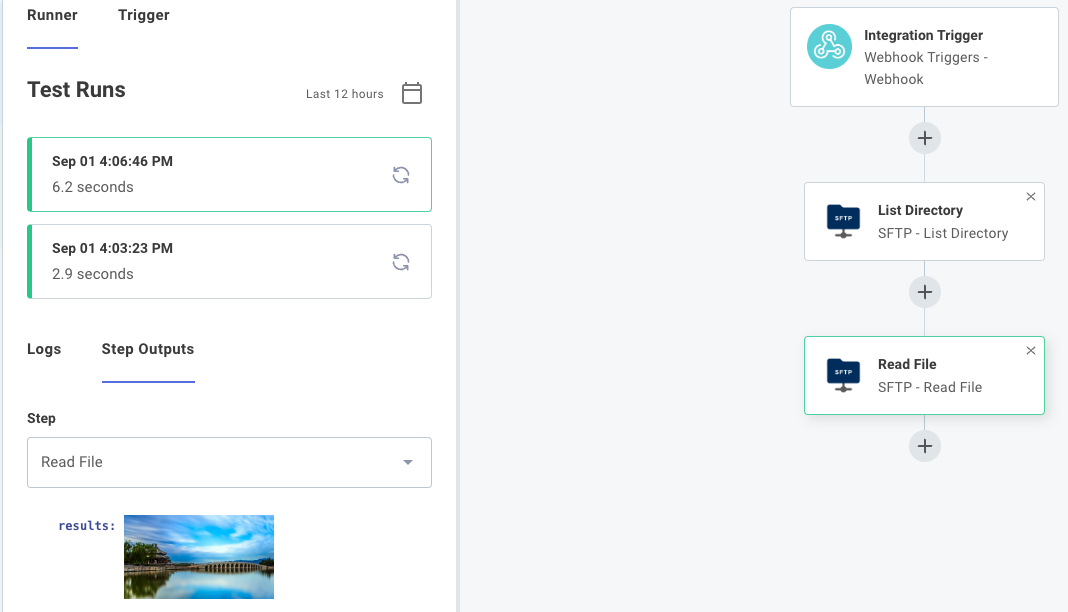
An SFTP Get File step will output the contents of a file that it fetched from an SFTP server (in this case, an image):
Outputs take one of three forms:
-
A primitive value, like a string, boolean value, number, or array of primitives. A subsequent step that references this output will receive the string, boolean, number, or array as input.
-
An object. An output might include multiple key-value pairs:
{ "key1": "value1", "key2": ["value2.0", "value2.1", "value2.2"] }You might see this after pulling JSON from an HTTP endpoint. Specific values from an object can be referenced as inputs using familiar JavaScript
.dotand["bracket"]notation. Using the above as an example, if you wanted to accessvalue2.1you could referenceresults.key2[1]. -
A binary file. Binary file outputs contain a combination of a file
Bufferand in indicator of content type (like"image/png") in the form:{
"data": Buffer,
"contentType": String
}
An action can return a combination of JSON and binary file(s) if properties of the JSON object are objects with data and contentType properties.
Configuring step inputs
Once you have added a step to your integration, you will likely need to configure some inputs for that step. Inputs might include a RESTful URL endpoint, an S3 bucket name, a Slack webhook to invoke, or even a binary file like an image or PDF to upload or process.
Some inputs are required, and denoted with a * symbol, while others are optional.
Inputs can take one of four forms: value, reference, config variable or template. Value inputs are static strings, reference inputs reference the results of a previous step, config variable inputs reference a customer-specific config variable, and template inputs allow you to concatenate static strings, config variables, and step result references.
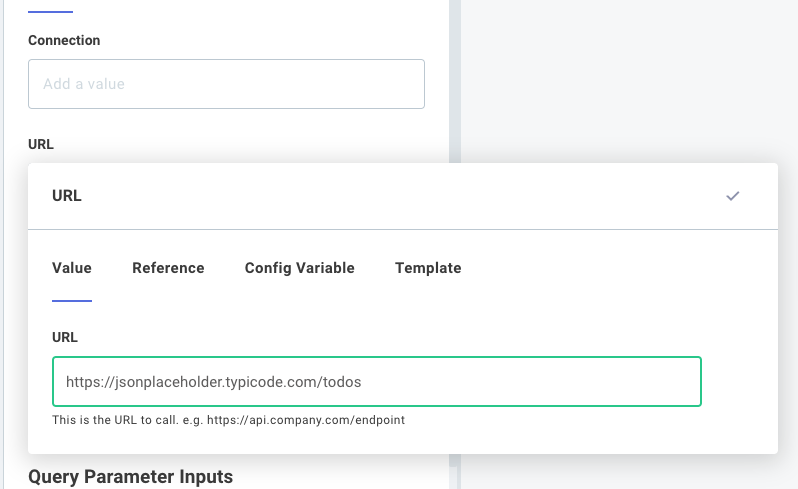
Value inputs
A value is a simple string (perhaps a URL for an HTTP request). If you set a value for an input, that static value is used as an input for all of your instances:
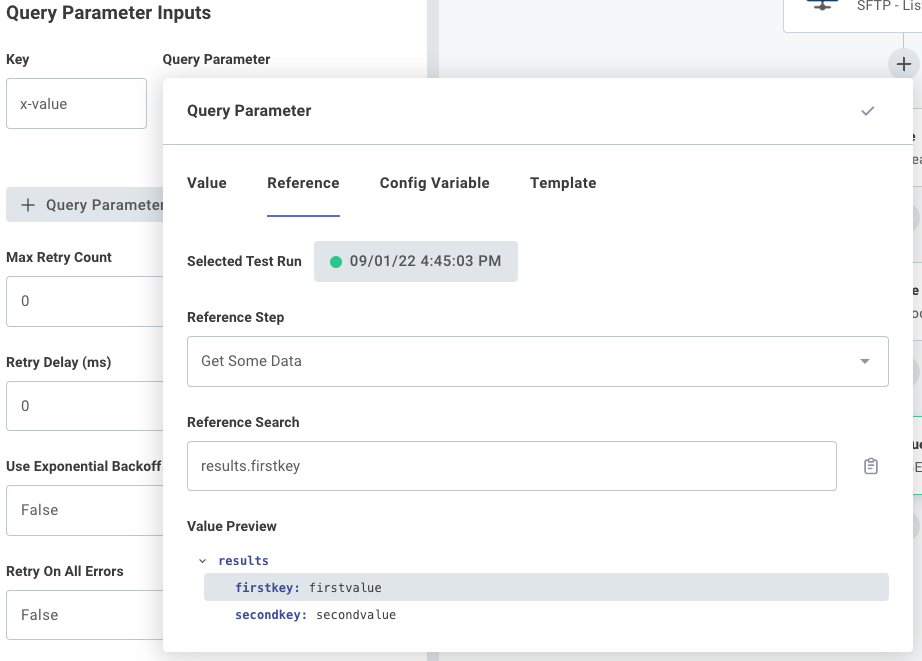
Reference inputs
A reference is a reference to the output of a previous step. For example, if a previous step pulls down a file from Amazon S3 and the step is named Fetch my file, then you can reference Fetch my file as an input for another step, and that subsequent step will be passed the file that Fetch my file returned.
Outputs from one step can be referenced by a subsequent step by referencing the previous step's results field.
So, if a previous step returned an object - for example, if an HTTP - GET action pulled down some JSON reading { "firstkey": "firstvalue", "secondkey": "secondvalue" } - you access that secondvalue property in a subsequent step's input by selecting the HTTP - GET step and choosing results.secondkey in your Reference search:
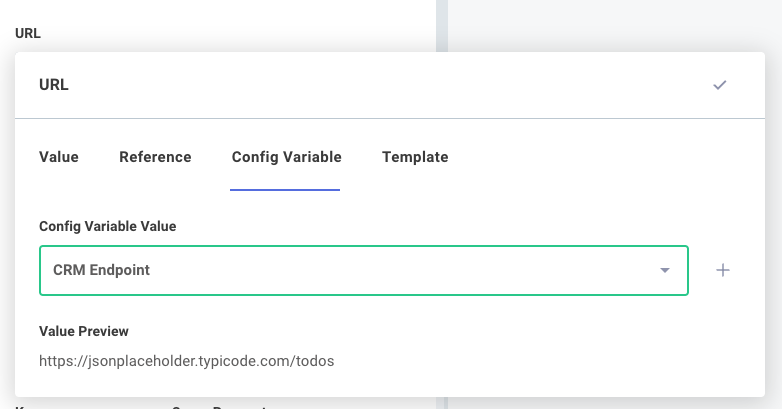
Config variable inputs
A config variable references one of the integration's config variables.
For example, we can select a config variable, CMS API Endpoint, as an input for one of our steps.
Config variables can be distinct for each customer, so each customer can be configured with a different CMS API Endpoint:
Templates inputs
Finally, a template is a combination of string values, config variables or step result references. You can concatenate several strings, config variables, and step results together to serve as a single input.
Templates are useful if an input needs to be templated out from various config variables and step results. For example, suppose you want to make an HTTP request to an API Endpoint that is stored as a config variable, and fetch an item whose ID was fetched in a previous step. You could combine the API endpoint, URL path, and product ID like this:
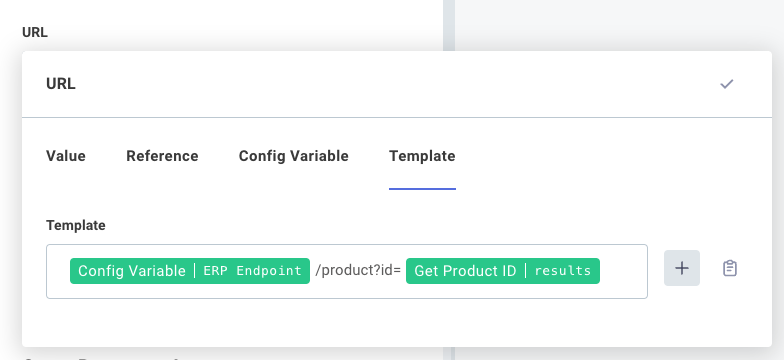
A static string, like /product?id= can be intermixed with config variables and step result references.
You can add references to config variables or step results by clicking the ADD TEMPLATE FIELD button.

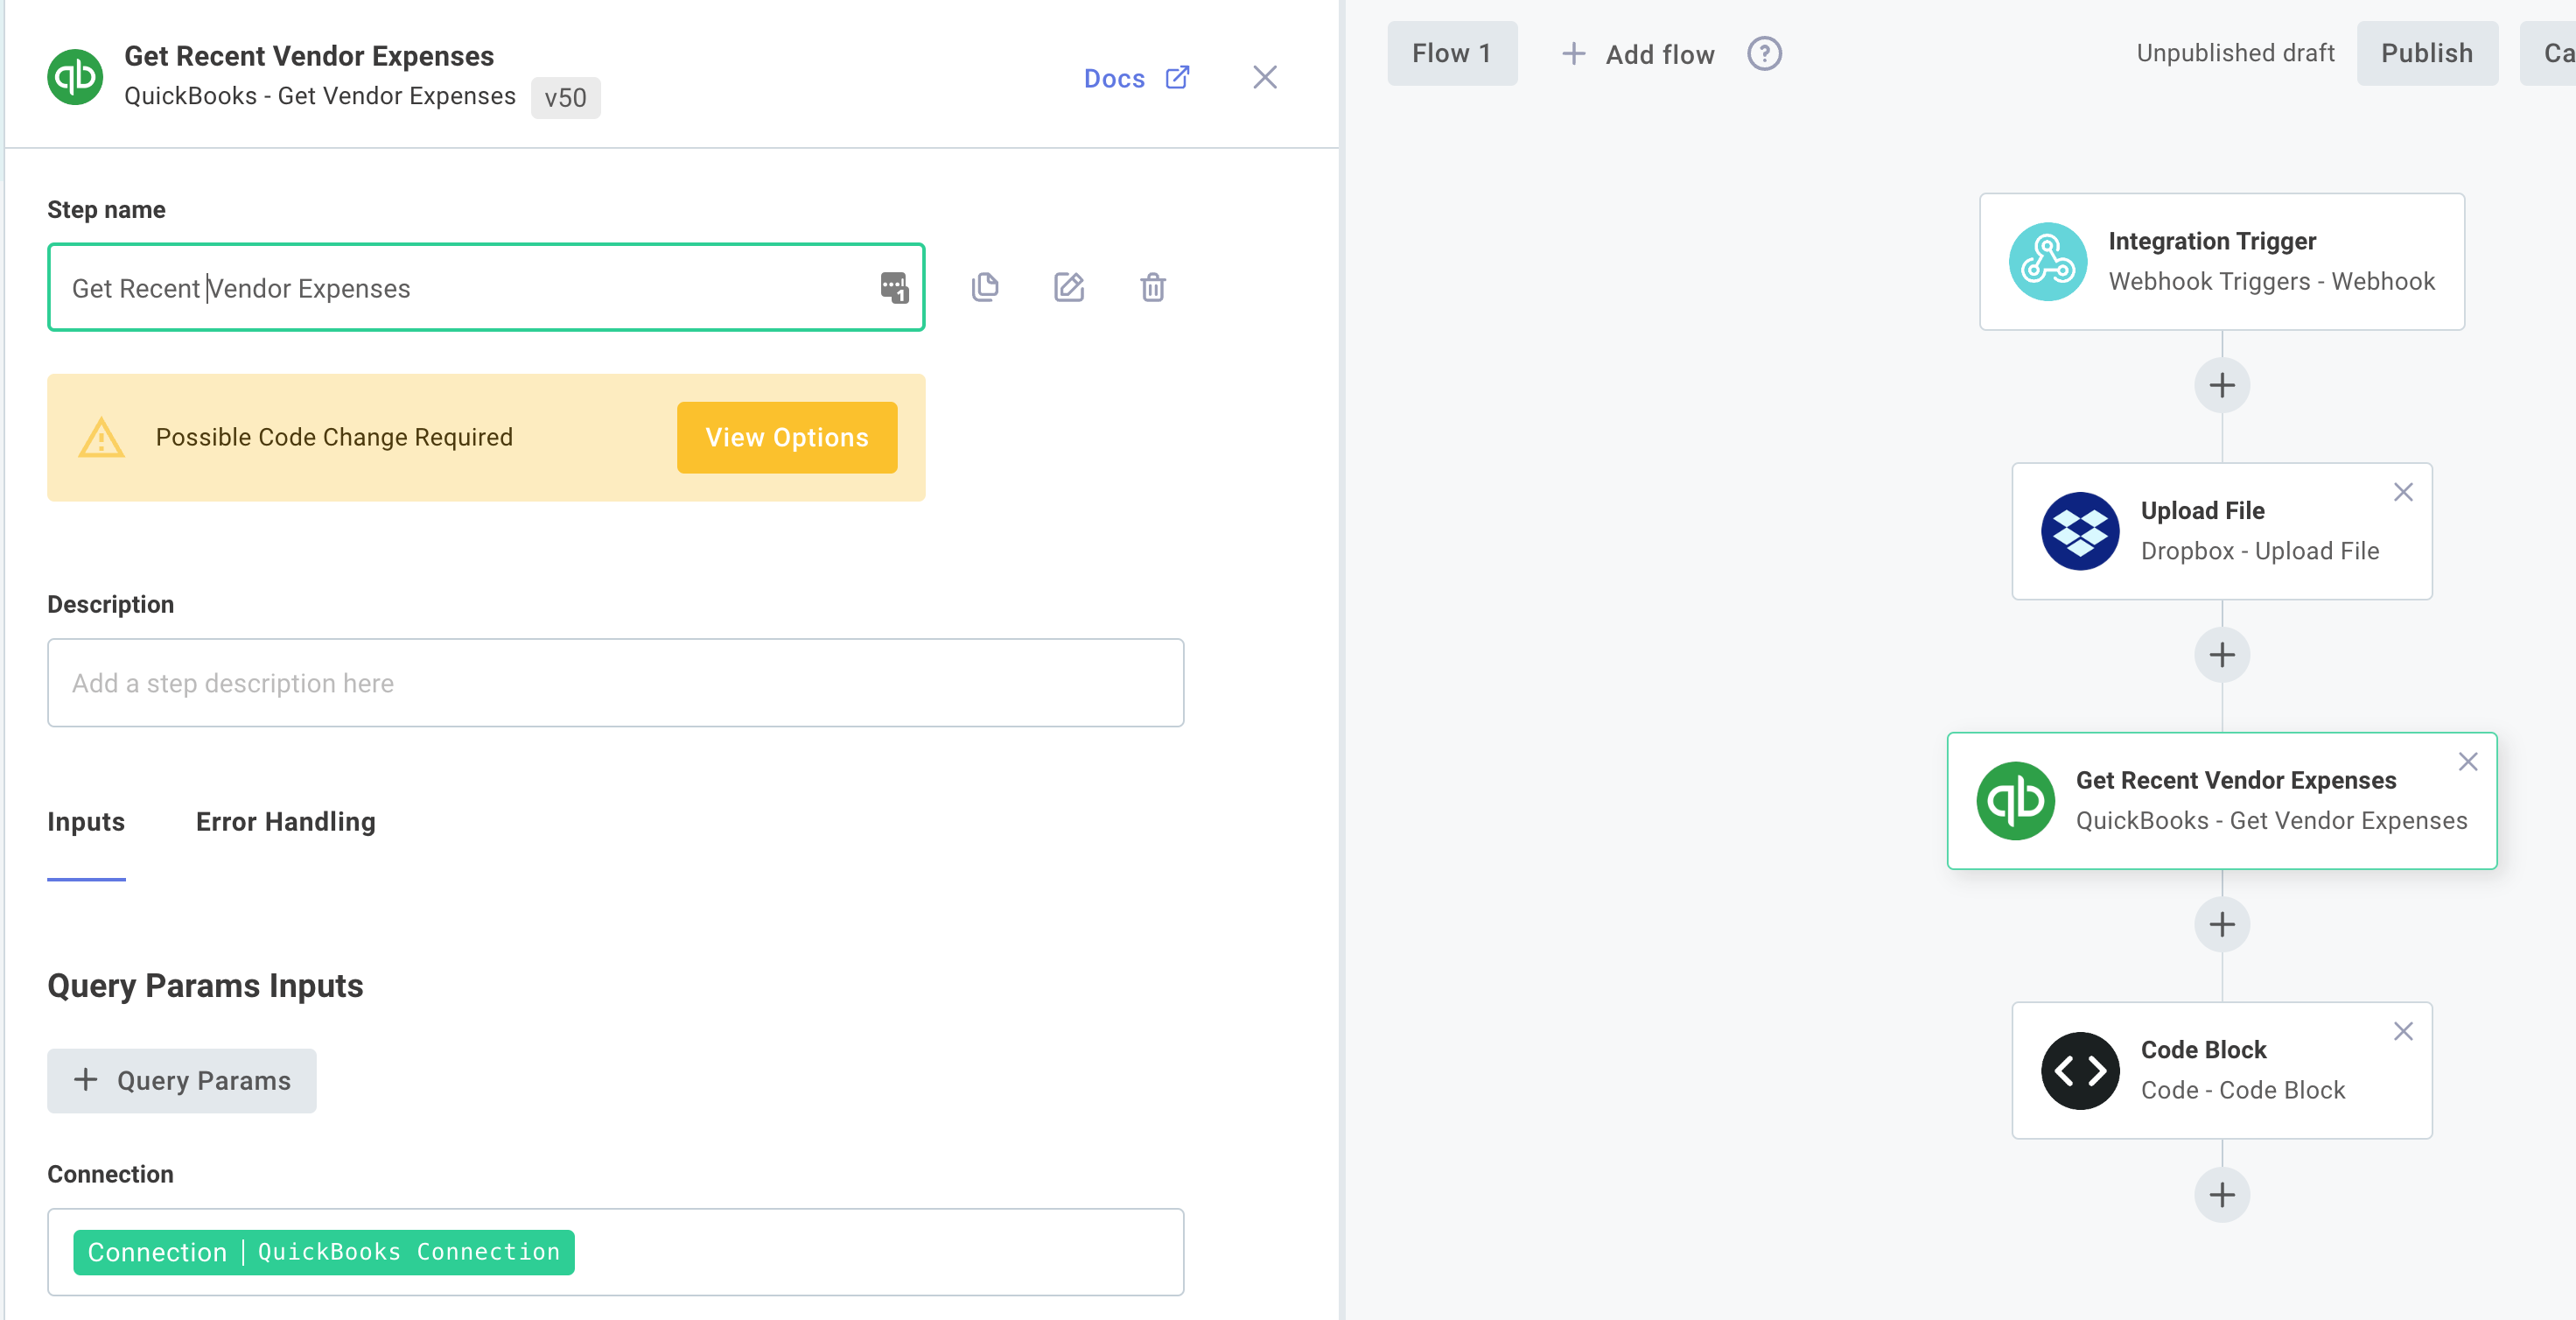
Changing step names
By default steps are uniquely named after the action they invoke (so, they're named things like CSV to YAML, or Delete Object). To override that default name, click the step and click the default name to edit its name.
Like using descriptive variable names in a program, renaming steps allows you to give your steps descriptive names. For example, rather than a step being called Delete Object you can name it Delete Schematics File from Share. We recommend giving your steps descriptive names so your team members can read through integrations and understand their purpose more readily.
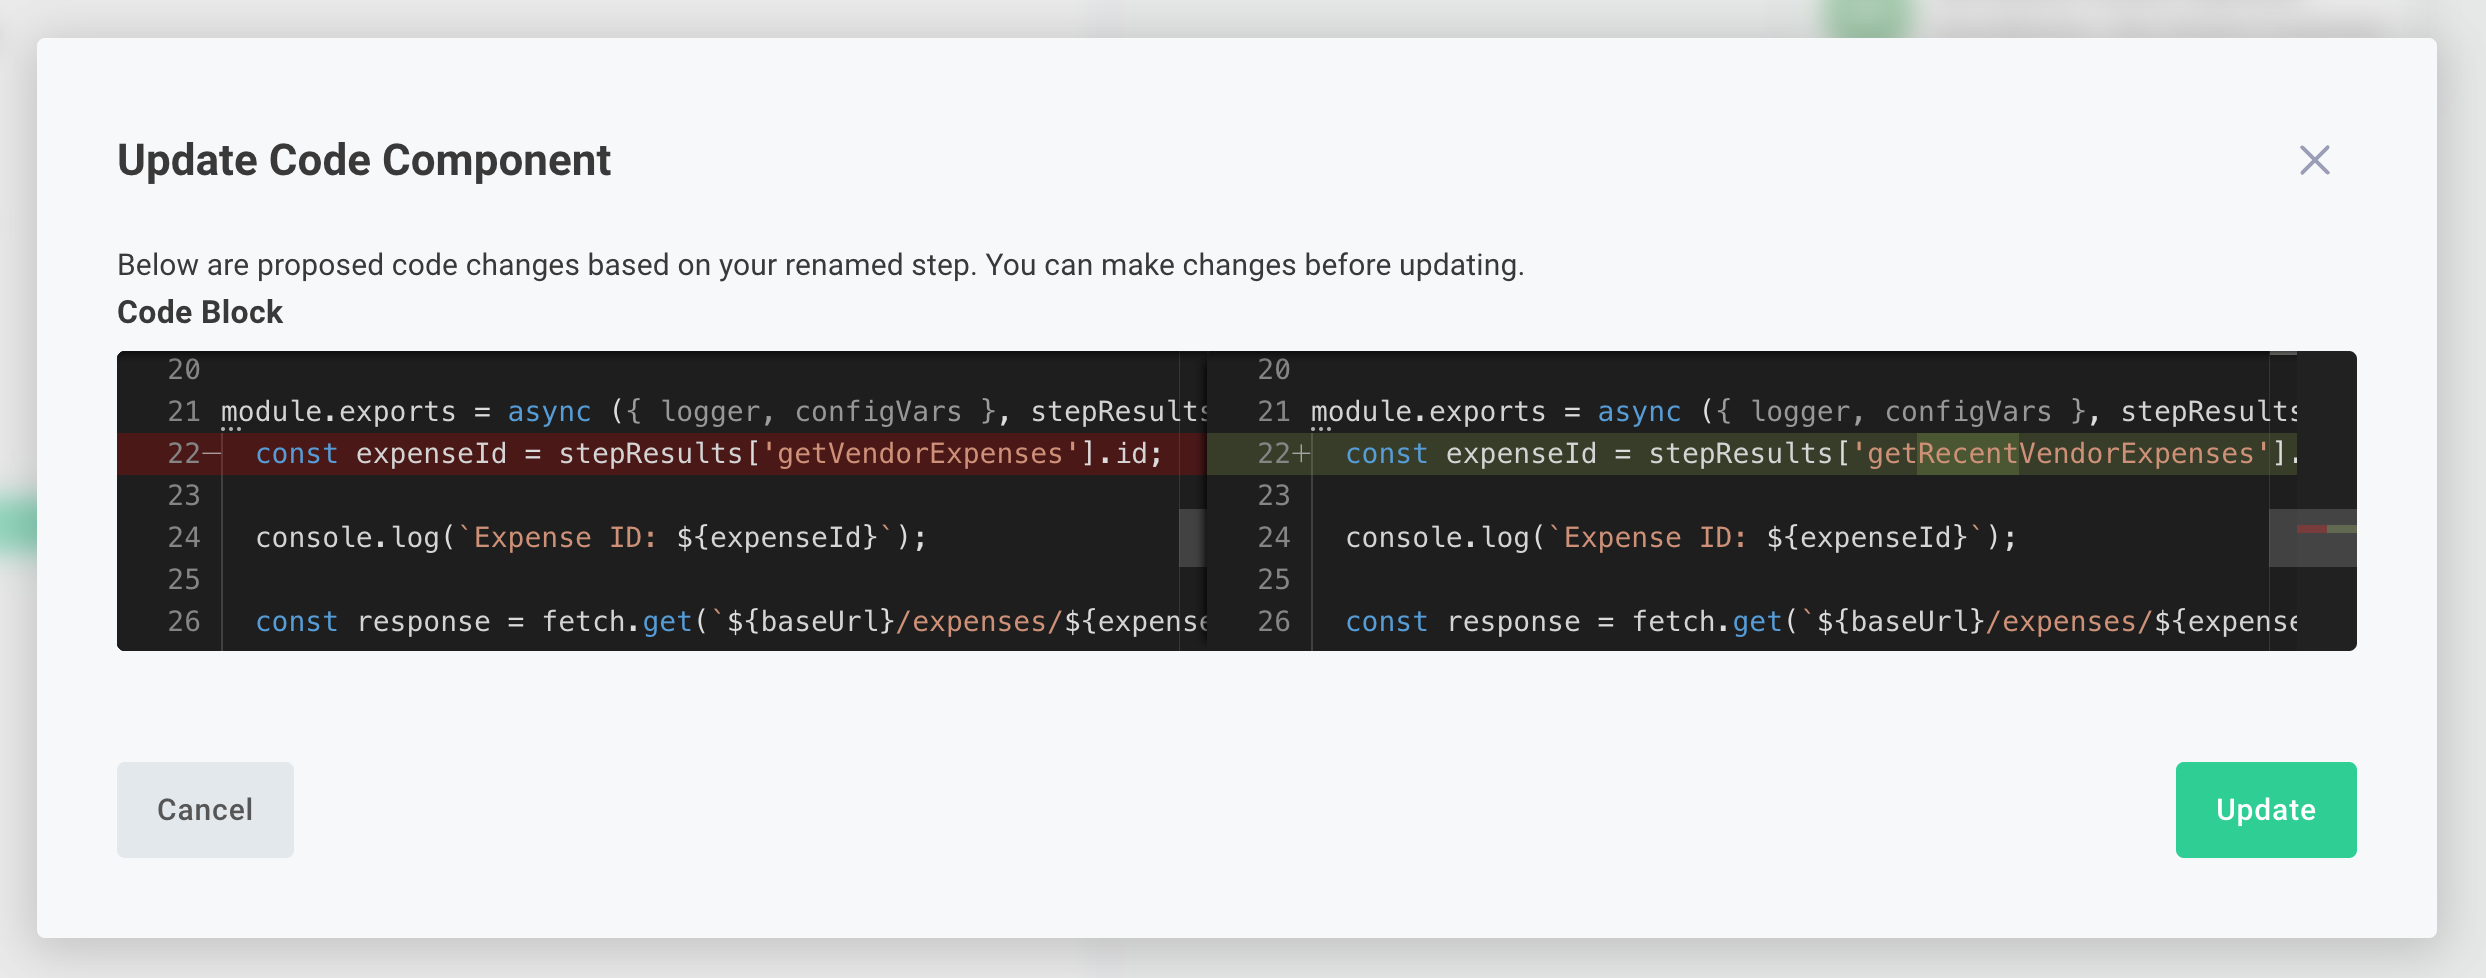
If subsequent steps reference the renamed step's results as inputs, those references are automatically updated. If you have code steps that reference the renamed step's results, you will see a prompt under the renamed step's name:
If you click View Options you will find yourself in a diff tool that will recommend changes to your code, so references to the renamed step's outputs still work. Make any changes you see fit, and click Update to apply the changes.
Reordering steps
Steps are executed in serial. To reorder steps, click and drag a step up or down.
Choosing component versions
Components are versioned. You can choose a version of each component that works for your integration. "Pinning" component versions for your integration prevents accidental regressions if a new version of a component is published that contains breaking changes.
To choose what version of each component your integration uses, click the Component Versions button on the right-hand side of the integration designer.
You can choose to run the latest version of a component, or any previous version. Components running the latest available version will be marked in grey, while components running a version for which there is a newer version available will be marked in yellow.
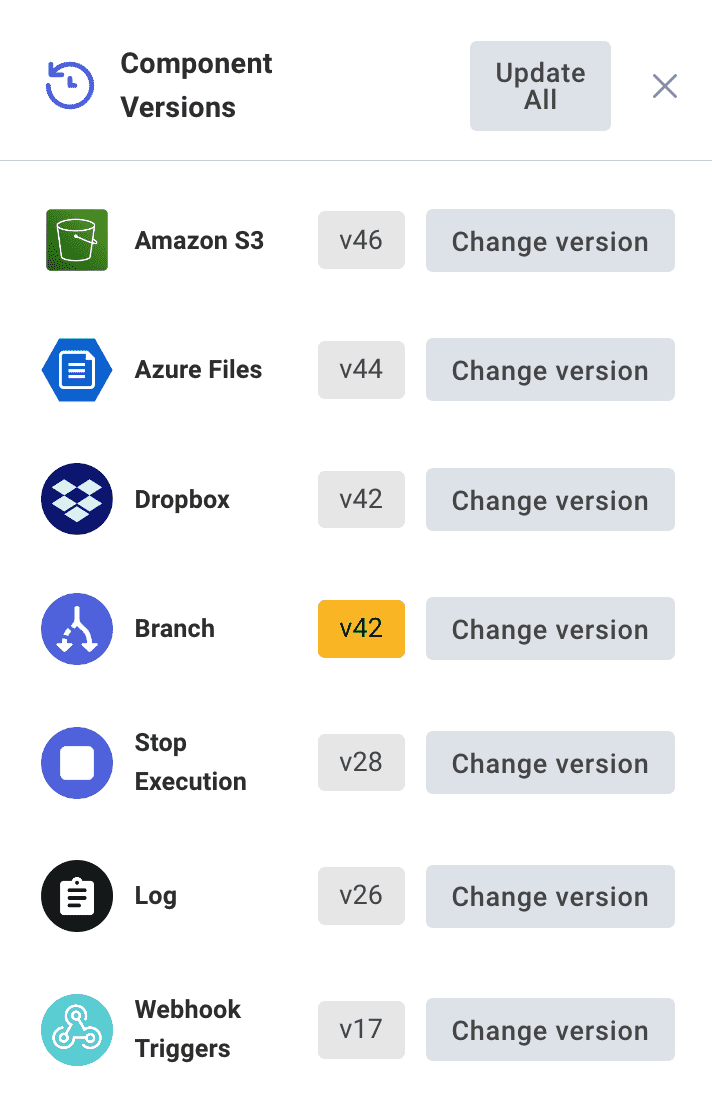
To change the version of a component your integration uses, click the CHANGE VERSION button to the right of the component you want to change, and select a version from the dropdown.
For More Information: Component Versioning
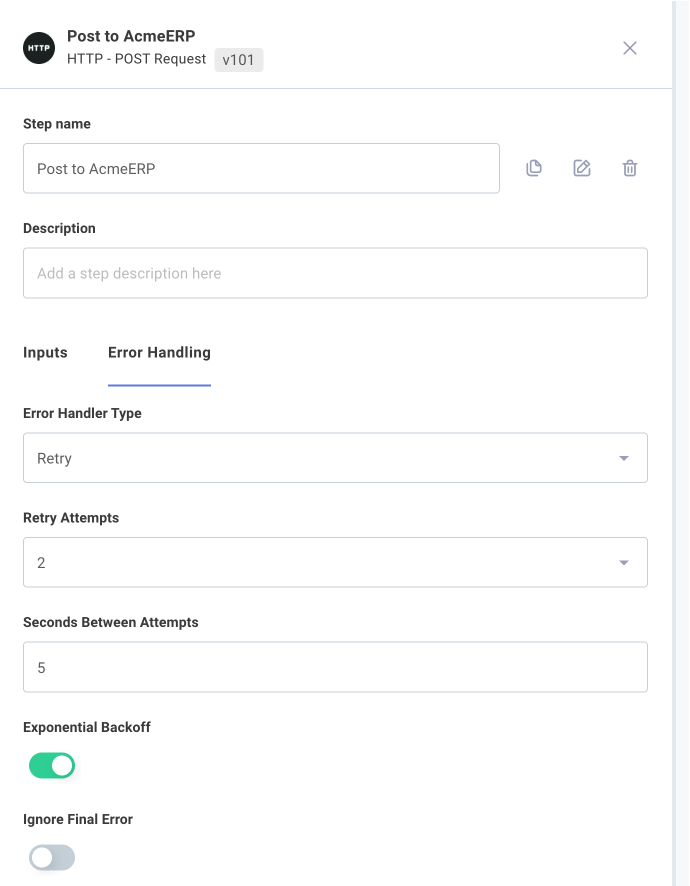
Step error handling
Sometimes a step in an integration throws an error. This can be caused by a variety of external factors - temporary network connectivity issues, brief third-party API outages, etc. You might not want your entire integration to stop because one step failed, especially if you're looping over hundreds of items and one item has issues.
You can configure how the integration runner should handle errors on each step. To do that, click a step that you would like to configure, and then open the Error Handling tab in the left-hand drawer.
Under Error Handler Type you have three options:
- Fail - stop the integration and throw an error.
- Ignore - ignore the error and continue running the rest of the flow.
- Retry - wait for an amount of time (Seconds Between Attempts) and then try the step again, a maximum of Max Attempts times. Optionally wait longer and longer (Exponential Backoff, twice as long each time) between retries. If the last attempt still fails, either fail the integration or ignore the error depending on if Ignore Final Error is true or false.
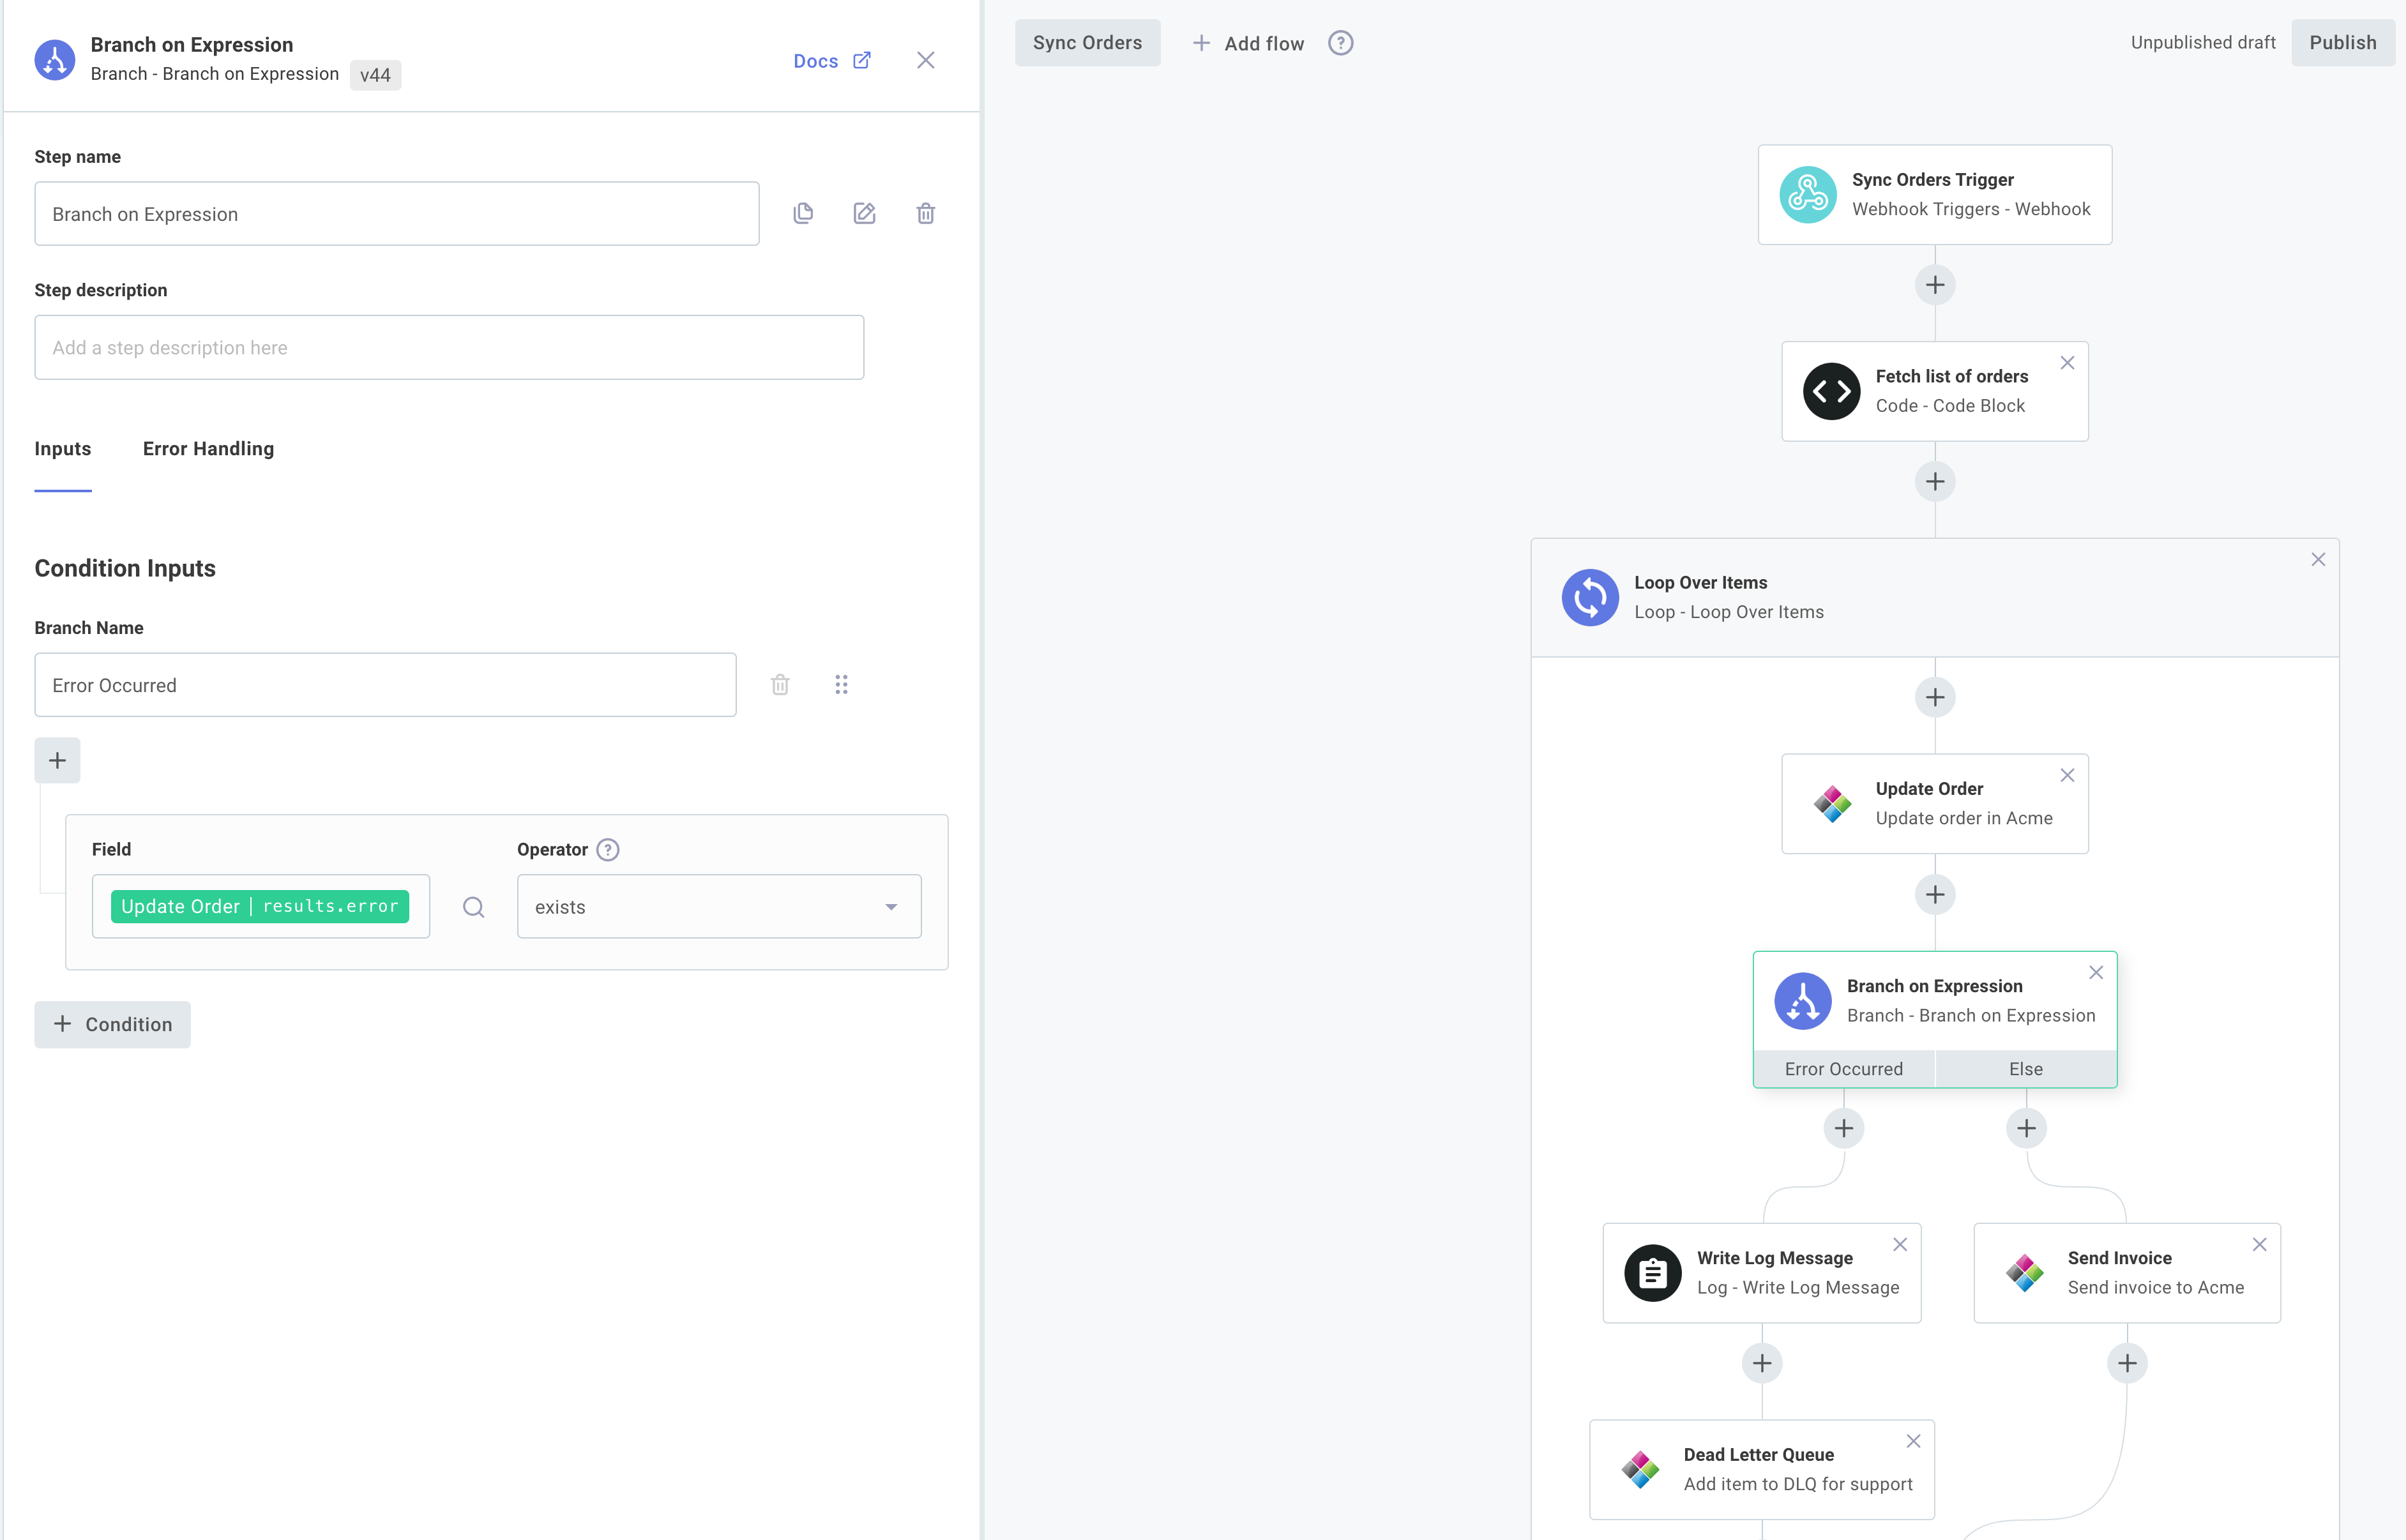
Branching after ignored errors
If a step is configured to Ignore errors, or if the step has retried its configured number of times and then ignored the final error, the step returns a result with an error property detailing the error that occurred.
You can use the branch component to branch based on that error.
This is useful if you have some sort of dead letter queue to write the failed item to, or if you would like to notify someone of the problematic item.
You can branch on whether or not results.error exists, and act accordingly.
Config variables in integrations
When your users configure and activate an instance of your integration, they'll walk through an instance configuration wizard where they'll enter credentials, selection options from dropdown menus, map fields, toggle boolean values, etc. Your integration can reference the config variables that users will set, and as an integration builder you can customize the configuration wizard experience for creating instances.
Start by opening the Configuration Wizard Designer by clicking the Configuration Wizard button. From there, you can define the configuration experience that will be used.
Configuration wizard designer
Users will enable and configure an instance of an integration through a Configuration Wizard. Users work through Configuration Pages, authenticating with third-party apps and setting config variables.
Configuration pages can contain config variables of various types and helper text and images to prompt the user where to look.
To add helper text, including headings (H1 - H6) or paragraphs, click the + Text/Image button and select the type of text you'd like to add.
To add an image, your image will need to be publicly accessible online. Enter the public URL of the image you'd like shown on your config page.
For further customization, you can choose to add Raw HTML to your config page.
You an add a configuration page by clicking + Config Page, and you can rename a config page or add a short description to the page by clicking the pencil icon beside the page.
Adding configuration variables
You can define names, descriptions, variable types, and optional default values of config variables to your configuration wizard, and you'll reference the values that users set for each in your integration.

When it comes time to deploy your integration, users can enter or select configuration options and tailor the integration without the involvement of integration builders.
Config variables that you define in the config variable drawer can be used within your integration as inputs or steps, or through the Branch component to drive branching logic.
Config variable data types
There are several types of configuration variables:
- String is a standard string of characters
- Date follows the form
mm/dd/yyyy, and presents end users a calender widget to choose a date - Timestamp follows the form
mm/dd/yyy, HH:MM [AM/PM], and presents end users a calendar and time widget to choose a date and time - Picklist allows you to define a series of options that your end user can choose from. Picklists are presented to end users as a dropdown menu of options. A picklist value can be up to 64 characters in length.
- Code lets your end user enter JSON, XML, or other formatted code blocks. Choose a Code Language when you create the config variable for syntax highlighting.
- Boolean allows your end user to choose either true or false.
- Number allows your end user to enter a number (integer or decimal).
- Object Selection allows your end user to select zero or more objects from a list. This config variable type always sources data from a data source.
- Object Field Map allows your end user to map a series of fields. This config variable type always sources data from a data source.
- JSON Form allows you to leverage JSON Forms to build your users' configuration experience.
- Connection is made up of multiple fields that determine how a component should connect to an external API. It might include a username, password, API key, endpoint URL, or several other things. Note that connection config variables can only be added to the first config page, as subsequent pages may use the connection to dynamically generate other config variables.
The type of config variable you choose affects the UI that the end user interacts with (they get toggles for booleans, date pickers for timestamps, an editor with syntax highlighting for code, etc). Regardless of what type of config variable you choose, though, all values are presented to actions as strings.
Once you've added a config variable, you can use it as an inputs to actions within your integration.
List and key/value list config variables
In addition to representing a single value, some config var types can represent a list of values, or a list of key/value pairs. This is helpful for when you want your users to be able to enter an unknown number of items as the values of a configuration variable. For example, you may want users to select one or more values from a picklist menu.
Config variables with a data type of string, date, timestamp, picklist, code, or boolean can be configured as lists or key/value lists.
To create a list config variable, create a new config variable and select LIST under Config Var Type:
When a list config variable is referenced by a step's input, that step's action receives a JavaScript array of values.
The config variable in the example above would provide the array ["First Option", "Third Option", "Second Option"] to the action.
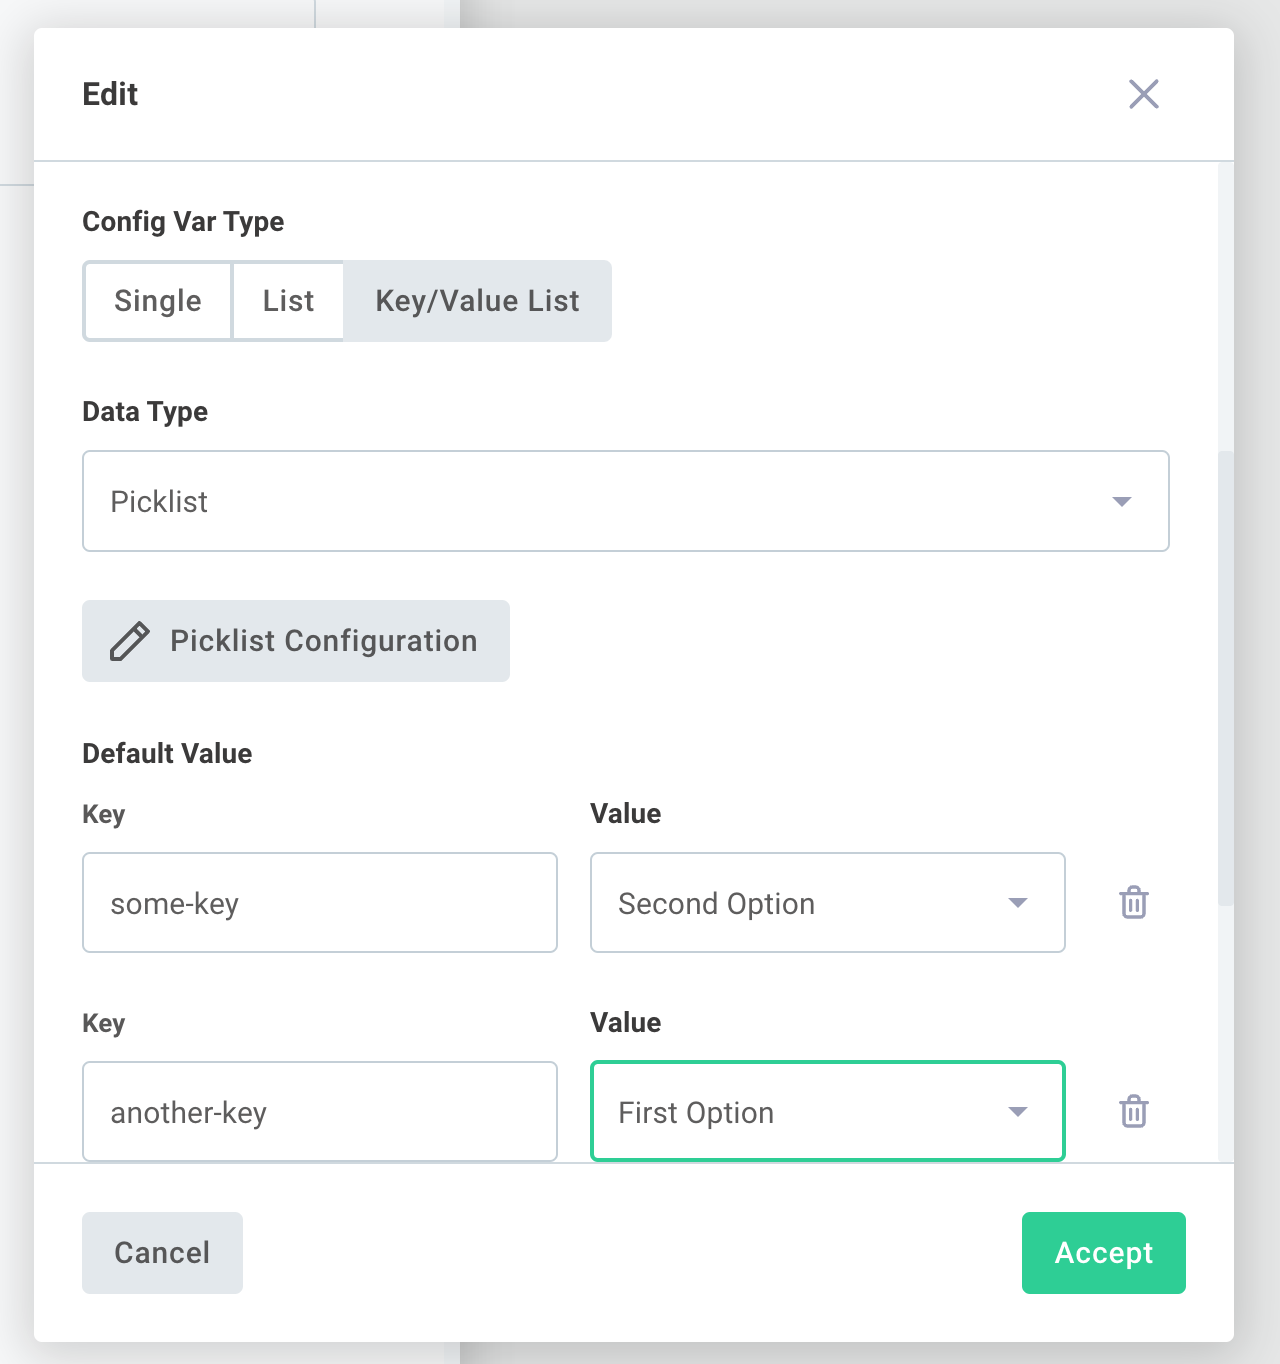
To create a key/value list config variable, create a new config variable and select KEY/VALUE LIST under Config Var Type:
When a key/value list config variable is referenced by a step's input, that step's action receives a JavaScript array of key/value pairs. The config variable in the example above would provide this array to the action:
[
  {
    key: "some-key",
    value: "Some value",
  },
  {
    key: "another-key",
    value: "Another value",
  },
];
Config variable data sources
Data Sources allow you to populate a config variable dynamically after they enter some connection settings. This is handy because users' configuration differs in third-party apps. Users can have different Facebook business names, different Google Analytics accounts, different fields on Salesforce resources, etc. You can pull in those things, and allow users to choose their Slack channel, select a folder in Google Drive, map fields from Salesforce, etc.
If you would like to populate a config variable dynamically from a data source, first ensure that a connection config variable for the third-party app is present on your first config page. Those are generally automatically created when you add a step to your integration for that third-party. On a subsequent page, add your config variable. Under Data Source, select the component and data source that you would like to use (for example, the Salesforce component Map Record Type Fields data source.
Your users will authenticate with the third-party app on their first config page, and will see data dynamically loaded from the third-party populate the config variable.
JSON Forms config variables
JSON Forms is a powerful form-generating tool that lets you transform JSON schema into a fillable form. You can build a static JSON form using the built-in JSON Forms component.
Connection config variables
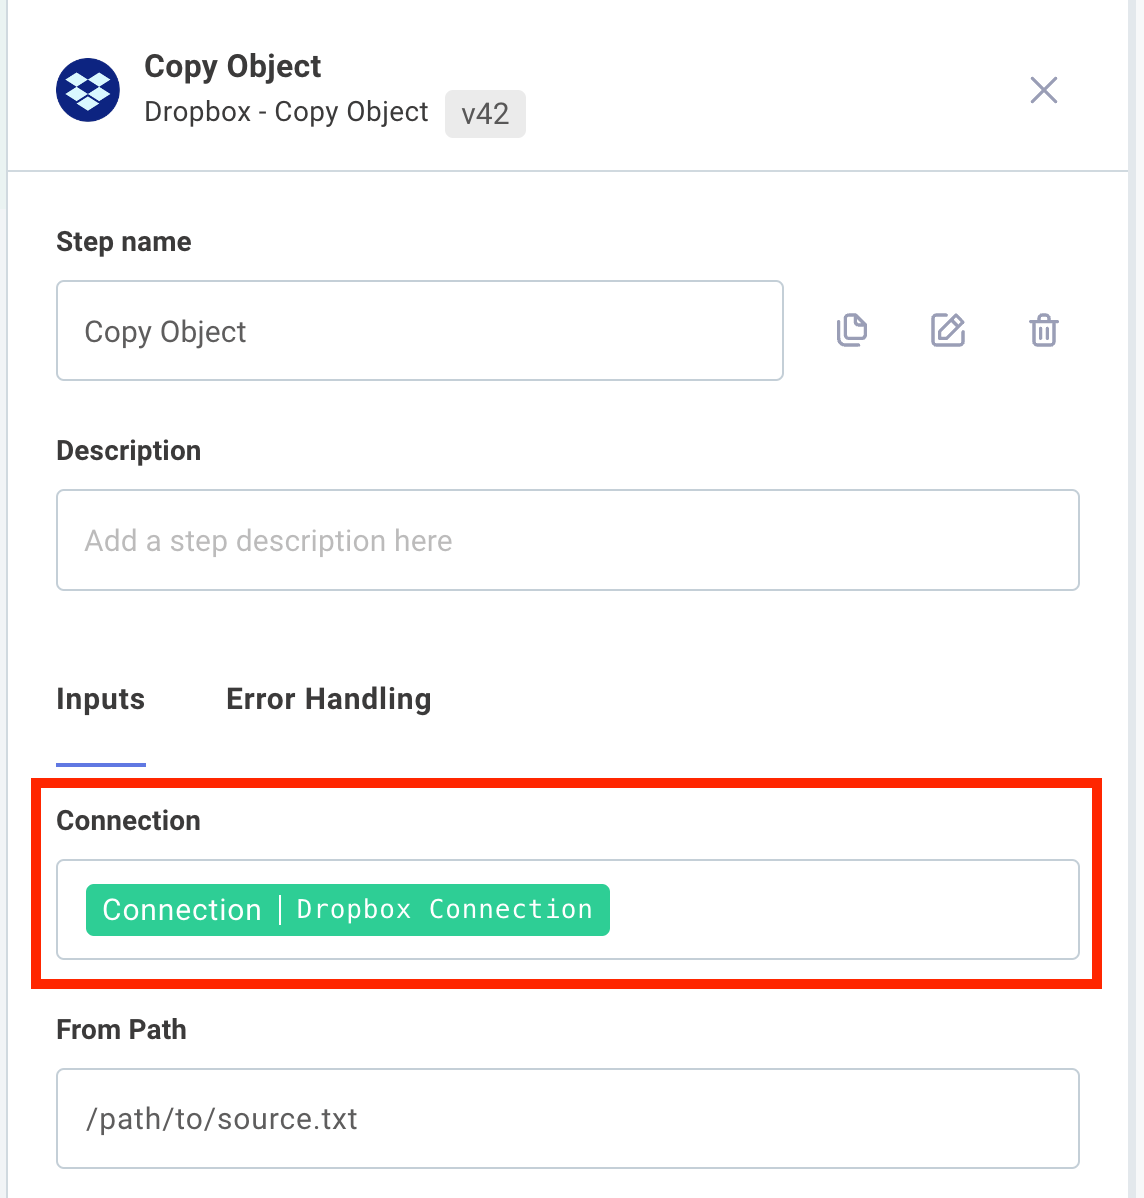
Connections are a special type of config variable that contain the information necessary to connect to a third-party app. A connection might include a simple username and password pair, or might declare all the fields required for OAuth 2.0 (like auth URL, client ID, etc.).
Once a connection config variable has been created, it can be assigned to any number of steps in your integration that support that connection type. For example, you can create a single Dropbox OAuth 2.0 connection, and assign that connection to a "List Files" step, "Get File" step and a "Delete File" step by selecting the connection from the connection input:
Connection config variables can only be added to the first page of the configuration wizard. This is because the connection can be used to dynamically populate config variables on subsequent pages.
OAuth 2.0 Connection Config Variables
A developer of a component that implements an OAuth 2.0 connection can choose to reveal or hide the various fields that are required for OAuth 2.0. The required fields include auth URL, token URL, scopes, client ID, and client secret, but some of those fields never change, so they can be hidden from users.
For example, Dropbox auth URL and token URL never change, and scopes are set within Dropbox. Only client ID and client secret are OAuth app specific. So, when you create an OAuth 2.0 connection for Dropbox, only App Key (client ID) and App Secret (client secret) are revealed.
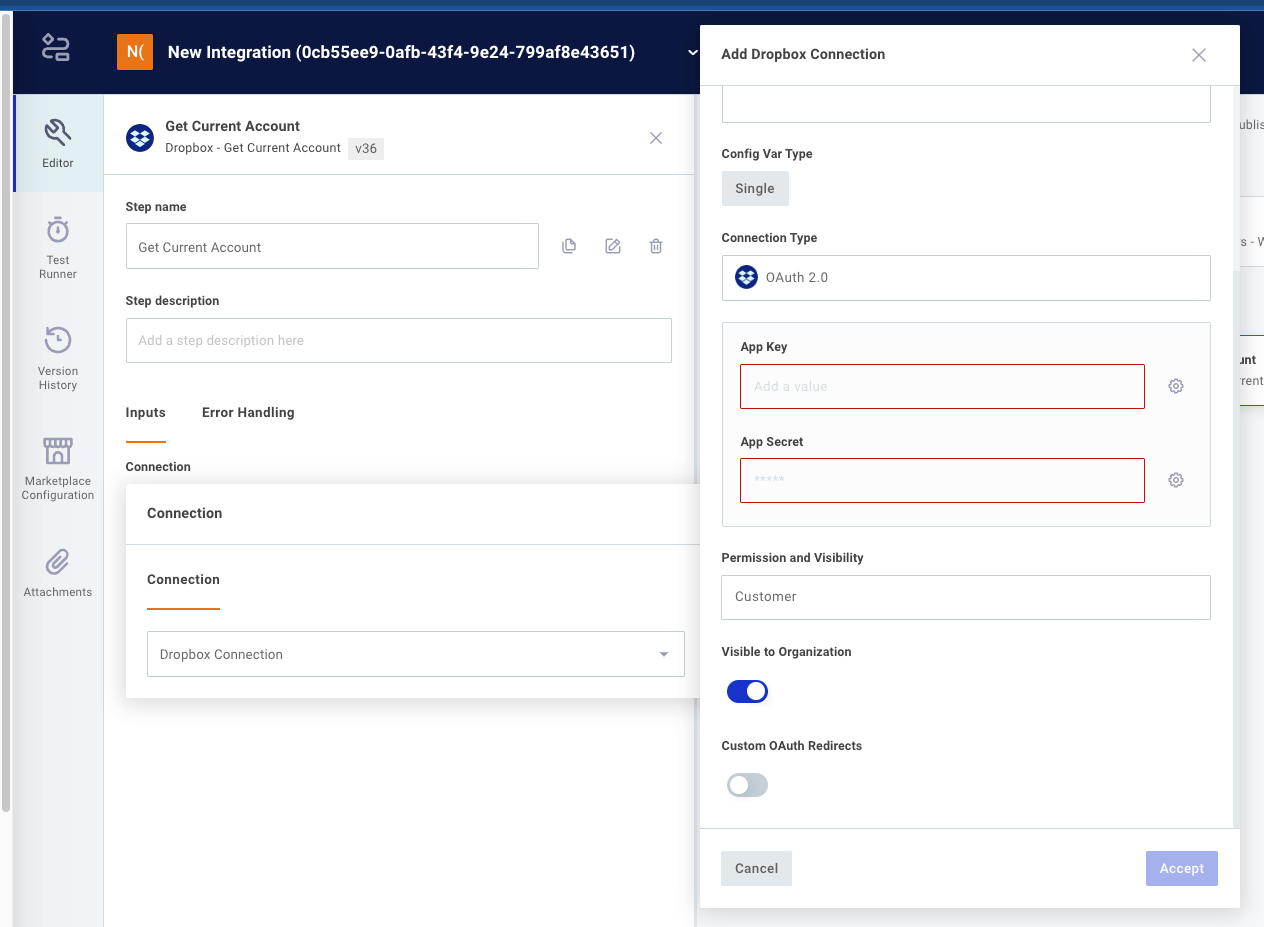
You as the integration builder can choose to enter static values for client ID and client secret at this point, or you can choose to let whoever deploys the integration enter those values. You can manage who sees what by toggling the Visible to Organization Deployer toggle.
Synchronous / asynchronous
Integrations can be triggered synchronously or asynchronously. For more information, see integration triggers.
Integration retry configuration
You can configure your asynchronously-invoked instances to retry if they fail to run to completion. This is handy if your integration relies on a flaky third-party API - the third party API might be down briefly, but back up a few minutes later. You can configure your integration to try again in a few minutes when the API is back up, without needing to trigger unnecessary alert monitors for your team.
To configure an integration to retry its execution, click your trigger, and then Flow Retry.
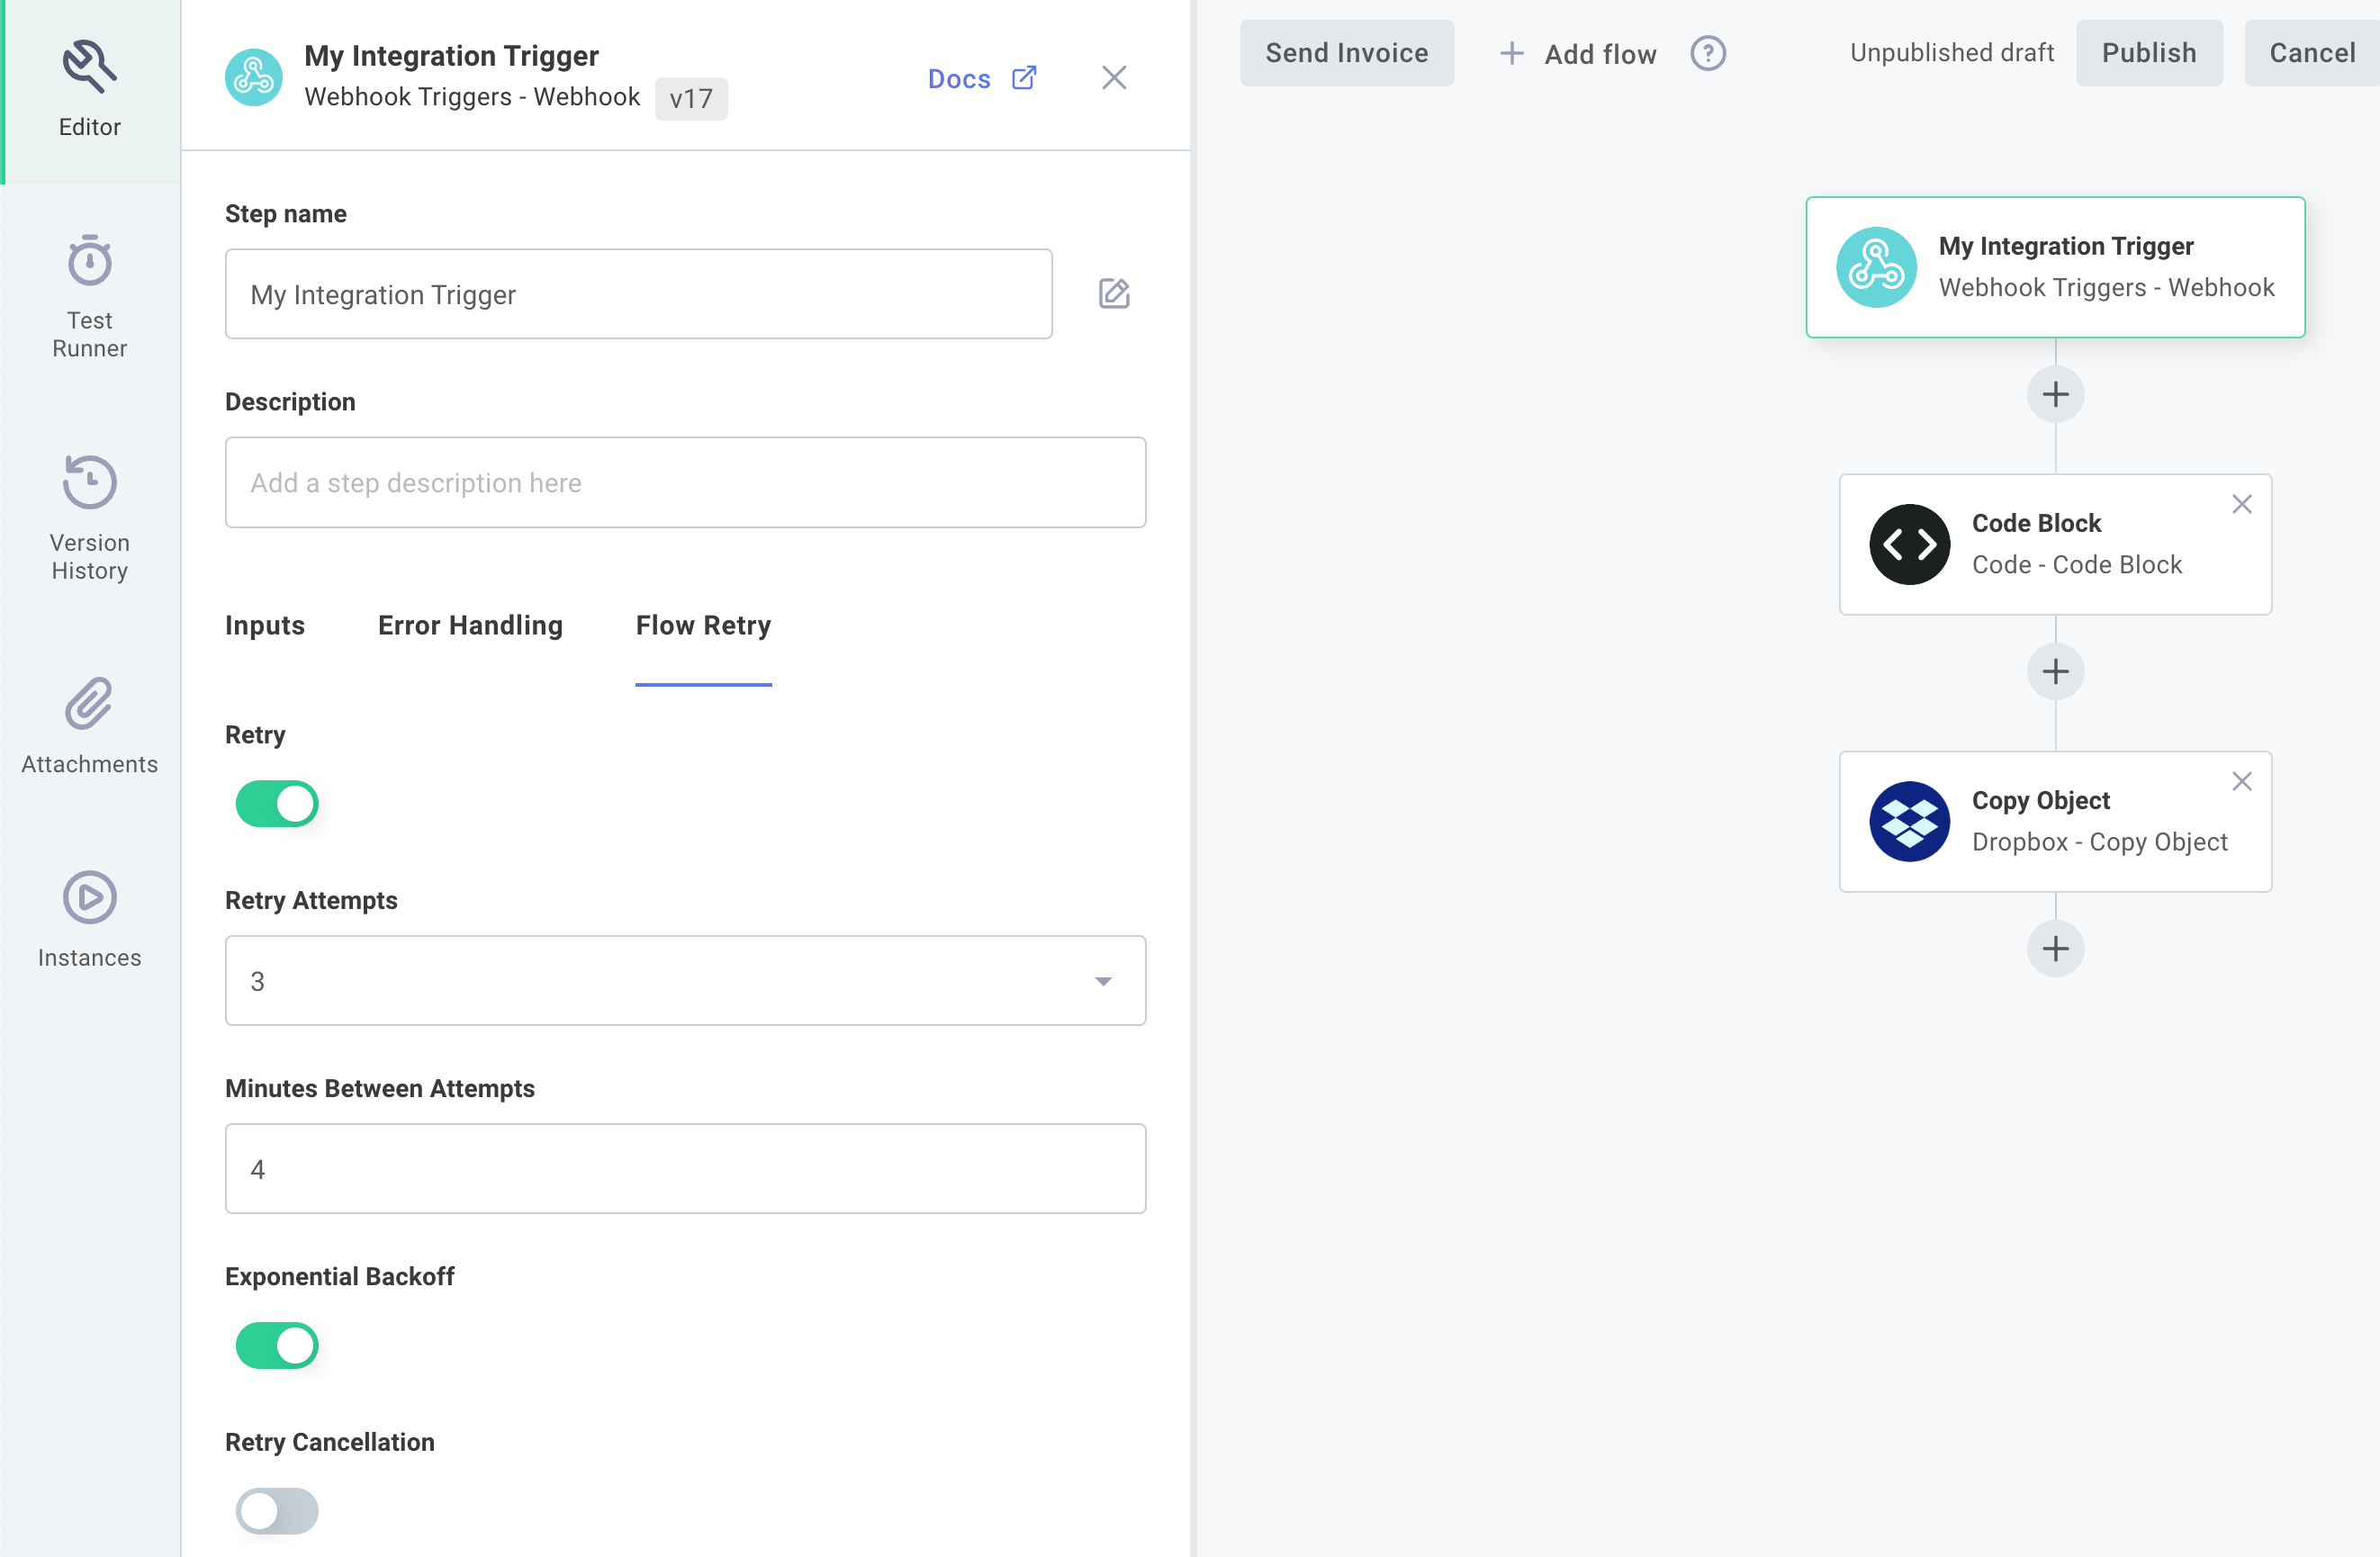
Retry Attempts indicates the maximum number of times (up to 5) that Builder will run the same instance invocation in the event of failure. If an instance has failed more than Retry Attempts number of times, the run will be marked as execution failed and relevant alert monitors, if configured, will fire.
Minutes Between Attempts indicates the number of minutes that Builder should wait before trying to run an instance again. If, for example, you specify 4 minutes, and the first instance invocation failed at 10:24, then the instance will attempt to run again at 10:28, 10:32, 10:36, 10:40 and 10:44 if it repeatedly fails to complete.
Note: Due to the nature of scheduled AWS Lambda functions, scheduled retries are precise to the minute (as opposed to to the second). So, an attempt that fails at 10:24 with a Minutes Between Attempts set to 4 might trigger next at 10:28 or 10:29.
If you have Exponential Backoff selected, your instance will wait a longer and longer time between attempted runs, using an exponential factor of 2. For example, if your Minutes Between Attempts is set to 3 and Exponential Backoff is set, then retry attempts will fire after 3, 6, 12, 24, and 48 minutes.
Note: The maximum amount of time an instance will take before retrying is 24 hours. If backoff is computed to wait more than 24 hours, it'll fire after waiting 24 hours instead.
Finally, Retry Cancellation gives you the ability to cancel a set of retry attempts if a more recent invocation of the instance has occurred. For example, if your integration takes a payload as part of its invocation and then updates some third party system with that payload data, you may want to cancel older invocations if newer data comes in. Otherwise, you may end up updating some third party system with newer data, and then the retry would overwrite the newer data with older data afterwards.
To configure retry cancellation, select a unique request ID from the trigger payload.
For example, you might pass in a header, x-my-unique-id: abc123 as part of your trigger payload.
If another invocation with that header comes in that updates resource abc123, you might want to cancel currently queued retries.
To do that, select your trigger's results.headers.results.headers.x-my-unique-id reference as your Unique Cancellation ID.
Cancellation IDs do not need to be headers. Instead, you can select a key from the payload body. For example, if your instance invocation looks like this:
curl 'https://hooks.us-east-2.elasticpathintegrations.com/trigger/EXAMPLE==' \
  --location \
  --header "Content-Type: application/json" \
  --data '{"productId":"abc123","price":"250","description":"A box of widgets"}'
You can key your unique cancellation ID off of results.body.data.productId.
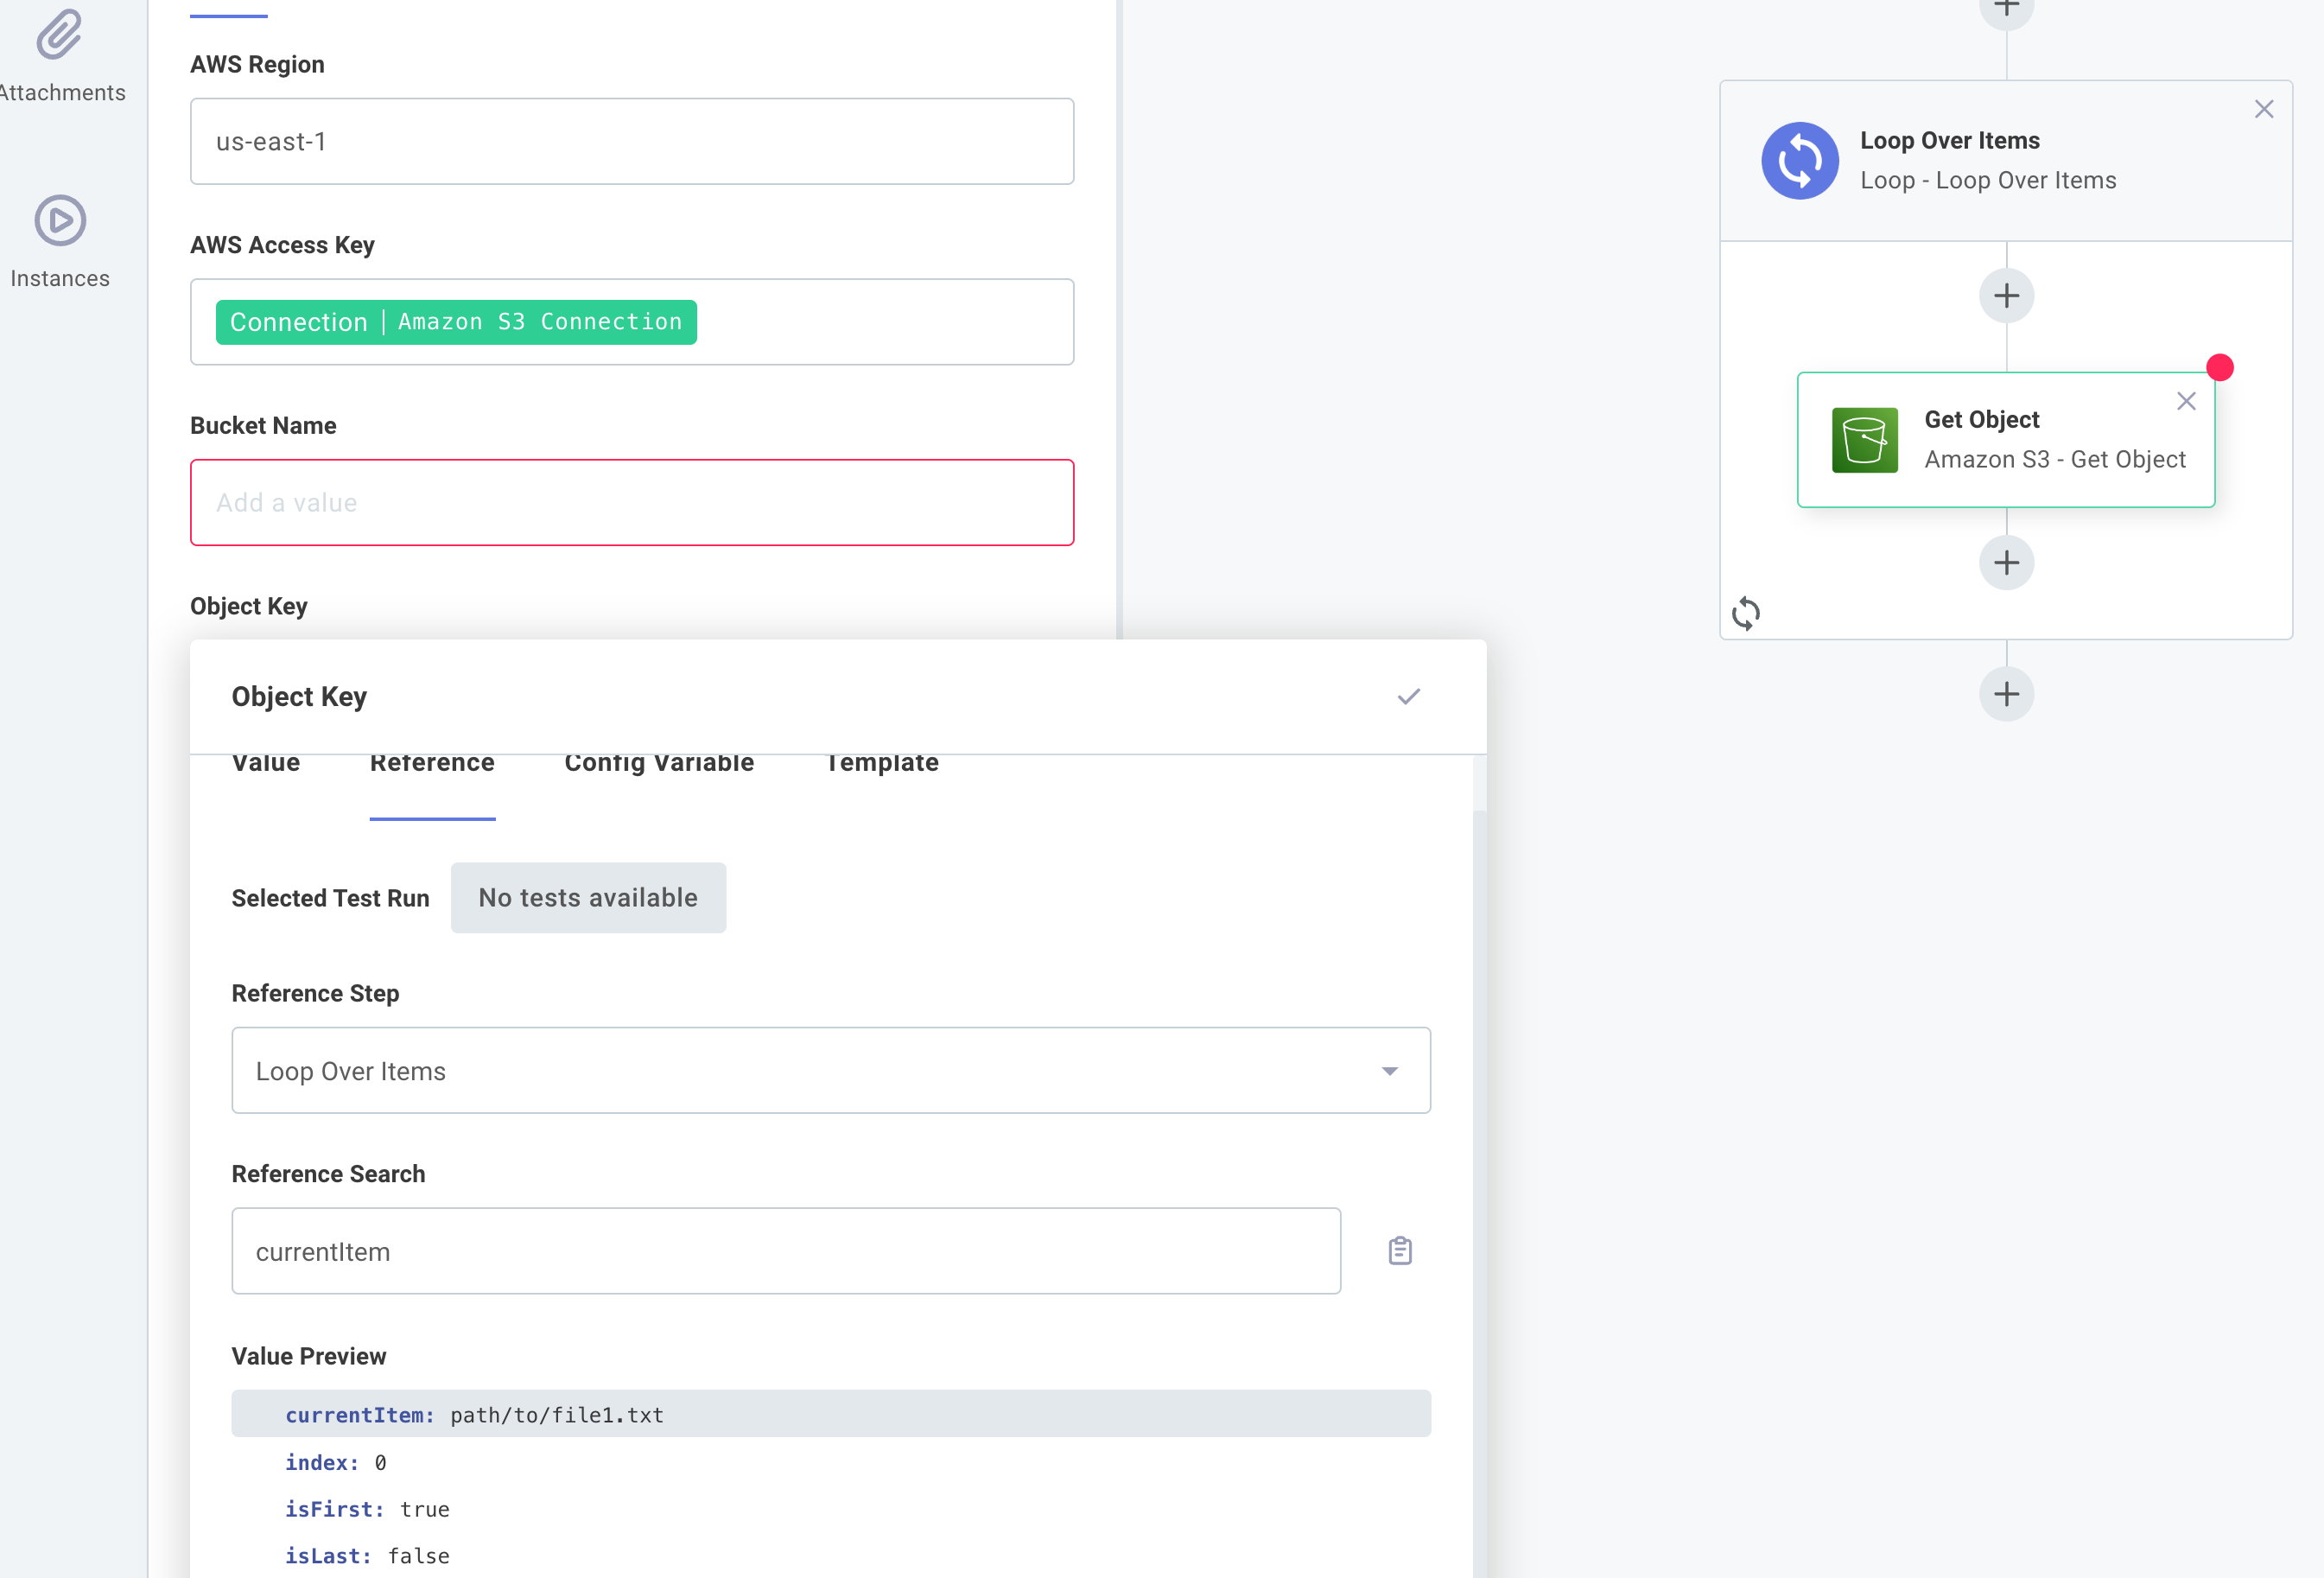
Looping
For many integrations it's handy to be able to loop over an array of items, or to loop a certain number of times. If your integration processes files on an SFTP server, for example, you might want to loop over an array of files on the server. If your integration sends alerts to users, you might want to loop over an array of users.
Builder provides the loop component to allow you to loop over an array of items, or you can loop a predetermined number of times. After adding a loop step to your integration, you can then add steps within the loop that will execute over and over again.
The loop components takes one input: a items. Items is an array - an array of numbers, strings, objects, etc. For example, one step might generate an array of files that your integration needs to process. Its output might look like this:
[
  "path/to/file1.txt",
  "path/to/file2.txt",
  "path/to/file3.txt",
  "path/to/file4.txt"
]
The loop component can then be configured to loop over those files by referencing the results of the list files step:
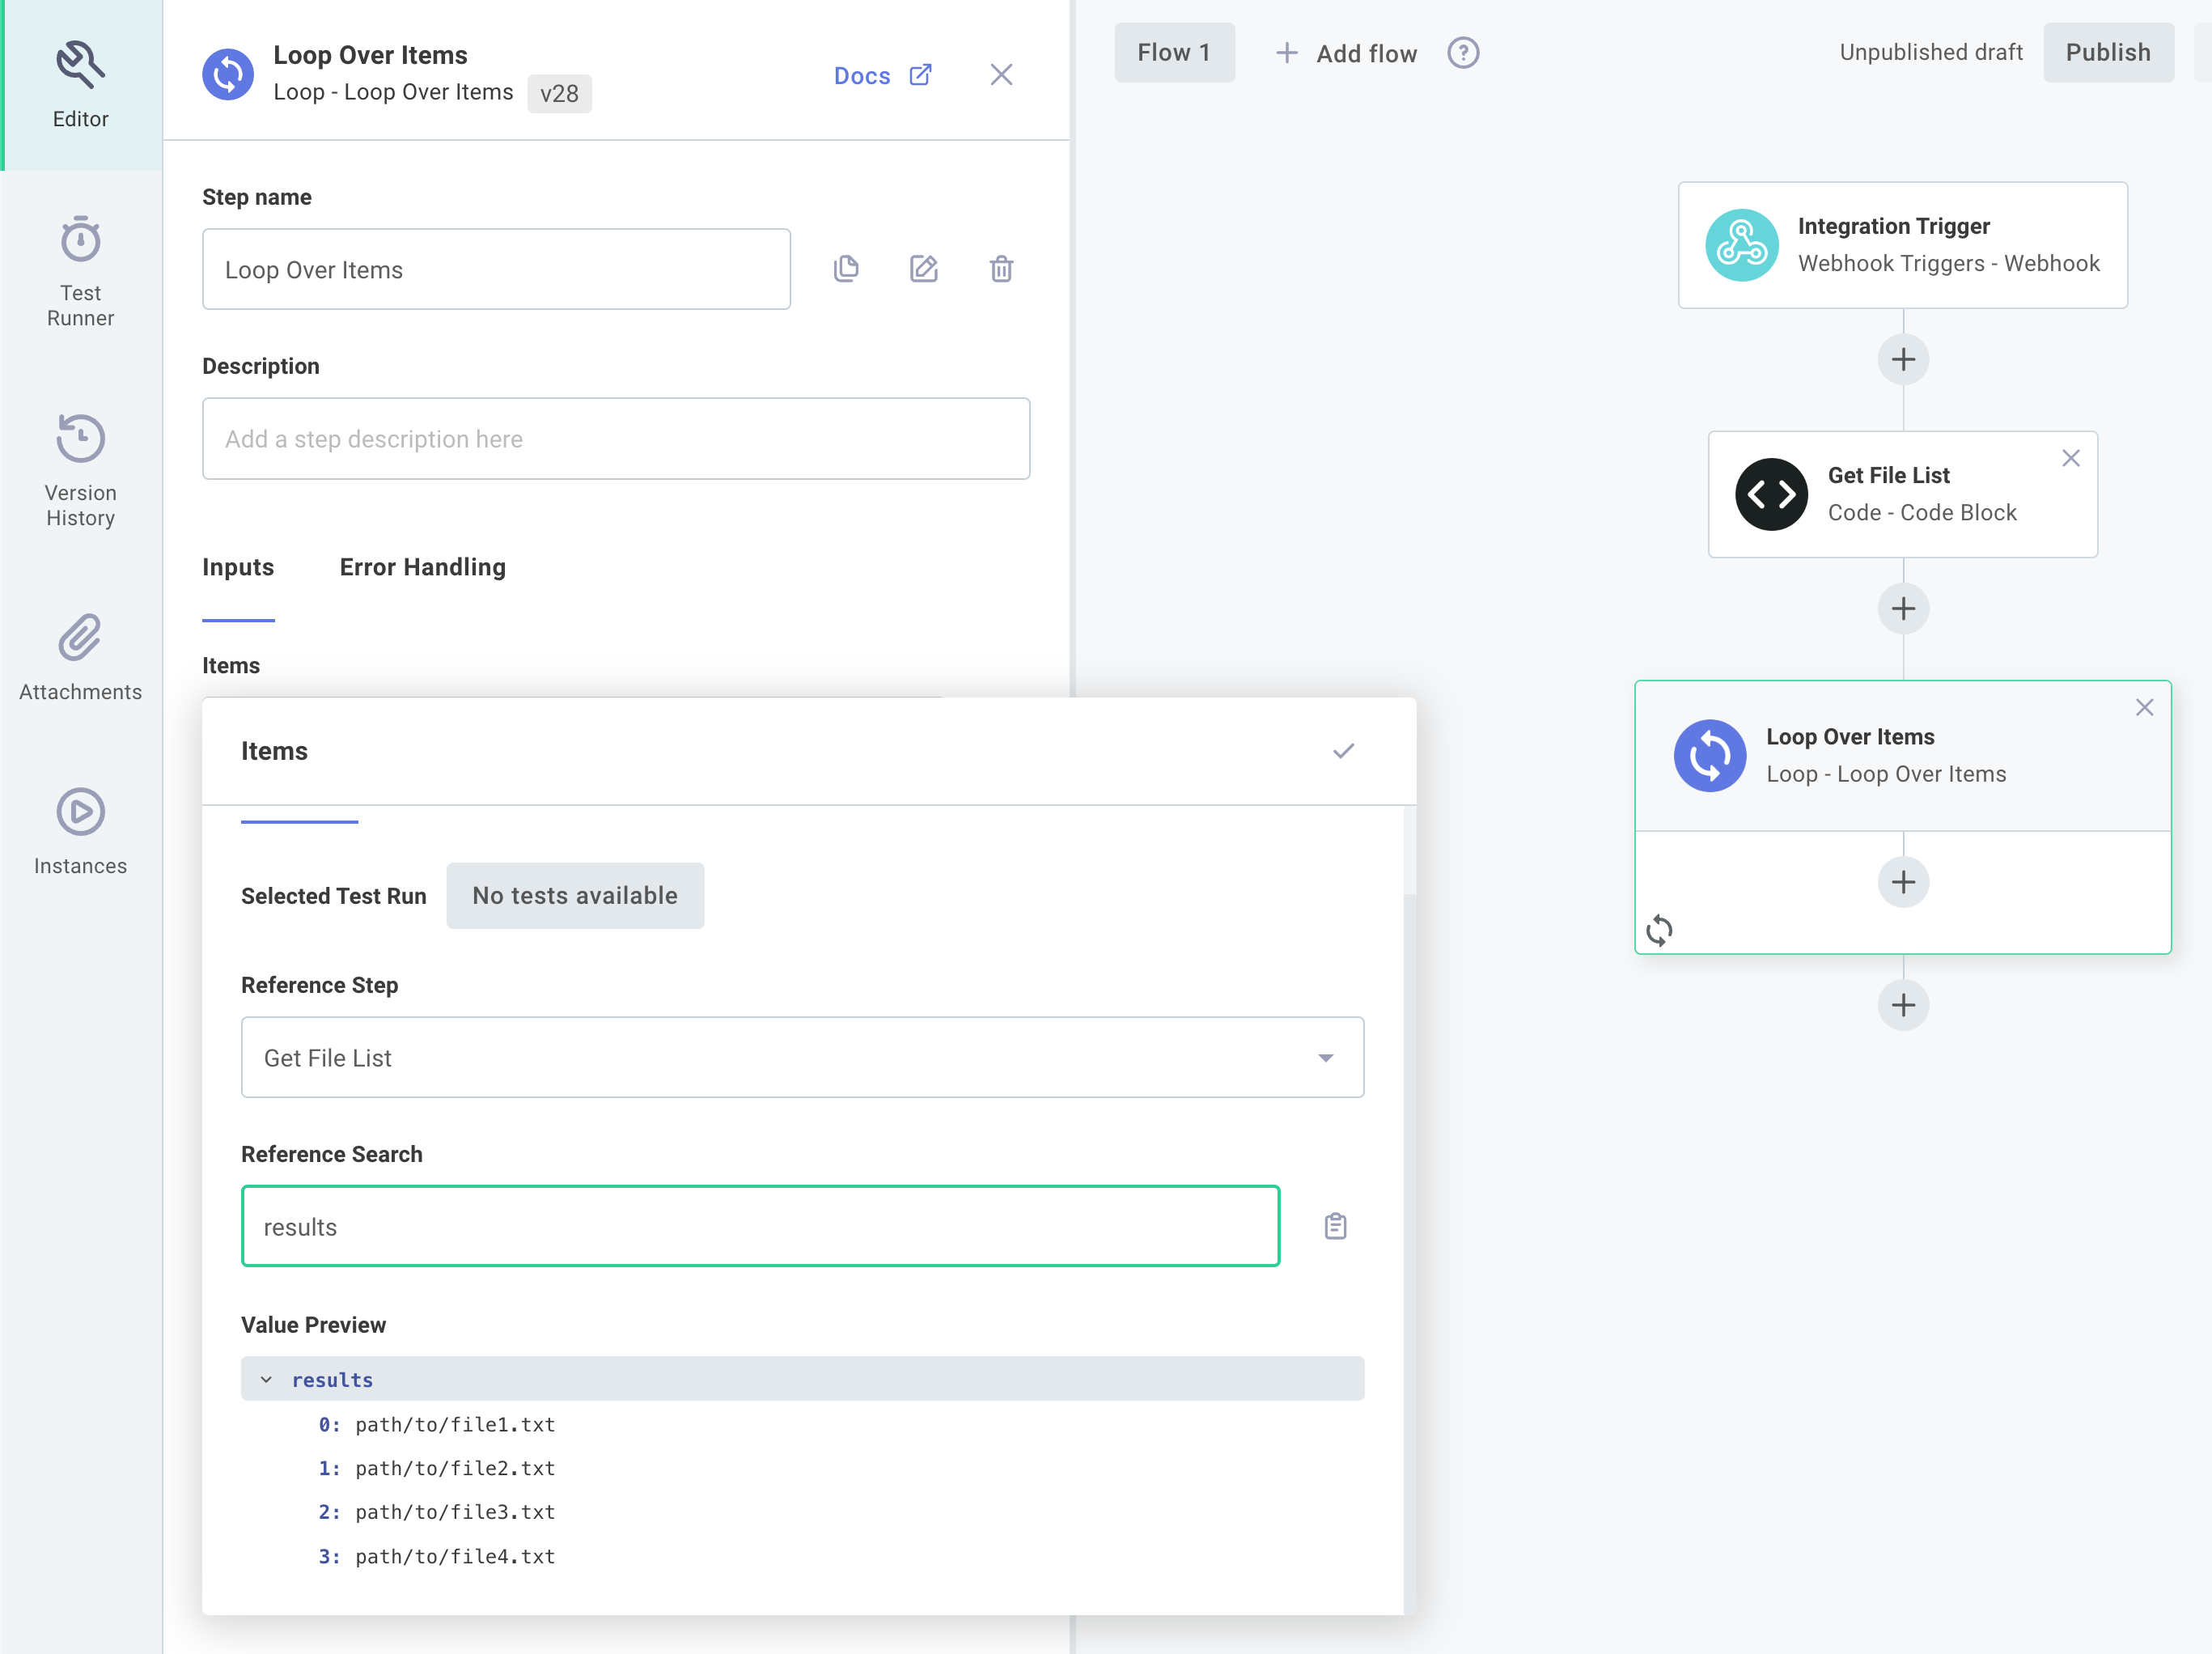
Subsequent steps can reference the loop step's currentItem and index parameters to get values like path/to/file3.txt and 2 respectively:
For More Information: The Loop Component Looping Over Files Quickstart Looping Over a Paginated API
Looping over lists of objects
The list of objects passed into a loop component can be as simple or complex as you like.
In this example, if we have a loop named Loop Over Users, and the loop was presented items in the form:
[
  {
    "name": "Bob Smith",
    "email": "bob.smith@example.com"
  },
  {
    "name": "Sally Smith",
    "email": "sally.smith@example.com"
  }
]
Then the loop will iterate twice - once for each object in the list, and we can write a code component that accesses the loop's currentItem and index values and sub-properties of currentItem like this:
module.exports = async (
  { logger },
  { loopOverUsers: { currentItem, index } }
) => {
  logger.info(`User #${index + 1}: ${currentItem.name} - ${currentItem.email}`);
};
That will log lines like User #1: Bob Smith - bob.smith@example.com.
Looping over a paginated API
Many third-party APIs limit the number of records you can fetch at once, and let you load a batch (or "page") of records at a time. You may need to loop over an unknown number of pages of records in an integration.
You can accomplish that with a combination of two loops (one to loop over pages, and one to loop over records on each page) and a break loop action that stops loading pages when there are no more left to load:
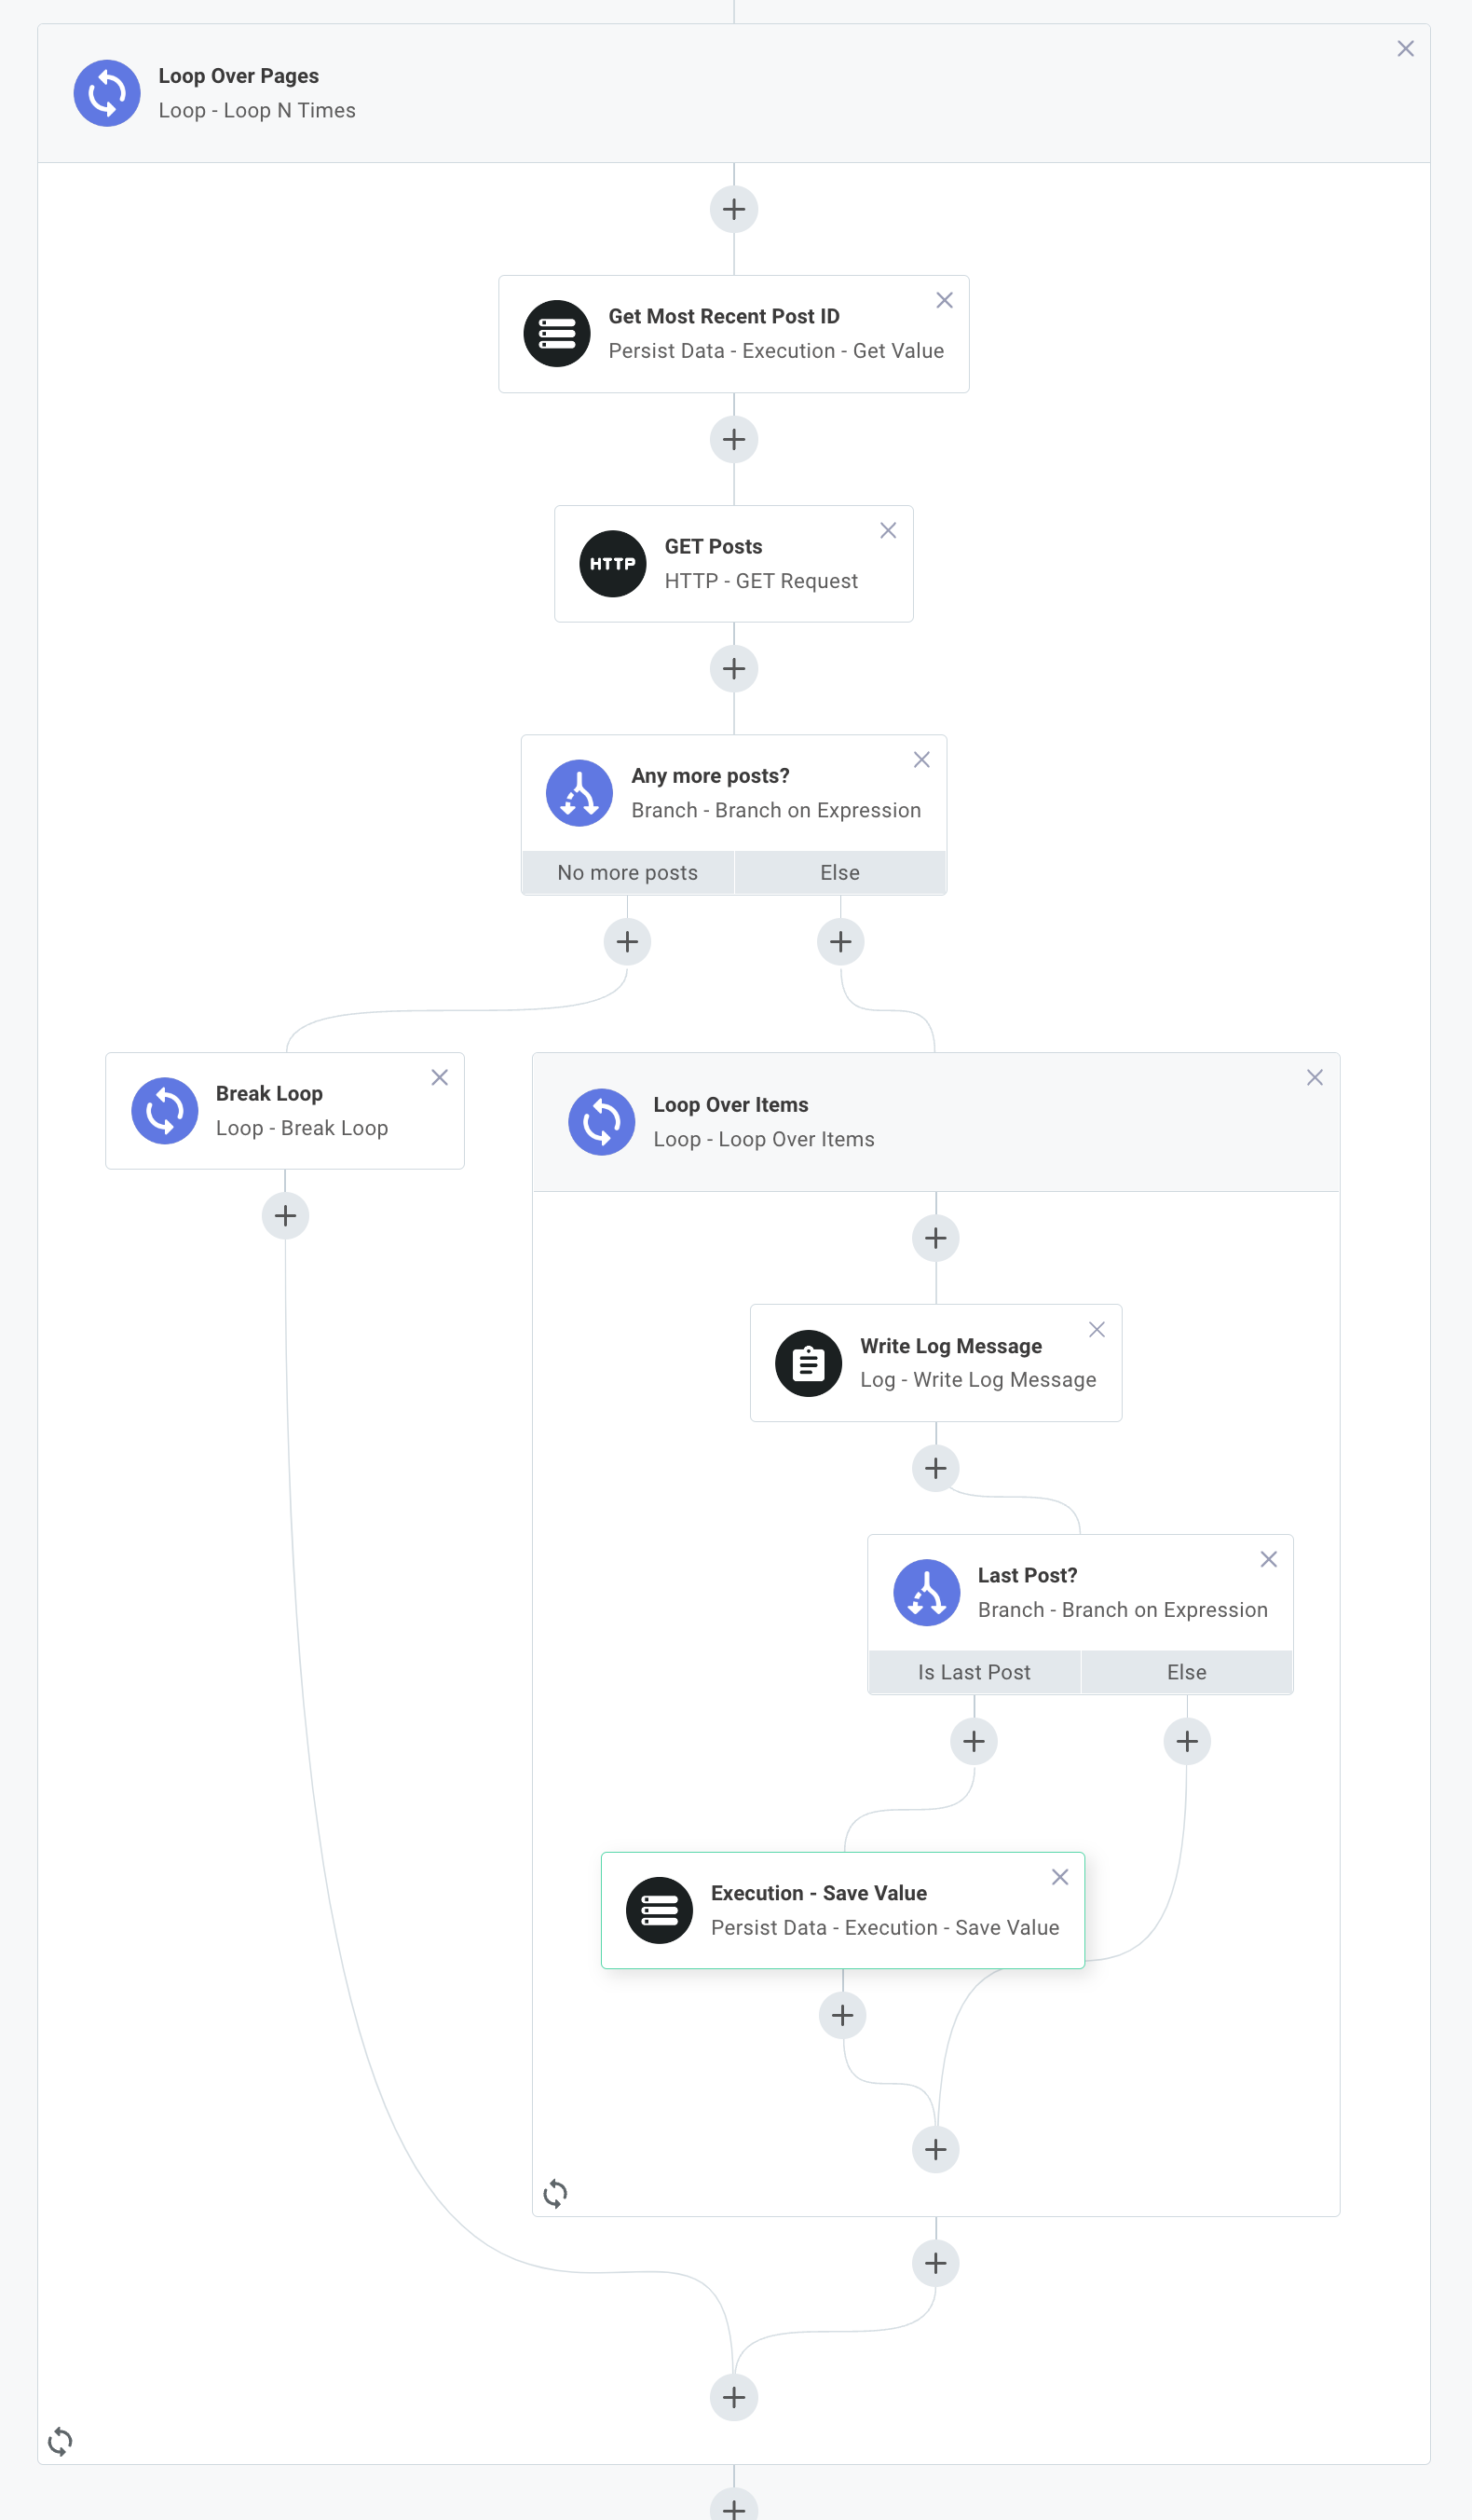
Please reference this quickstart for an example of how to loop over a paginated API.
Return values of loops
A loop will collect the results of the last step within the loop, and will save those results as an array. For example, if the loop is presented the list of JSON-formatted user objects above, and the last step in the loop is a code component reading:
module.exports = async(context, loopOverUsers: { currentItem }) => {
    return {data: `Processed ${currentItem.email}`}
}
Then the result of the loop will yield:
["Processed bob.smith@example.com", "Processed sally.smith@example.com"]
Branching
The branch component allows you to add branching logic to your integration. Think of branches as logical paths that your integration can take. Given some information about config variables or step results, your integration can follow one of many paths.
Branch actions are handy when you need to conditionally execute some steps. Here are a couple of examples of things you can accomplish with branching:
Example 1: The webhook request your integration receives could contain an "Order Created", "Order Updated" or "Order Deleted" payload. You need to branch accordingly.
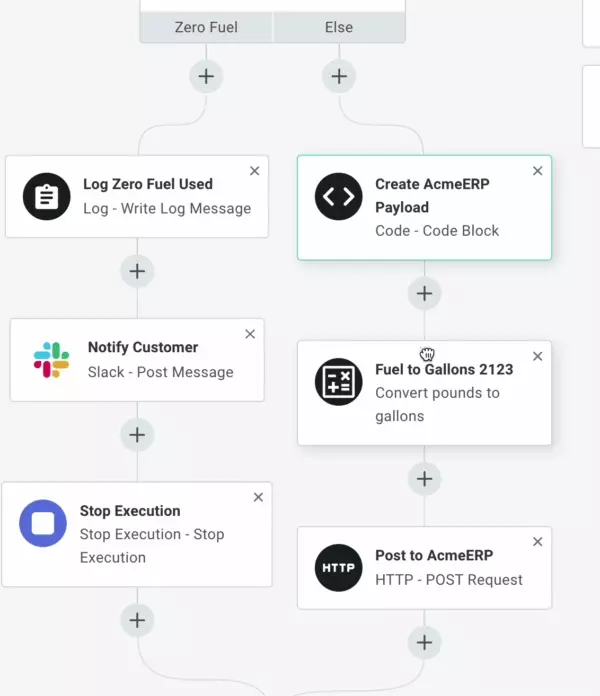
Example 2: Your users want to be alerted when rocket fuel level is below a certain threshold. You can branch into "send an alert" and "fuel level is okay" branches depending on results of a "check rocket fuel level" step.
Example 3: You want to upsert data into a system that doesn't support upserting. You can check if a record exists, and branch into "add a new record" or "update the existing record" branches depending on if the record exists.
For More Information: The Branch Component
Branching on a value
Adding a Branch on Value action to your integration allows you to create a set of branches based on the value of some particular variable. It's very similar to the switch/case construct present in many programming languages.
Consider Example 1 above.
Suppose the webhook request you receive has a header, payload-type that can be one of three values: order-create, order-update or order-delete.
You can look at that value and branch accordingly.
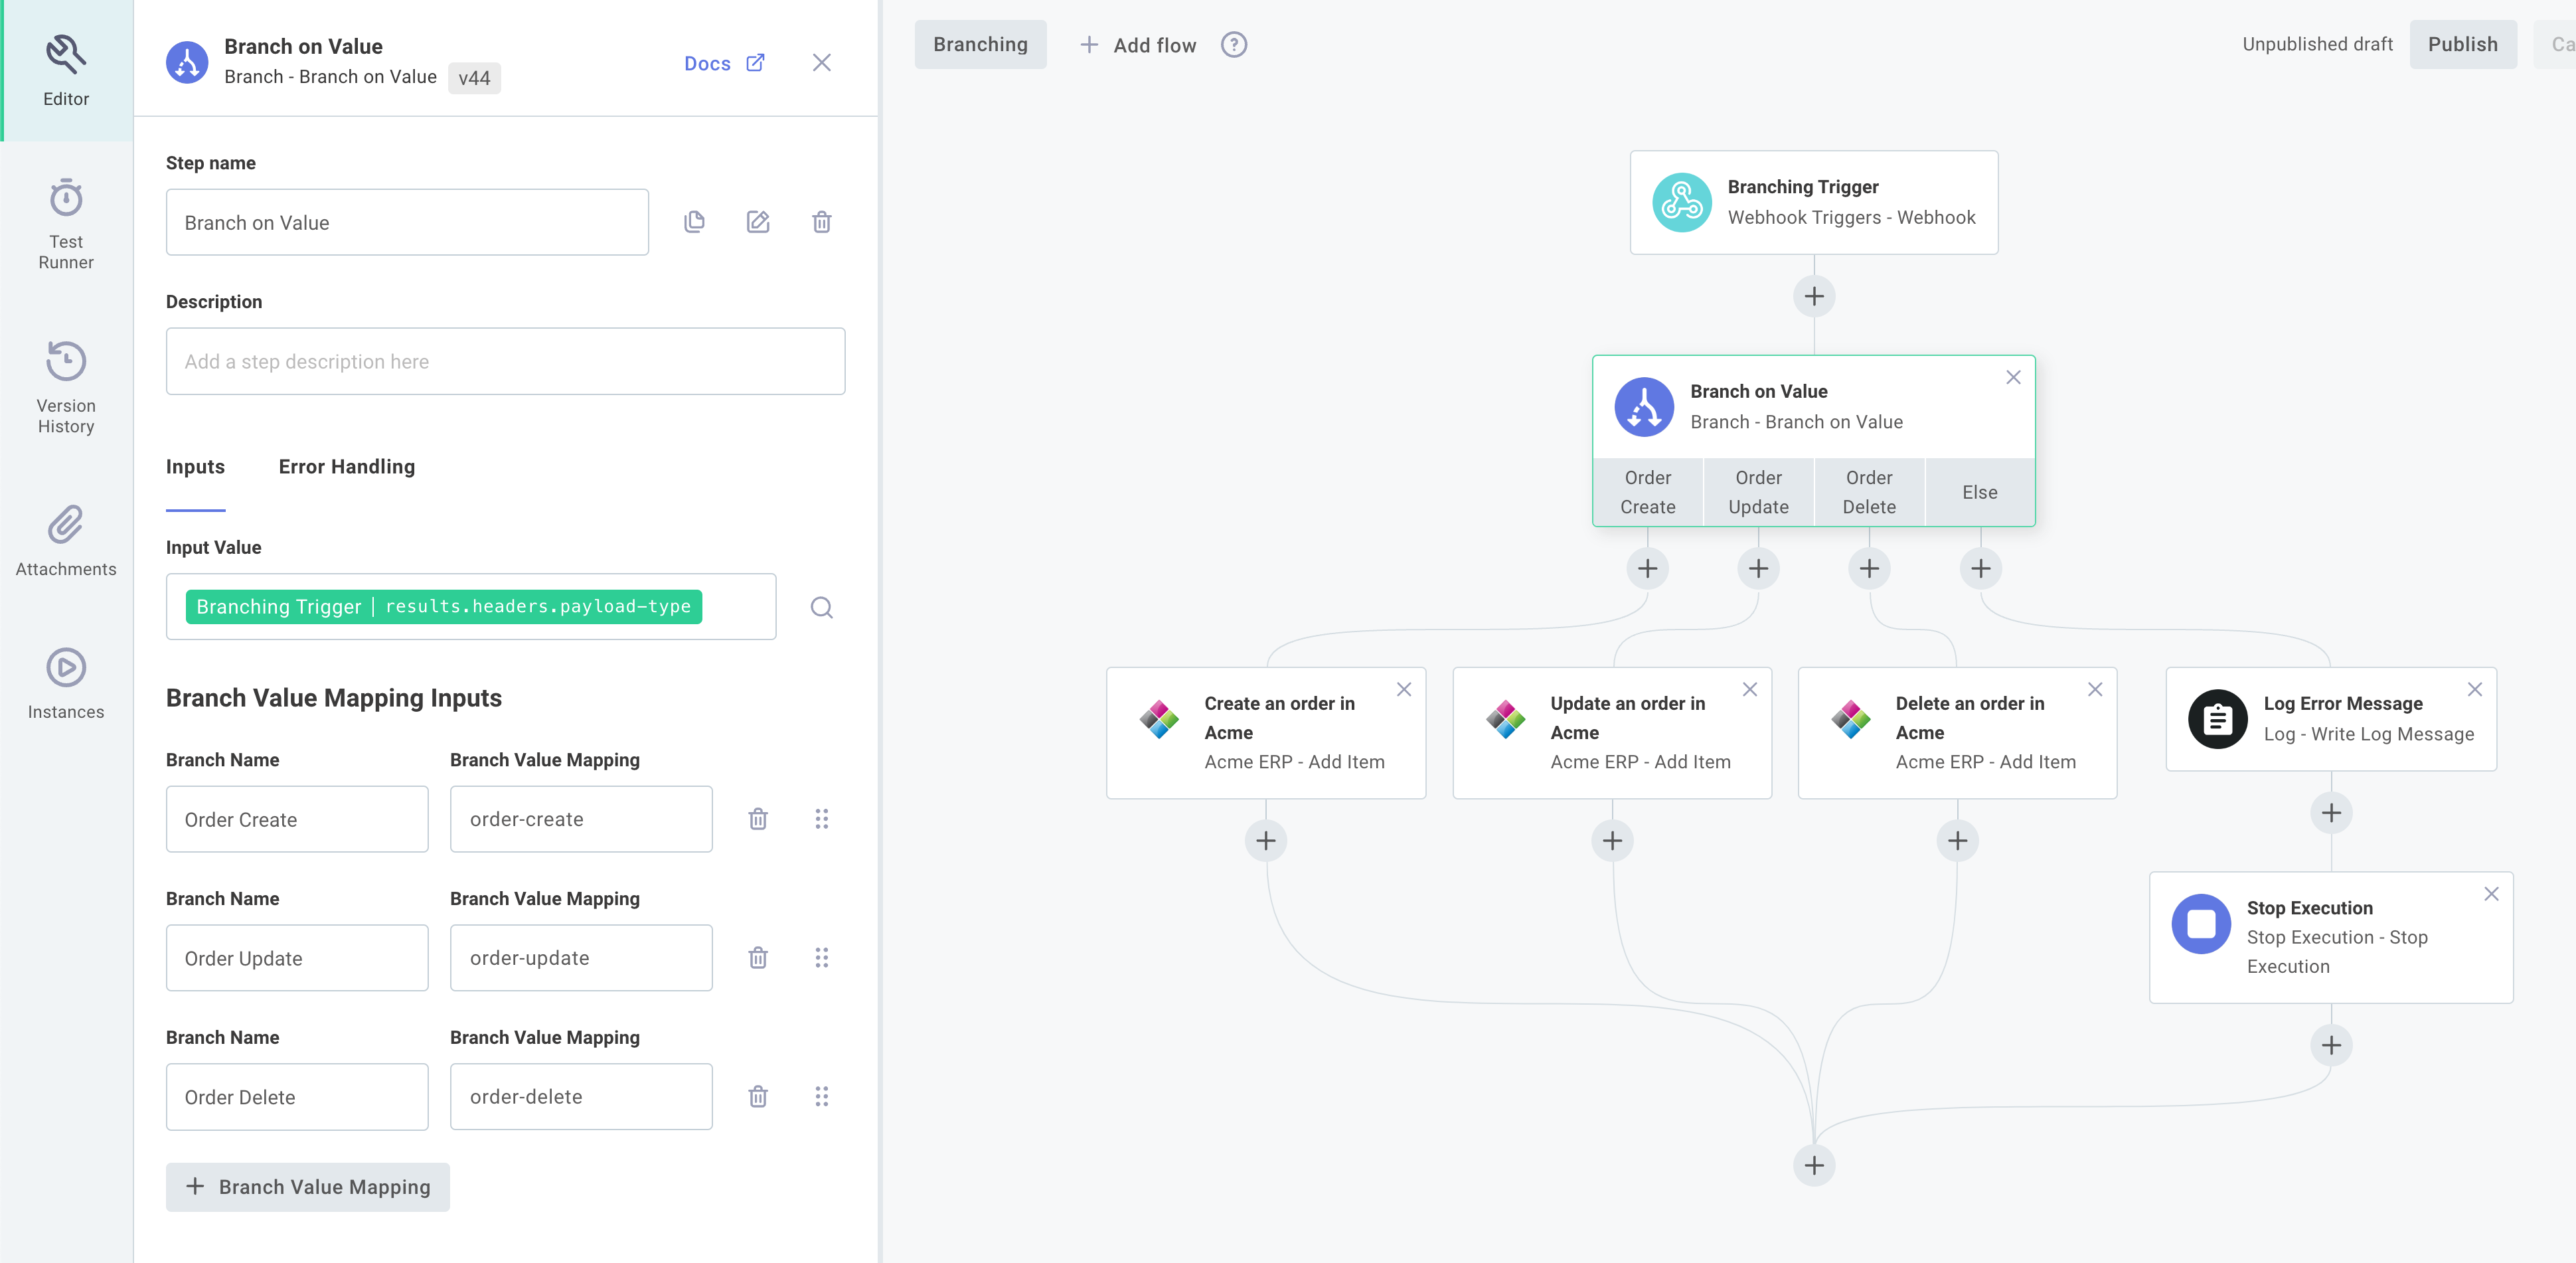
For More Information: Branch on Value Action
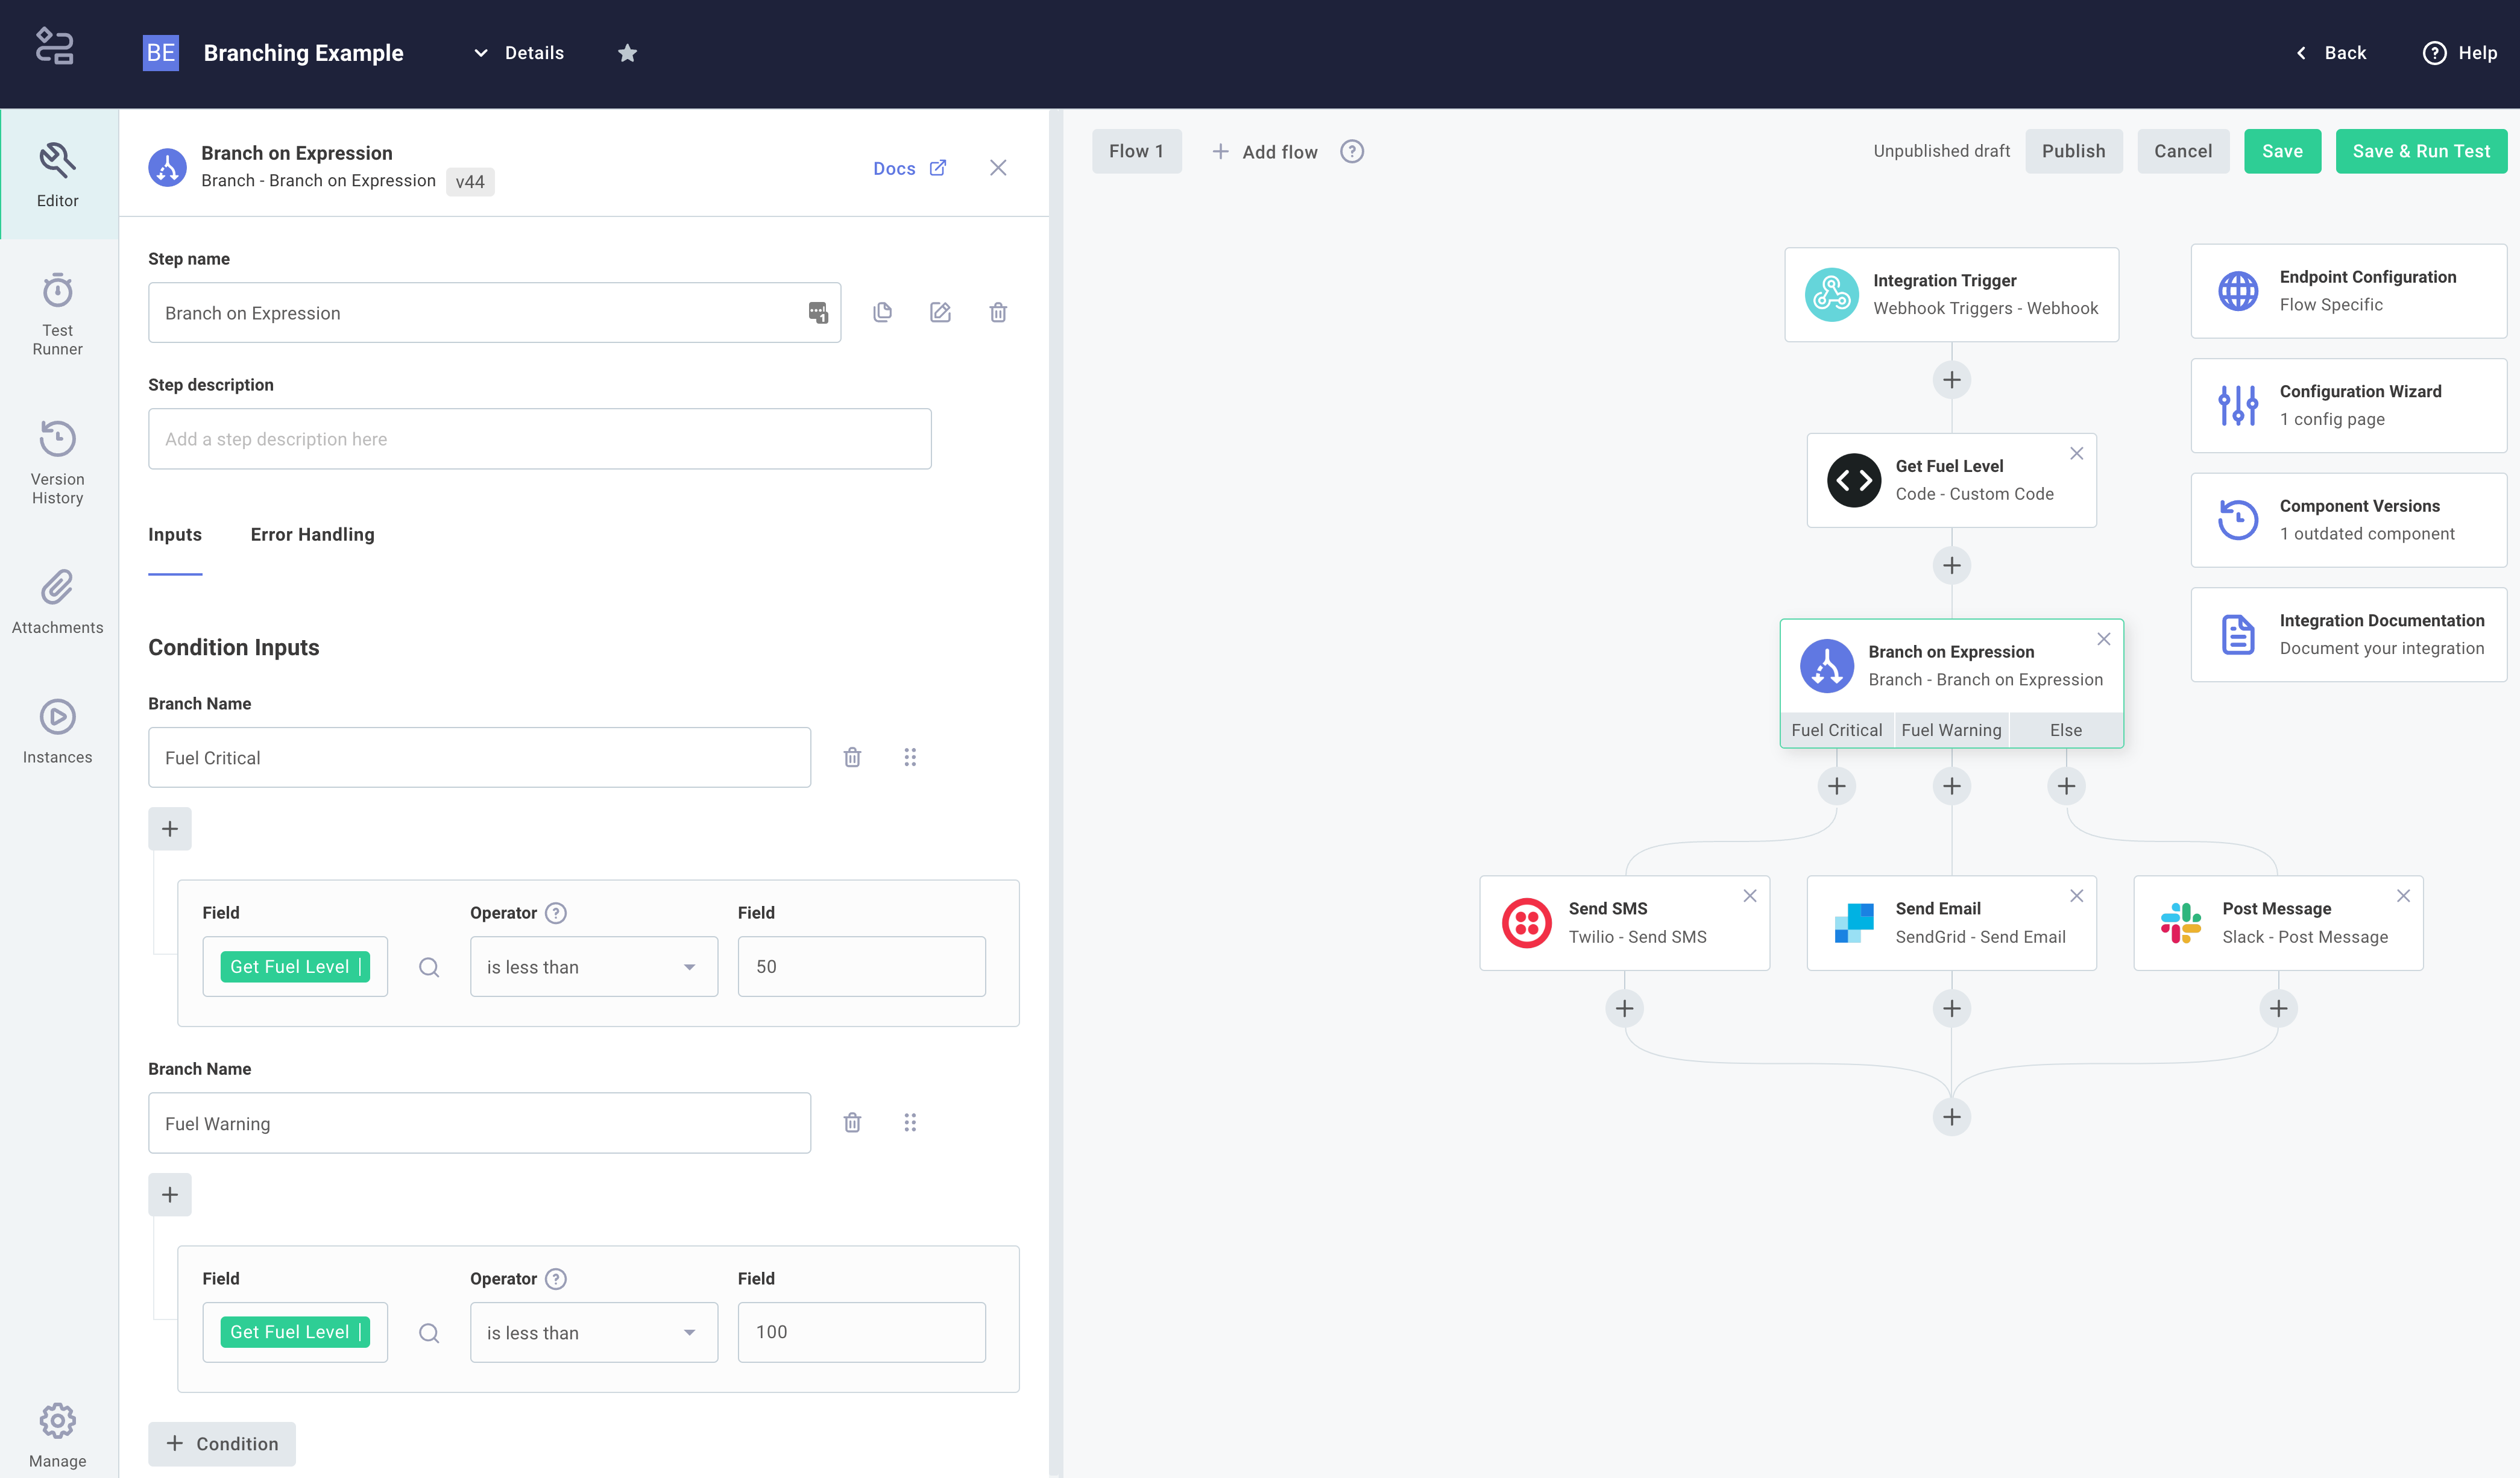
Branching on an expression
The Branch on Expression action allows you to create branches within your integration based on more complex inputs. You can compare values, like config variables, step results, or static values, and follow a branch based on the results of the comparisons.
Consider Example 2 above. You have a step that checks rocket fuel level, and you want to alert users in different ways if their fuel levels are low. You can express this problem with some pseudocode:
if fuelLevel < 50:
    sendAnSMS()
else if fuelLevel < 100:
    sendAnEmail()
else:
    doNothing()
To express this pseudocode in an integration, add a step that looks up rocket fuel level. Then, add a Branch on an Expression action to your integration.
Create one branch named Fuel Critical, and under Condition Inputs check that results of the fuel level check step is less than 50.
Then, create another branch named Fuel warning and check that results of the fuel level check step is less than 100.
This will generate a branching step that will execute the branch Send Alert SMS if fuel levels are less than 50, Send Warning Email if fuel levels are less than 100, or will follow the Else branch if fuel levels are 100 or above.
Branch on expression operators
You can compare config variables, results from previous steps, or static values to one another using a variety of comparison operators.
These operators each evaluate to true or false, and can be chained together with And and Or clauses.
-
The equal operator evaluates if two fields are equal to one another, regardless of type.
Left Field Right Field Result Comments 5.25.2true5.25false"5.2"5.2trueStrings are cast to numbers when compared to numbers "Hello""Hello"true"Hello""hello"falseString comparison is case-sensitive false0trueBoolean falseevaluates to0, andtrueevaluates to1.[1,2,3][1,2,3]trueArrays whose elements are the same are considered equal {"foo":"bar"}{"foo":"bar"}trueObjects with the same keys/values are equal -
The does not equal operator evaluates if two fields are not equal to one another, regardless of type.
Left Field Right Field Result 5.35.2true [1,2,3][1,2,4]true -
The is greater than operator evaluates if the left field is greater than the right field, and is an implementation of the JavaScript greater than operator.
Left Field Right Field Result Comments 5.25.3false5.35.3falseThe values are equal; one is not greater than the other "5.3"5.2trueStrings are cast to numbers when compared to numbers "Hello""World"falseStrings are compared alphabetically - "Hello"does not occur after"World""hello""World"trueThe ASCII value for "h"occurs after"W"truefalsetruetrue(1) is greater thanfalse(0) -
The is greater than or equal to operator is similar to is greater than, but also returns true if the values being compared are equal to one another.
Left Field Right Field Result Comments 5.3"5.3"trueStrings are cast to numbers when compared to numbers -
The is less than operator evaluates if the left field is less than the right field.
Left Field Right Field Result Comments 34true"abc""daa"true"a"is less than"d"alphabetically -
The is less than or equal to operator is similar to is less than, but also returns true if the values being compared are equal to one another.
-
The contained in operator evaluates if the value of the left field is contained in the right field. The right field must be an array or a string.
Left Field Right Field Result Comments "world""Hello, world!"true"World""Hello, world!"falseString comparison is case-sensitive 2[1,2,3]true"2"[1,2,3]falseThe string "2"does not occur in the array of numbers[1,2,3] -
The not contained in operator evaluates if the value of the left field does not appear in the right field.
Left Field Right Field Result 2[1,2,3]false'Hi''Hello'true -
The is empty operator evaluates if the given value is an empty string or an empty array.
Field Result ""true"hello"false[]true[1,2,3]false -
The exactly matches operator evaluates if the two fields are equal to one another, taking type of the values into consideration.
Left Field Right Field Result Comments "5"5falseThe string "5"is not equal to the number5 -
The does not exactly match operator evaluates if the if the two fields are not equal to one another, taking type of the values into consideration.
Left Field Right Field Result Comments "5"5trueThe string "5"is not equal to the number5 -
The starts with operator evaluates if the the right field's value begins with the left field's value. Both right and left values must be strings.
Left Field Right Field Result Comments "Test""Testing Value"true"test""Testing Value"falseComparisons are case-sensitive "Test""A Testing Value"falseThe right field must start with (not contain) the left value -
The does not start with operator returns the opposite of the starts with operator.
-
The ends with operator evaluates if the right field ends with the left field. Both right and left values must be strings.
Left Field Right Field Result orld!Hello, World!trueorldHello, World!false -
The does not end with operator returns the opposite of the ends with operator.
noteThe following three comparison operators accept date/times as strings in these three formats:
YYYY,YYYY-MM-DD,YYYY-MM-DDTHH:mm:ssZ[Z]. Additionally, UNIX epoch timestamps in milliseconds are accepted (for example, the number1631568050represents a time in 2021-09-13). -
The is after (date/time) operator attempts to parse the left and right fields as dates, and evaluates if the left field occurs after the right field.
Left Field Right Field Result Comments "2021-03-20""2021-04-13"false"2021-03-20T12:50:30.105Z""2021-03-20T11:52:21.881Z"trueWhen dates are equivalent, time is compared "2021-03-20"1631568050false1631568050is the UNIX epoch time for 2021-09-13, which occurs after 2021-03-05 -
The is before (date/time) operator attempts to parse the left and right fields as dates, and evaluates if the left field occurs before the right field.
-
The is the same (date/time) operator attempts to parse the left and right fields as dates, and evaluates if the timestamps are identical.
Left Field Right Field Result Comments "2021-03-20T12:50:30.105Z""2021-03-20T12:50:30.105Z"true"2021-03-20T12:50:30Z"1616244630000true1616244630is the millisecond UNIX epoch representation ofMarch 20, 2021 12:50:30"2021-03-20T12:50:30Z""2021-03-20T12:50:31Z"false -
The is true operator evaluates if an input field is "truthy".
Common "truthy" values include
true,"true","True","Yes","yes","Y"and"y".Common "falsy" values include
false,"false","False","No","no","N"and"n"and evaluate tofalse. Other values that evaluate tofalseare0,null,undefined,NaNand"".All other values (a non-zero number, a non-empty string, any array or object, etc.) evaluates to
true.Field Result "Yes"true"True"true[]true{}true"Hello"true-5true"n"falsefalsefalse""falsenullfalse0false -
The is false operator returns the opposite of the is true operator.
-
The does not exist operator evaluates to
trueif the presented value is one of the following:undefined,null,0,NaN,falseor"".Field Result undefinedtrueNaNtrue1false"Hello"false -
The exists operator returns the opposite of the
does not existoperator.
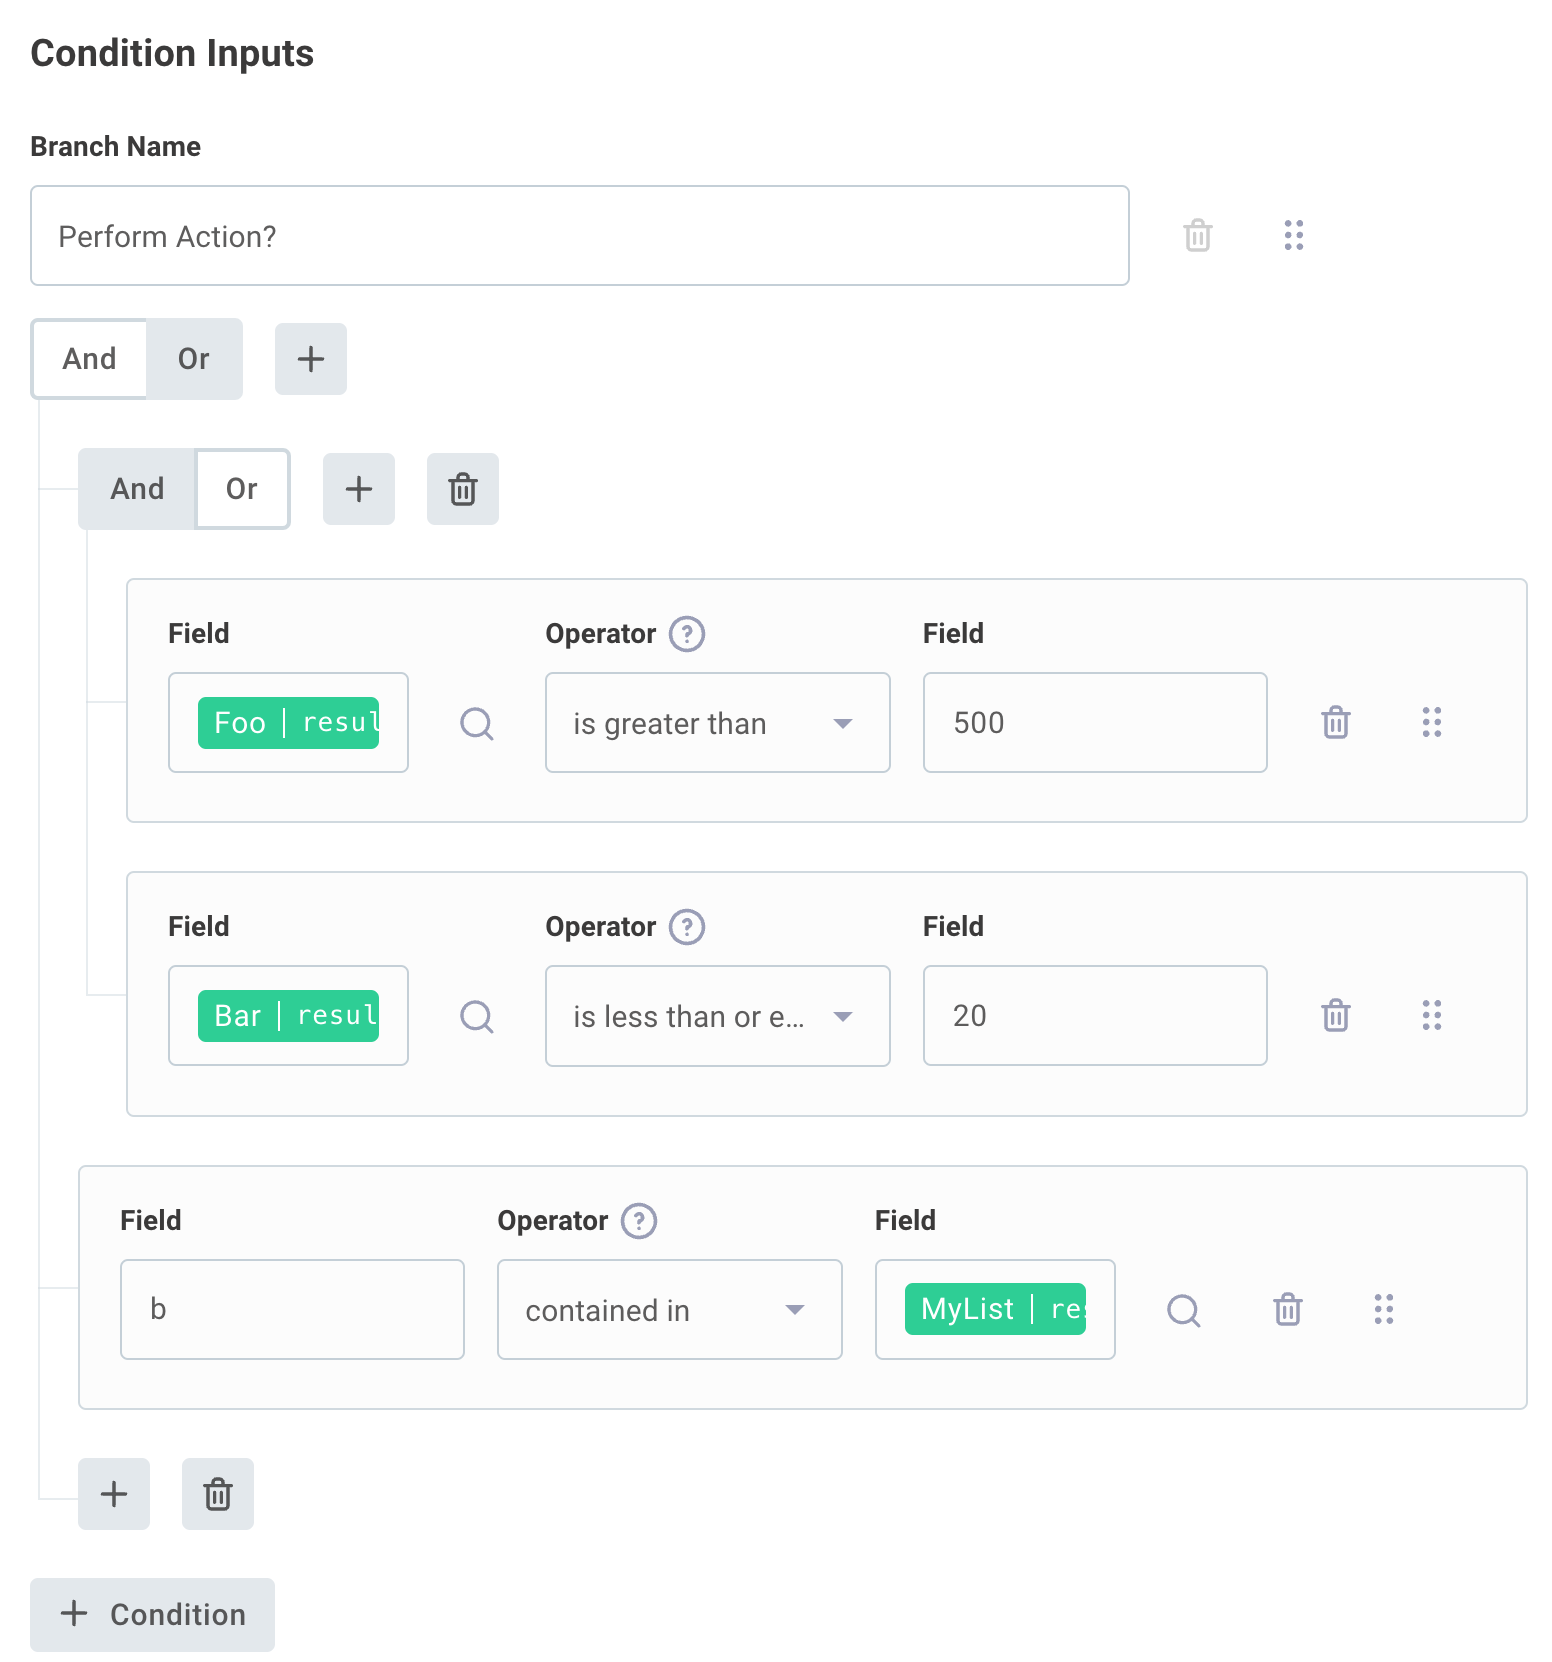
Combining multiple comparison operators
Multiple expressions can be grouped together with And or Or clauses, which execute like programming and and or clauses. Take, for example, this programming expression:
if ((foo > 500 and bar <= 20) or ("b" in ["a","b","c"]))
The same logic can be represented with a group of conditionals in a Branch on Expression action:
Converging branches
Regardless of which branch is followed, branches always converge to a single point. Once a branch has executed, the integration will continue with the next step listed below the branch convergence.
This presents a problem: how do steps below the convergence reference steps in branches that may or may not have executed (depending on which branch was followed)? In your integration you may want to say "if branch foo was executed, get the results from step A, and if branch bar was executed, get the results instead from step B." Builder provides the Select Executed Step Result to handle that scenario.
Imagine that you have two branches - one for incoming invoices, and one for outgoing invoices, with different logic contained in each. Regardless of which branch was executed, you'd like to insert the resulting data into an ERP. You can leverage the Select Executed Step Result action to say "get me the incoming or outgoing invoice - whichever one was executed."
This action iterates over the list of step results that you specify, and returns the first one that has a non-null value (which indicates that it ran).
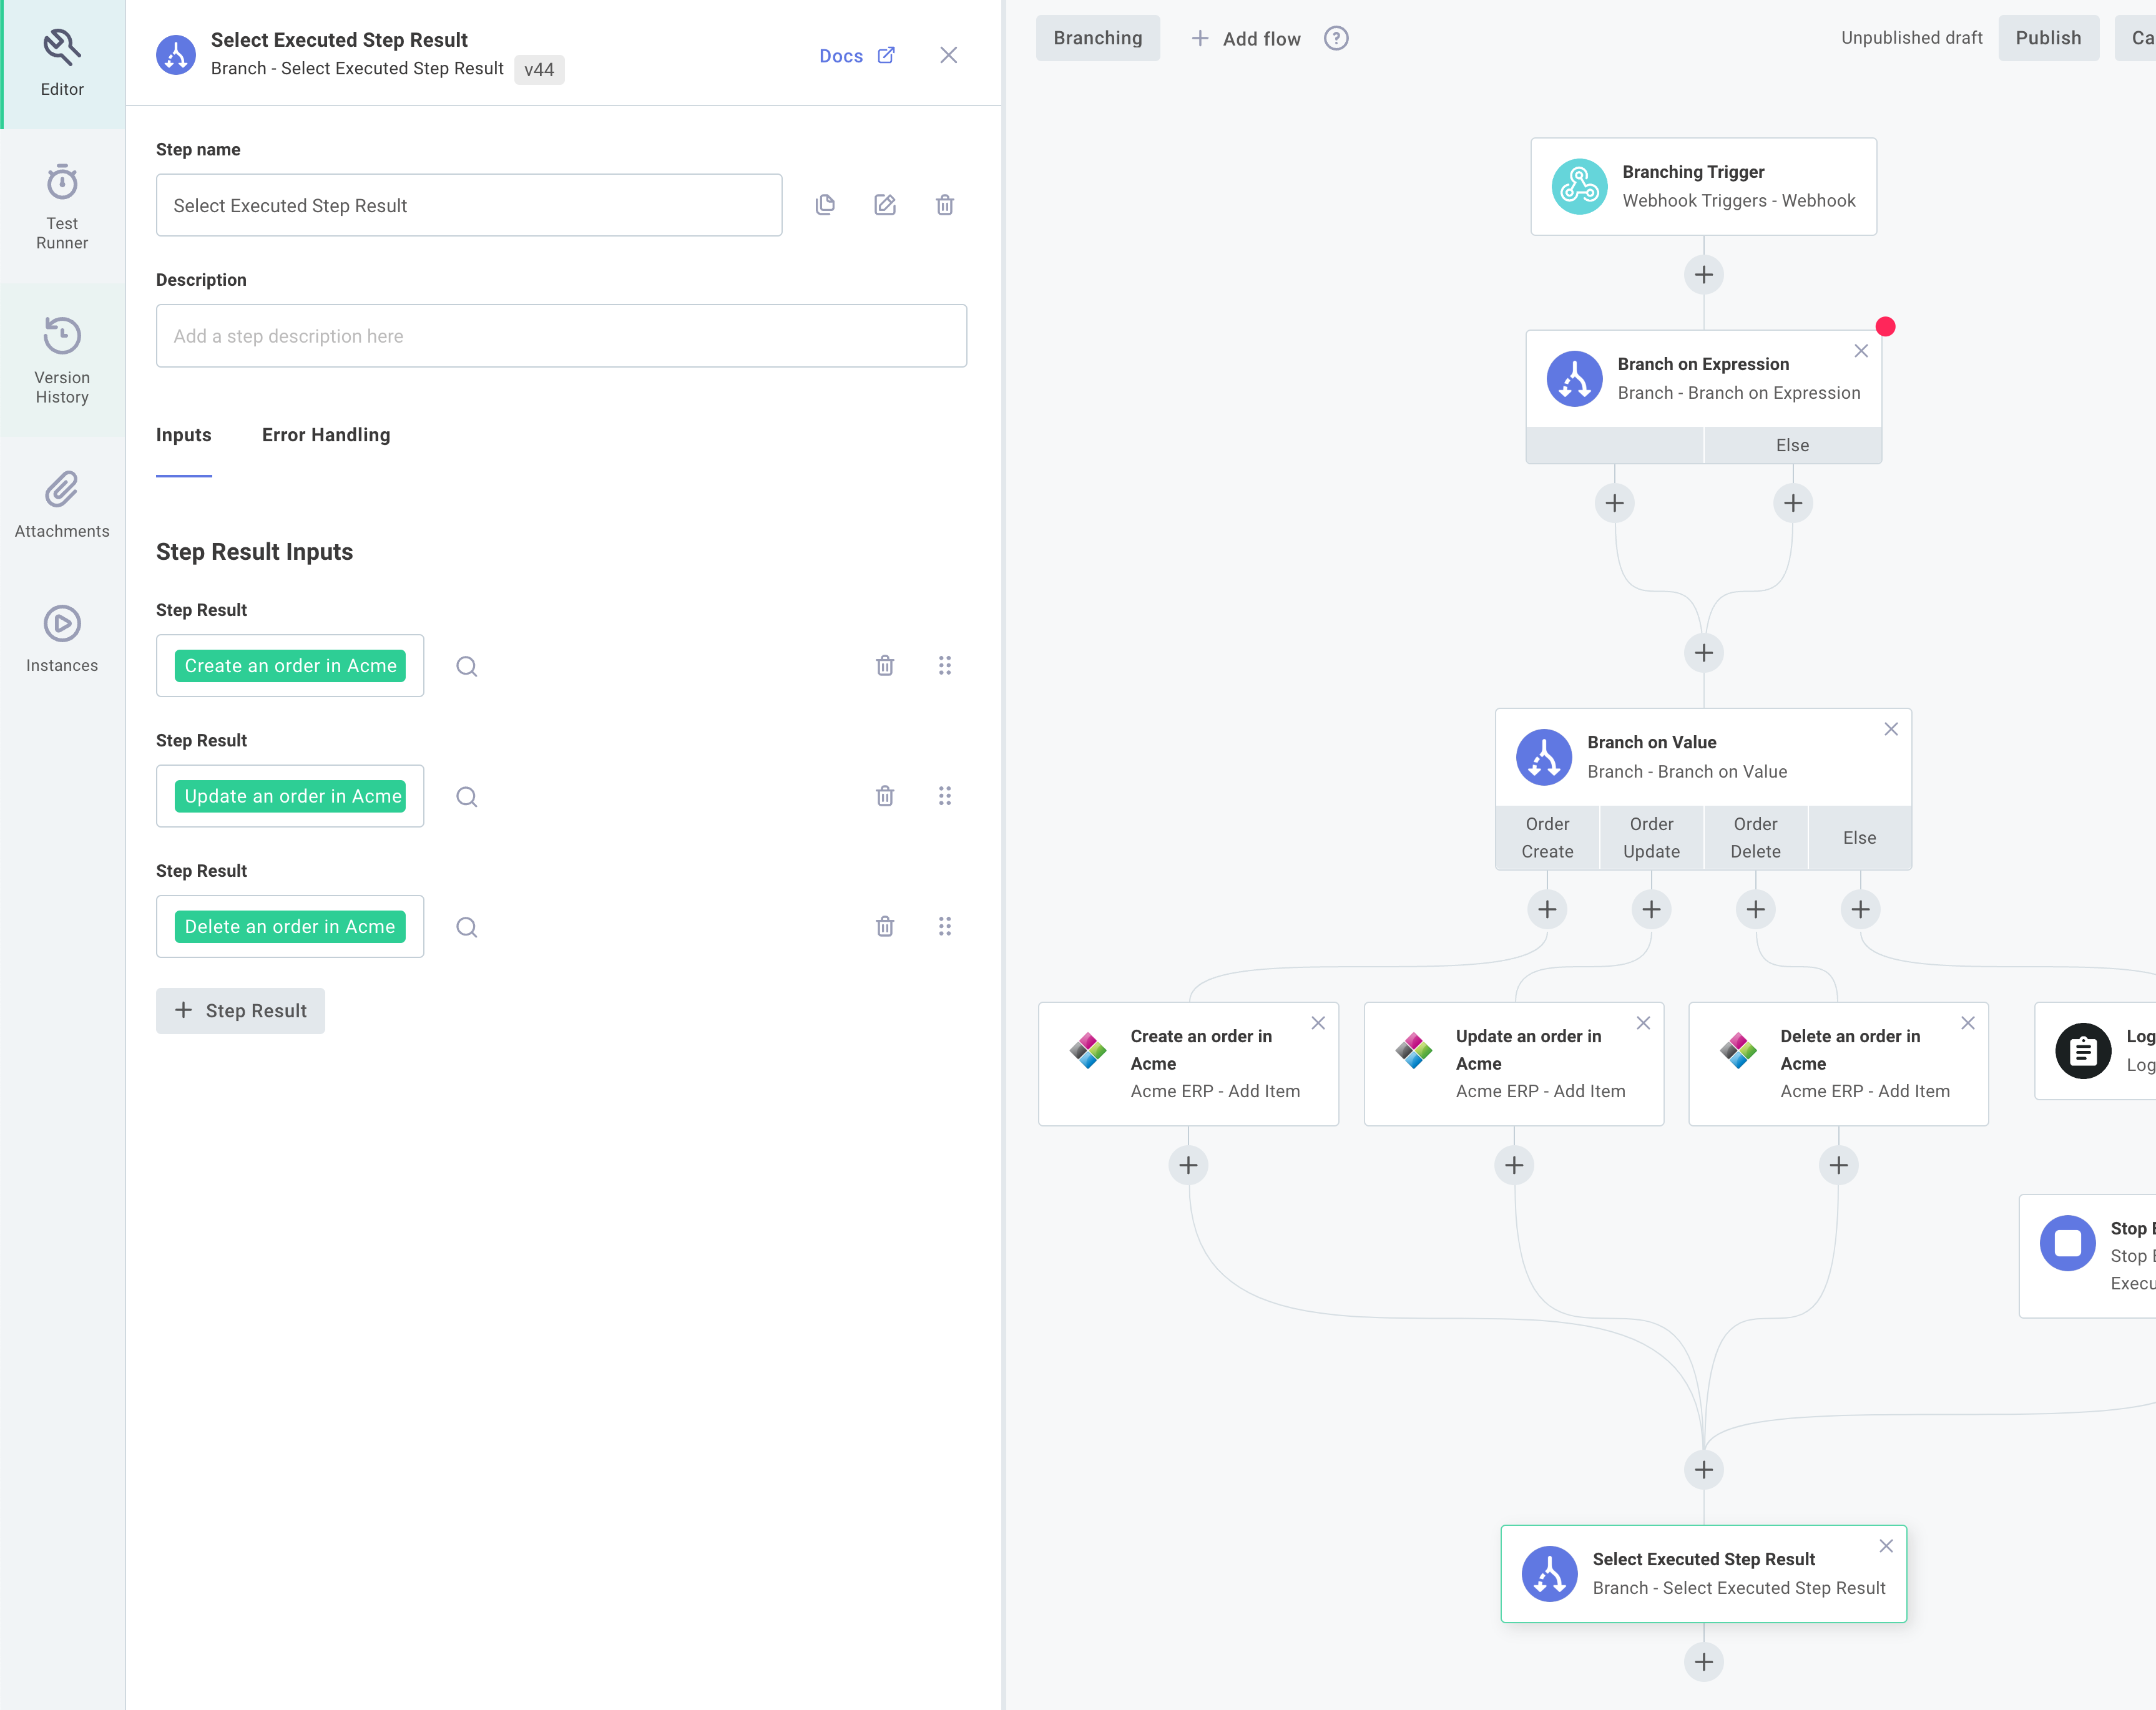
Within the component configuration drawer, select the step(s) whose results you would like, and the Select Executed Step Result step will yield the result of whichever one was executed.
Persisting data between runs
Sometimes it's helpful to save data from one execution of an integration so it can be used in a subsequent execution. Builder provides components that allow you to save some state from one run for use in a future run.
Why is this important or helpful? Imagine you have an integration that pulls down and processes data from a data source. Your integration recently processed a record with ID "123", and the next time your integration runs you want to ensure it processes ID "124" and above. You can persist "123" using a Save Value action, and then the next time your integration runs it can use Get Value to know that "123" was the most recently processed record. You can then build your integration to process newer records than the one that was saved.
Let's look at two components that take advantage of persisting data:
The persist data component
Data can be persisted between runs using the Persist Data component.
Data are stored in key-value pairs, and values can be strings, numbers, objects, or lists.
You can choose to persist data with the Flow - actions - that lets you persist data scoped to the current flow.
You can also use the Cross Flow - actions to persist data that can be shared between flows of an instance.
Or, you can use the Integration - actions to persist data between instances of the same integration (so, multiple instances can share a data store).
You can store a key/value pair using the Save Value action, or you can use Persist Data's other actions to append to a persisted list. If you would like to save a timestamp instead, you can use the Save Current Time action to save the current time into a key of your choosing.
Later, in a subsequent run, you can fetch the value you saved using the Get Value action.
If a key is not set, Get Value will return null.
You can remove data from an array, or remove a key/value pair altogether, using Persist Data's other actions.
The process data component
For some integrations, it's handy to know what data from an array you've already processed, and what data you haven't. For example, your integration might pull down an array of orders from a data store to be converted into invoices. Your order array might look like this:
[
  {
    "orderid": 123,
    "items": {
      "widgets": 5,
      "whatsits": 7
    }
  },
  {
    "orderid": 122,
    "items": {
      "whoseits": 2
    }
  }
]
The Process Data's DeDuplicate action allows you to pass in such an array objects in descending order, along with a unique identifier (like orderid).
The action uses data persistence between runs to track the most recently processed item (in this example, "orderid": 123).
The next time this integration is run and an array of orders are passed into the DeDuplicate step, the step will return all objects in the array that appear before the object with "orderid": 123.
So, if there's an order ID 124, 125, etc., it'll return those.
That way, the subsequent execution will ignore order ID 123 and before, and instead process only more recent orders.
For More Information:
Persisting Data in Custom Components
Flows in integrations
Some integrations have a single flow (a single trigger, and a series of steps that are executed). If you have multiple logical flows that are related - for example, if you are integrating with Acme ERP, and Acme ERP is configured to send a variety of webhook payloads to you - you can combine multiple flows into a single integration, one flow to handle each webhook type. Rather than deploying a dozen distinct instances to integrate with Acme ERP, it's more manageable to deploy a single integration that is made of multiple flows.
An integration's config variables are scoped for the integration. So, a config variable set for an integration is shared and can be referenced by any of the integration's flows. Each flow has its own unique trigger, and so has its own webhook URL that you can use to invoke that specific flow.
Managing integration flows
To add a new flow to your integration click the + Add flow button on the top of the designer.
To edit a flow, click your current flow's name and then click the pencil icon to the right of a flow. Each flow should be given a unique name, and can have an optional description.
To delete a flow from an integration, click the trash icon to the right of the flow's name and description.
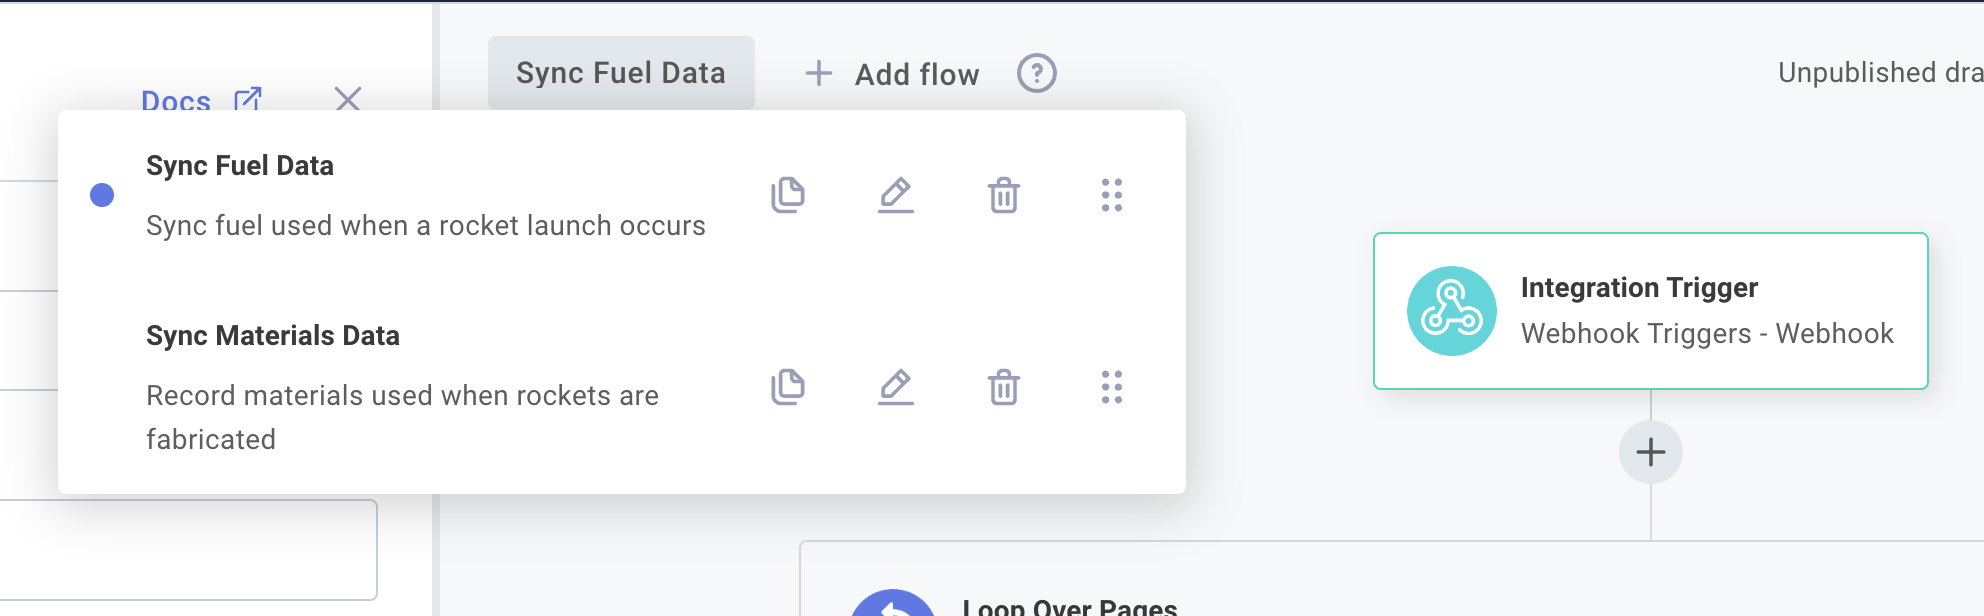
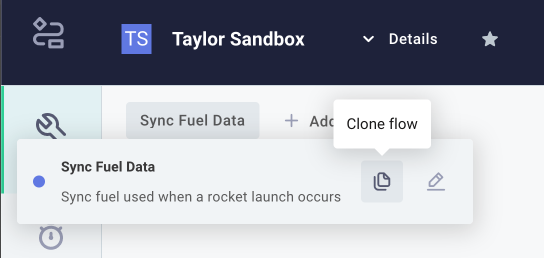
Cloning a flow
If you need to add a flow that is similar to another flow you've already built, it's helpful to be able to clone (make a copy of) a flow. To clone a flow, open the flow menu by clicking the name of your flow on the top left of the integration designer. Then, select the content_copy icon, and give your copy a new name.
Testing and running flows
Each flow runs separately and has its own trigger. They're tested independently as well. To test a flow, click the flow selection button on the top left of the integration designer area and select the flow you would like to test. Then, run tests just as you would with a single-flow integration.
Interacting with SOAP APIs
A Simple Object Access Protocol (SOAP) API defines how a client should interact with the API through XML and a schema called a WSDL. To interact with a SOAP-based API, you can use the built-in generic SOAP component to fetch and interpret the WSDL and make requests to the API.