Integrating with Shopify
You can quickly and easily integrate Shopify with Commerce using the Integrations Hub in Commerce Manager. Integrating Shopify with Commerce enables you to synchronize your Shopify store catalog and inventory data with Commerce. Once this data is accessible in Product Experience Manager, you can elevate your merchandiser experience, creating distinctive product encounters that exceed customer expectations and stimulate growth.
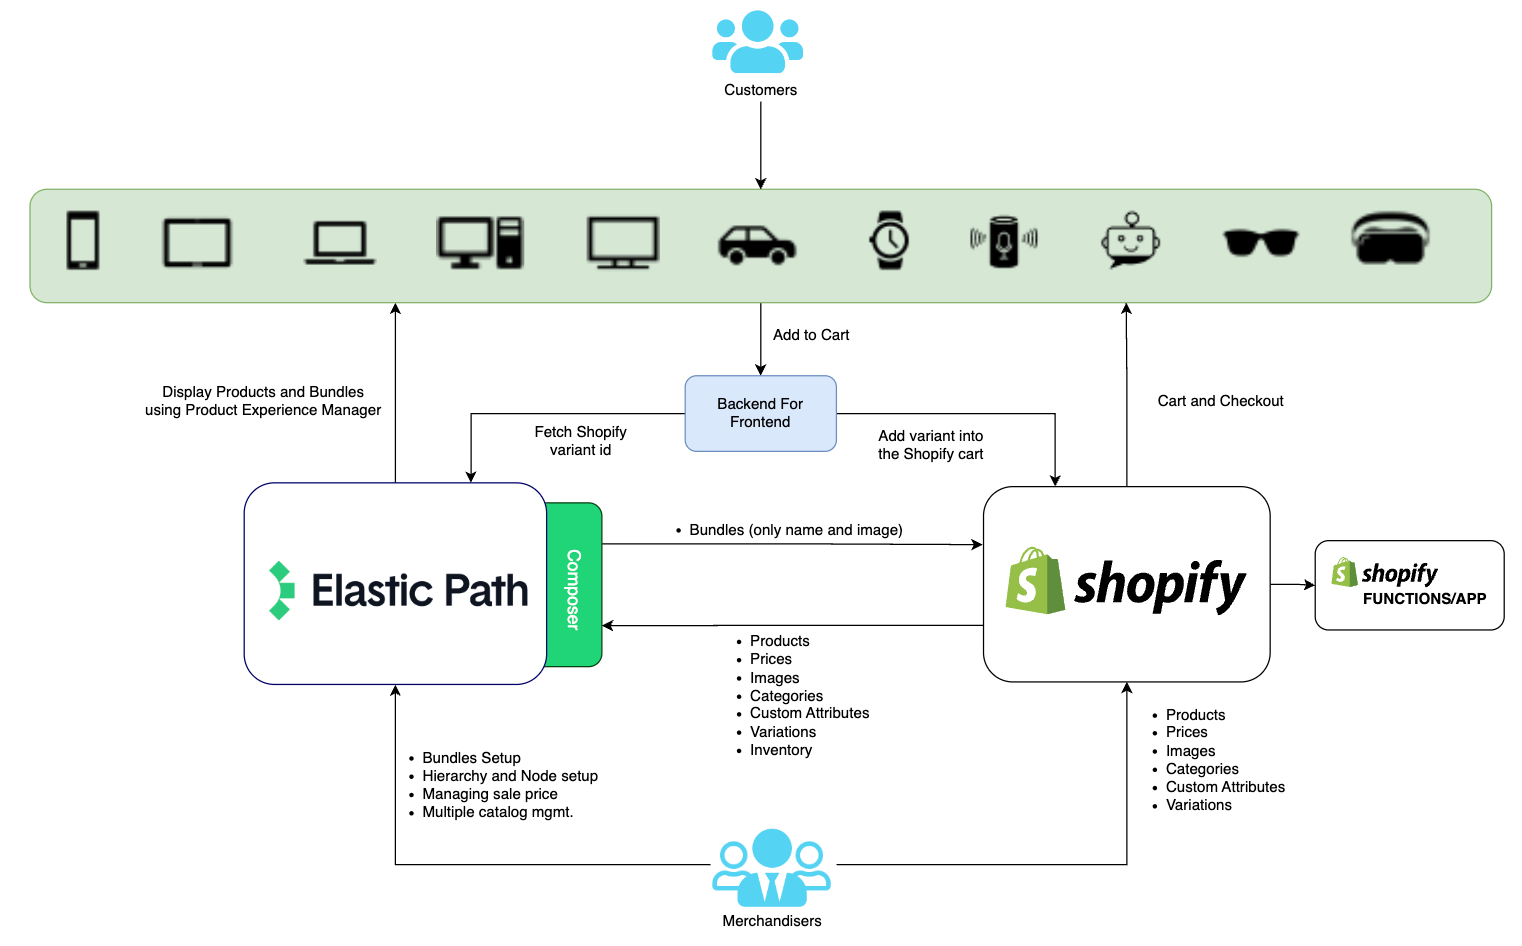
Understanding how the Shopify Integration Works
The Shopify Integration ensures a seamless synchronization of catalog information such as products, prices, images, variations, templates, attributes and categories from Shopify to Elastic Path. This integration supports incremental updates through webhooks and offers the option of a full sync, allowing the migration of all catalog data into Elastic Path. By default, the full sync is disabled, but you can enable this and also define cron job timings. The full sync functionality and webhook-based integration also allows you to sync your inventory information from Shopify to Elastic Path.
Additionally, the bundle sync feature enables you to create bundles in Elastic Path, automatically generating them in Shopify upon catalog publication. The bundle details, such as name, description, and image, are only synced in Shopify. This feature is available by default, and you have the flexibility to customize syncing preferences with available configuration options.
Shopify Integration Templates
The Shopify integration uses the following request templates that contain all parameters required for the Shopify integration to function correctly. The Shopify integration provides default templates. However, when configuring the integration, you can edit these templates to change or add any additional parameters depending on your business requirements. The templates use JSONata.
The following table describes the templates available.
| Template | Description |
|---|---|
| ElasticPath Product Template | This template defines the product information you want to synchronize from Shopify to Elastic Path. The default template loads product data from Shopify to Elastic Path. You can change this template based on your business needs. |
| ElasticPath Price Template | This template specifies how prices are synchronized from Shopify to Elastic Path. Do not change the priceBookName field in the template. You can change this template based on your business requirements. |
| ElasticPath Node Template | This template applies only if Enable Category Sync is enabled. You can add nodes in different locales. When selecting a hierarchy, do not change the hierarchySlug field in the template. You can change this template based on your business needs. |
| Shopify Get Product Query | Shopify GraphQL APIs is used to fetch product information from Shopify. The default product query is included in the configuration, but you can change it based on your business needs. Refer to Product Query Shopify Documentation to make changes. The configuration of the Elastic Path Product Template relies on the output of this query to transform product requests for Elastic Path. |
Prerequisites
Collecting Commerce Manager setup information
Collect the following Commerce API keys. When you log in to Commerce Manager as a Seller Admin, you can find this information in SYSTEM > Application Keys in Commerce Manager. Also see how to create a new application key.
| Commerce API Key | Description |
|---|---|
| Client ID | Your Commerce Client ID. |
| Client Secret | Your Commerce Client Secret. |
| Token URL | Your Commerce API token URL. |
When integrating with third-party providers, we recommend you use the closest region in the third-party service to reduce latency as much as possible. See Regions and URLs table.
Collecting Shopify connection details
You must collect the following details from Shopify store:
| Option | Description |
|---|---|
| Host | Your domain of your Shopify platform without https://. For example, <YOUR_STORE>.myshopify.com. |
| Admin API Access Token | Admin access token generated by your Shopify custom app. See Shopify Custom App Installation. |
Shopify Custom App Installation
Follow these steps to generate Admin API Access Token.
- Log into your Shopify admin console.
- Go to Settings > Apps and sales channel.
- Select Develop apps.
- Select Create an app.
- In the App name field, enter the name for your App.
- Select Create app.
- Under the Overview tab, select Configure Admin API scopes.
- Under the Configuration tab, select the following checkboxes:
- read_inventory
- read_products
- write_products
- Select Save.
- Select Install app. Once the app is created, you can see the Admin API access token under the API Credentials tab. You can reveal your access token only once so make sure to copy your access token and paste it in the Shopify Integration.
Configuring Shopify Integration
Before you begin ensure that you have created a price book and a hierarchy, and created and configured a Catalog with this price book and hierarchy in Commerce Manager to hold the Shopify catalog data. Once you have completed the Prerequisites, you are ready to configure the Shopify integration.
-
In Commerce Manager, under COMPOSER, select Integrations Hub.
-
Under Product Information, select Shopify.
-
Select Configure. The integration guides you through the steps you need to follow.
-
Select Next. The Connections page is displayed.
-
Enter the following details in the Elastic Path section:
- Client ID
- Client Secret
- Token URL
For more information, see Collecting Commerce Manager setup information.
-
Enter the following details in the Shopify section:
- Host
- Admin API Access Token
For more information, see Collecting Shopify connection details.
-
Select Connect. The authorization is successfully completed.
-
In the Shopify API Version field, enter your Shopify API Version.
-
Select Next. The Template page is displayed.
-
(Optional) Edit the templates on the Template page. See Shopify Integration Templates.
-
Select Next.
-
In the Select Catalog field, choose the placeholder catalog you created prior to the integration configuration.
-
In the Select Pricebook field, choose the placeholder price book you created prior to the integration configuration.
-
Select the Enable Category Sync checkbox to sync categories from Shopify to Elastic Path. It is enabled by default. This means that collections are created as nodes in the hierarchy selected in Elastic Path and products are associated to these nodes.
You may choose not to retrieve category information from Shopify if you are planning to use Product Experience Manager to set up a multi-tier taxonomy. In such cases, you can disable this configuration.
-
In the Select Hierarchy field, choose the placeholder hierarchy you created prior to the integration configuration. If you do not turn on Enable Catagory Sync, you do not have the option to choose a hierarchy.
-
Select the Enable Inventory Sync(Shopify to Elastic Path) checkbox to sync inventory from Shopify to Elastic Path. It is enabled by default. This means that as part of a full load, inventory information are also loaded along with product data.
If this configuration is enabled, a INVENTORY_LEVELS_UPDATE webhook event type is created in Shopify. If this configuration is disabled, inventory information is not synced from Shopify to Elastic Path.
-
Select the Enable Bundle Sync(Elastic Path to Shopify) checkbox to sync bundles from Elastic Path to Shopify. You can create bundles in Commerce Manager after loading all products from Shopify to Elastic Path. It is enabled by default.
-
Select the Enable Full Sync(Shopify to Elastic Path) checkbox to enable full sync capabilities from Shopify to Elastic Path, including products, prices, images, variations, templates, attributes, categories, and inventory. Full sync can be triggered by manually running the URL endpoint or by enabling the scheduler. Delta syncs are enabled by default.
-
Select the Full Sync Scheduler (Shopify to Elastic Path) checkbox to run the full sync periodically. The field is activated only when Enable Full Sync(Shopify to Elastic Path) is enabled. The default time is every 15 minutes, but you can change it based on your business requirements.
-
Select Finish. Your integration is now enabled, and you can see the following changes:
- In Commerce Manger, go to Product Experience Manger > Configurations, you can see that all templates and attributes have been loaded from Shopify.
- In Commerce Manger, under SYSTEM, go to Store settings > Webhooks to see that your webhooks specific for Bundles sync from Elastic Path to Shopify have been enabled.
- Go to your Shopify store and ensure that the following webhooks have been created:
- PRODUCTS_CREATE event: Notifies Elastic Path when a new product is created in Shopify.
- PRODUCTS_UPDATE event: Notifies Elastic Path when an existing product is updated in Shopify.
- PRODUCTS_DELETE event: Notifies Elastic Path when an existing product is deleted in Shopify.
- INVENTORY_LEVELS_UPDATE event: Notifies Elastic Path whenever the inventory level is changed in Shopify. This webhook is created only if Enable Inventory Sync is turned on.
- COLLECTIONS_UPDATE event: Notifies Elastic Path whenever there is any change in a collection in Shopify. For example, if a new collection is created or products are associated with an existing collection. This webhook is created only if Enable Category Sync is turned on.
Using Shopify Integration
Once the integration is enabled and your Shopify catalog data is synchronized with Commerce, your catalog becomes visible on your storefront upon publishing. If you have set a Full Sync Scheduler (Shopify to Elastic Path), it automatically triggers at the defined time to run the full sync. Alternatively, you can follow these steps to manually trigger the full sync.
-
In Commerce Manager, go to COMPOSER > Integrations Hub.
-
Select the Shopify integration.
-
Under Trigger Details, select _Inbound product (Full Load). This option is visible only if you select the Enable Full Sync(Shopify to Elastic Path) checkbox.
-
Copy the URL link and paste it in the browser. This triggers a full load of all products, categories, if Enable Catagory Sync is enabled, prices, templates, variations, and images from Shopify to Elastic Path.
-
Go to Catalogs and publish your catalog so you can see all the information in your Elastic Path storefront. See Publishing Catalogs. If you did not turn on Enable Category Sync, you need to create your own multi-tier taxonomy using hierarchies and nodes, and associate those hierarchies with your catalog before publishing.
-
Once the catalog data is visible on your storefront, you can add products to your cart and checkout.
Use case scenario 1: setting up a sale price.
You can set up a sale price for a product in Commerce Manager. To do this, perform the following steps:
- In Commerce Manager, under Product Experience Manager, select Products.
- Select the product from the list that you want to set up a sale price.
- select + Add Sale Price, and do the following:
- To associate the option with a price book, from Price Book list, select a price book.
- In Sale Name, enter a name for your sale.
- (Optional) From Start Date / Time - End Date / Time, select a start date and time and an end date and time of the sale.
- Enter a price for each of the available currencies. You can add currencies under SYSTEM in Store Settings > Currencies.
- Select Add Sale.
- Publish your catalog again. See Publishing Catalogs.
- Go to your storefront to see the new sale price for that product.
Use case scenario 2: creating a new bundle
-
In Commerce Manager, under Product Experience Manager, select Products.
-
Create a new bundle product. See Bundles in Commerce Manager.
-
Publish your catalog. See Publishing Catalogs.
You can now see that the newly created bundle has been added to your Shopify store. Note that any changes made to the bundle in the Shopify store are not synchronized back to Elastic Path.
-
Associate this product with the sales channel in your Shopify store. To do this:
- Go to Publishing section on the right pane, and select three dots associated with it.
- Select storefront checkbox.
- Select Save. You can now see the bundles in your Elastic Path storefront. You can add this item to your cart and proceed with the checkout process.
Demo
Watch the following video to learn how to integrate Shopify with Commerce using the Integrations Hub in Commerce Manager: