Creating Bundles
With Product Experience Manager, you can create and manage bundles. A bundle is a purchasable product comprising one or more products that you want to sell together. You can have:
- Dynamic bundles. Dynamic bundles allow your shoppers to choose their own options in a bundle.
- Bundles of bundles. Your bundle consists of child bundles.
Dynamic Bundles
Dynamic bundles allow merchandisers to create configurable product groupings where shoppers can personalize selections within defined rules. These bundles are composed of components—logical groupings of related product options—each with customizable constraints and behaviors. This flexible structure enables tailored experiences, driving higher engagement and average order value.
Core Concepts
Component Level Rules
Rules can be defined for each component to control shopper selections:
- Minimum Selections: Require at least a certain number of products that can be chosen within a component.
- Maximum Selections: Limit the number of products a shopper can pick from a component.
- Optional Components: Components can also be optional by setting the minimum selection to zero.
Product Option Quantity Rules
Merchants can define rules for each product within a component to control shopper purchase quantity:
- Default Quantity: If you do not set a minimum or maximum quantity for a component option, the shopper will be limited to the default quantity that you have set for that specific option within the bundle configuration. This is useful when you want to ensure a specific number of a particular item is included if the shopper selects it.
- Minimum Quantity: This sets the lowest number of units a shopper must select for a product option.
- Maximum Quantity: This defines the highest number of units a shopper can select for a product option.
Product Option Defaults
Specific product options can be designated as default within each component. This is particularly useful when the bundle is initially displayed in the cart or when a shopper hasn't yet customized their choices.
Parent Products as Options
When working with products that have variations (such as clothing items with different sizes and colors), you can add the parent product to a bundle component. This automatically makes all child products (variations) available for selection within that component.
Additionally, you can configure specific child products to be excluded from the bundle when the parent is added. This gives you fine-grained control over which variations are available for selection within the bundle, while still benefiting from the convenience of adding the parent product.
For example, if you add a "T-Shirt" parent product to a bundle component, all its variations (Small/Red, Medium/Blue, Large/Black, etc.) become available for selection. However, you might want to exclude certain variations (e.g., Small/Green and Medium/Yellow) from this particular bundle. You can configure these specific child products as exclusions, ensuring they won't appear as options even though the parent product is included.
Bundle Configuration in Catalog and Cart
Dynamic bundles have a bundle_configuration which describes the options selected by a shopper. This configuration is crucial for both displaying bundle options in your catalog and processing bundle purchases in your cart.
Bundle Configuration Structure
The bundle_configuration is a JSON object that contains:
selected_options: An object where each key is a component ID (e.g., "size", "color", "extras")- Each component contains key-value pairs where:
- The key is the product ID of the selected option
- The value is the quantity of that option
- Each component contains key-value pairs where:
Working with Bundle Configurations in Catalogs
- Once your bundles are published in a catalog, a shopper can select the products they want.
- Use Get a product in a catalog release to check a bundle's default configuration. The default
bundle_configurationis returned in themetasection of the response. - Use the configure a shopper bundle endpoint to store a shopper's selections.
When adding a dynamic bundle to a cart, you need to include the bundle_configuration in the cart item. This ensures that the correct products and quantities are added to the cart.
Creating Dynamic Bundles: An Overview
- Create your products.
- Create a bundle.
- Specify minimum and/or maximum values for the number of product options that can be selected within the bundle. For example, if you want the shopper to select exactly 4 out of 10 options, set both the minimum and maximum values to 4 for each of the 10 product options.
- For each product option in the bundle, specify if it is a default option by adding
"default": trueto the product options that you want to be pre-selected for the shopper. - Publish the bundle to your catalog so you can display the products to your shoppers in your storefront.
- When a shopper interacts with the bundle on your storefront, they can select the products they want from the list of options. Use the configure a shopper bundle endpoint to capture the shoppers selections. This updates the
bundle_configurationwith the product options chosen by a shopper. - Once a shopper has configured their bundle, use the add a product to a cart endpoint to add the selected bundle to the shopper’s cart.
- When the shopper proceeds to checkout, the selected product options from the bundle are included in the order.
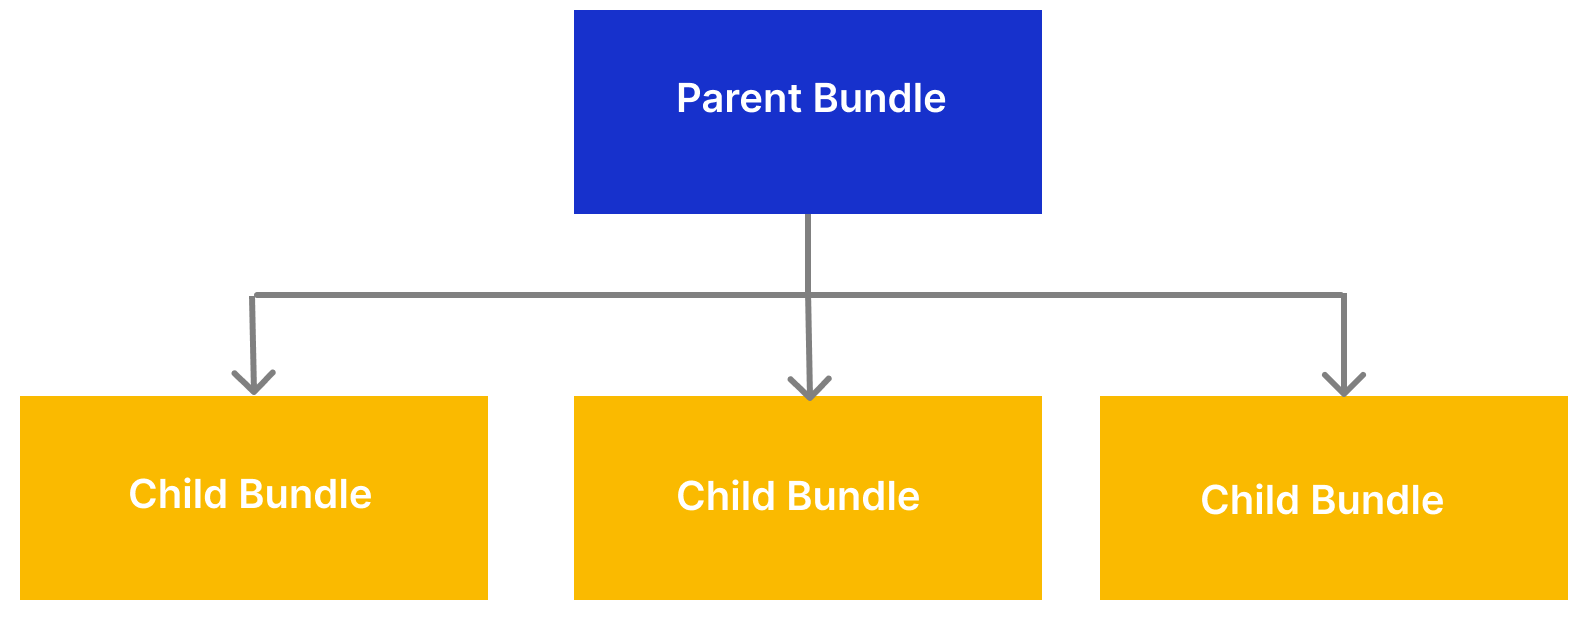
Bundles of Bundles
A Bundle of Bundles is a specialized grouping mechanism that allows merchandisers to organize multiple, related product bundles under a single parent container. The parent bundle serves only as a logical container and cannot be added to cart directly - it exists solely to help shoppers navigate to the appropriate child bundle.
Important: Bundles of bundles should be used as a last resort for complex scenarios when simpler bundle options don't meet your requirements. This is the most complex bundle use case and should only be implemented when other bundle types cannot address your specific merchandising needs.
Structure
In a Bundle of Bundles, you typically have:
- A parent bundle with a single component (e.g. "Couch Type")
- Multiple bundle options within that component (e.g., "2-Seater Sofa Bundle", "3-Seater Sofa Bundle")
- Each bundle option is itself a complete bundle with its own components and configuration options
When implementing a Bundle of Bundles in your storefront, the parent bundle serves primarily as a navigation aid. Shoppers browse the parent bundle to discover the available bundle options, then select and configure the specific child bundle they're interested in.
For a detailed implementation example, see the Couch Collection example.
Requirements
- You cannot have more than one level of child bundles. In other words, a child bundle cannot have a child bundle as a component.
- A parent bundle can contain both bundle and product components.
- Each bundle of bundle option needs to be configured and added to the cart individually.
Creating bundles of bundles: an overview
To create a bundle of bundles, simply add a bundle as a component to another bundle.
- Create your products.
- Create all your child bundles.
- Create a parent bundle and specify the product ID of your child bundle as an option of a component in your bundle. You cannot have more than 1500 options in a bundle.
Before you Begin
- Ensure that you have created at least one price book.
- Ensure that all products that you want to add to the bundle are created with the required details.
- Ensure any child bundles that you want to add to a parent bundle are created with the required details.
A bundle without a SKU must have a minimum quantity of components and options. Either:
- a single option with a minimum quantity of 2.
- 2 options, each with a minimum quantity of 1.
Commerce Manager does not sort components and component options. You must program your storefront to sort the components and component products in the order that you want.
Procedure
The steps below describe how to complete the basic information for a bundle and adding the components and product options that make up a bundle.
-
Go to Products > Bundles.
-
Select Create new bundle.
-
(Optional) Expand Locale drop-down list. The languages you have configured in Store Settings > Locale are displayed first. Custom product locales are displayed underneath. See Configuring Locales.
-
In Basic Information, provide the following:
- Name: Name for the bundle.
- (Optional) SKU Number: The SKU of the bundle.
- Commodity Type: Select whether the product is physical or digital.
- (Optional) Description: A description for the bundle.
- In Product Tags, either:
- enter a tag and press Enter. Repeat this step for each tag you want to use.
- select View as a comma separated list and enter a comma separated list of tags.
- Slug: A label for the bundle that is used in the URL paths. A slug can contain any combination of letters, numbers, periods, hyphens, and underscores. No spaces or other characters are allowed. By default, the bundle name is used as the slug.
- (Optional) External Reference: A unique attribute associated with the product. This could be an external reference from a separate company system, for example. The maximum length is 2048 characters.
- (Optional) MPN: Manufacture Part Number (MPN).
- (Optional) UPC/EAN: Universal Product Code (UPC) or European Article Number (EAN) used to scan a product in a Point of Sale (POS) system.
- Bundle products can have rich media assets, such as product images or a file containing additional product details. Only the main image for a bundle is shown. You can only replace or delete an existing main_image. If there are other files associated with bundle, they are not shown here. You can go to Media Management for a product to manage these files. To add media for the bundle, do one of the following:
- Drag and drop the file from your local directory.
- Click Choose File and browse and add the file.
- In the add by URL field, add the URL for the media. To delete media from Commerce, go to Products > Media. See Files in Media.
-
In Manage Bundle Components, add the components and component products to include in your bundle.
-
Select Add Component.
-
(Optional) You can specify a sort value. A sort value must be a number. You can specify any numbers that you want. For example, 1, 2, 3, or 100, 90, 80, and so on. The sort value is visible when you add the products to your catalogs. You can then use the sort value to program your storefront to display the bundle components in the order that you want.
-
In Component Name, enter a name for the component. The component name is the name that is displayed in your storefront.
-
In Component Key, enter a unique identifier to identify a component. The component key can be anything you like but it should be relatively short and must not contain any special characters.
-
(Optional) In Minimum, enter the minimum number of products a customer can buy.
-
(Optional) In Maximum, enter the maximum number of products a customer can buy.
noteIf you do not specify any minimum or maximum values for the product options in your components, your shoppers can select any combination of product options.
-
To add products to a component, select Add Products. The Add products to a bundle component pane is displayed. A list of all the available products in your store is displayed
-
You can add as many options you want. You can also filter the products by SKU, Product Name, and Product status, or scroll through the list.
-
Select + next to the products you want to add.
-
Close the Add products to a bundle component pane. The products you selected are added to the component.
-
In Order, you can specify a sort value for the product. A sort value must be a number. You can specify any numbers that you want. For example, 1, 2, 3, or 100, 90, 80, and so on. The sort value is visible when you add the products to your catalogs. You can then use the sort value to program your storefront to display the products in the component in the order that you want.
-
All the products are listed with the following details:
- Name: The name of the product.
- SKU: The SKU of the product.
- Status: Whether the product is Live or Draft.
-
(Optional) By default, the quantity you configured while creating the product is displayed in Quantity. You can enter a new quantity, depending on your requirements.
-
(Optional) In Default, select the products that you want to configure as default options. Each component can have as many defaults as the maximum number of products set for the bundle. A shopper can either select the bundle with the default products or choose products from all the components. Shoppers must either select products for all components or use the default options for all components; they cannot choose products for only one component and leave the others with default options.
-
Repeat steps 6 to 19 for each component you want to add to the bundle.
-
Select Save Bundle.