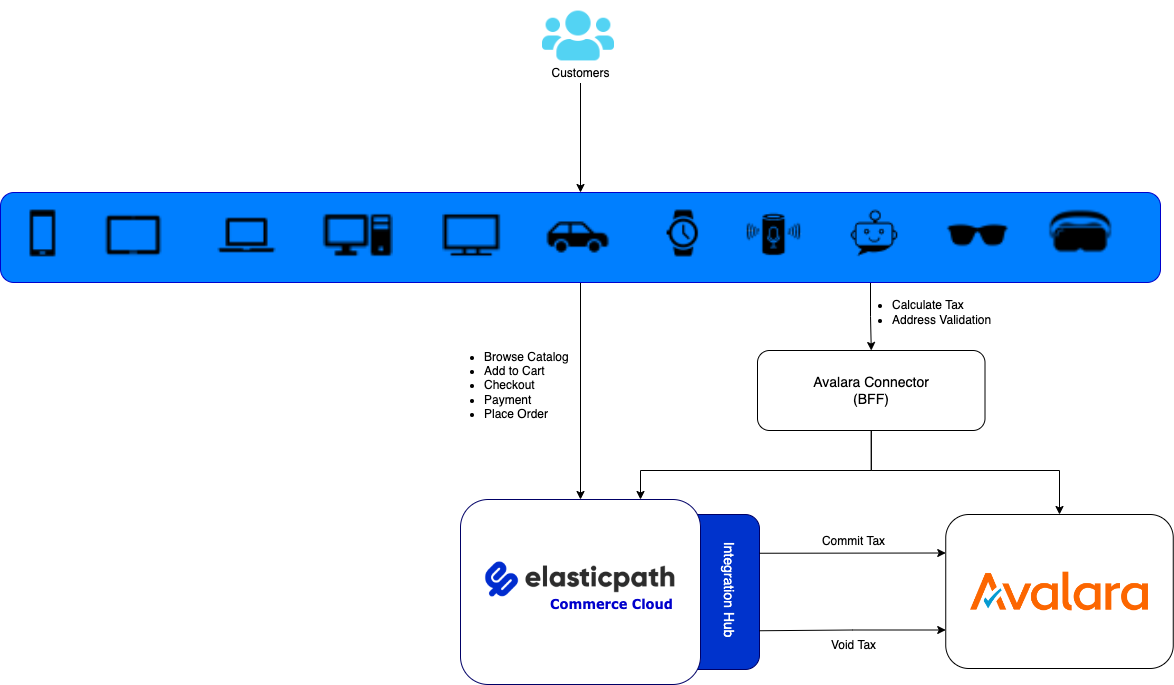
Integrating with Avalara
You can quickly and easily integrate Commerce with Avalara using the Integrations Hub in Commerce Manager. Using Avalara Integration, you can commit tax and void tax on specific order events.
Order changes in Commerce, like creating, fulfilling, and canceling, generate webhook events that cause orders to be created, fulfilled, and canceled in Avalara. The following Commerce event types can be used to generate webhook events.
order.createdorder.fulfilledorder.paidorder.authorizedorder.cancelled
When integrating with third-party providers, we recommend you use the closest region in the third-party service to reduce latency as much as possible. See Regions and URLs table.
Prerequisites
You must have products in Commerce Manager.
Configuring Avalara Integration
-
In Commerce Manager, go to COMPOSER > Integrations Hub.
-
Under Tax and Shipping, click Avalara.
-
Click Configure. The Avalara integration guides you through the steps you need to follow to complete the integration.
-
Click Next. The Connection page is displayed.
-
Enter the following details in Avalara Connection:
- Company Code - Your company code.
- Avalara APP Version - Enter your API version. Default is
1.0. - Avalara Environment - Select either Sandbox or Production.
- Avalara UserName - Your Avalara username.
- Avalara Password - Your Avalara password.
-
Enter the following details in Commerce Connection:
- Client-ID - Your Commerce Client ID.
- Client-Secret - Your Commerce Client Secret.
- Token URL - Your Commerce API Token URL.
Token URL for:
- EU -
https://useast.api.elasticpath.com/oauth/access_token - US -
https://useast.api.elasticpath.com/oauth/access_token
To collect your Client-ID and Client-Secret, log into Commerce Manager with Seller Admin privileges and go to SYSTEM > Application Keys. See Application Keys.
-
Click Connect. The authorization is successfully completed.
-
Click Next.
-
In the Commit Trigger field, select one of the following order events according to your requirements to initiate the commit transaction:
order.createdorder.fulfilledorder.paidorder.authorized
-
(Optional) Turn on the Enable Ship from toggle to enter the ship from address. It is enabled by default.
-
(Optional) In the ship from address field, click Edit and enter the ship from address.
-
In the Default Tax Code field, enter your default tax code if your product doesn’t have an associated tax code.
-
Click Next. You can see the default Commit Tax Template and Void Tax Template fields.
-
(Optional) Click Edit to modify Commit Tax Template and Void Tax Template according to your requirements.
-
Click Next. The Setup Webhooks and flows page is displayed. From this page, decide which webhooks you want to setup, depending on your requirements. The Avalara Integration automatically creates the webhooks, once you have finished configuring the integration.
The following toggles are enabled by default:
- Enable Commit webhook : triggers commit transaction
- Enable Void webhook : triggers void transaction
- Enable Product extension : configures product extension flow in Commerce Manager
-
(Optional) Click Edit in the Product extension input field, to edit the default request in order to setup product extension flow and fields in Commerce depending on your requirements. This integration will create a new template and field in Commerce Manager.
-
(Optional) Click Edit, in the Customer extension input field, to edit the default request in order to setup customer extension flow and fields in Commerce depending on your requirements.
-
Click Finish. Your integration is enabled.
The new template and atrributes will be displayed on the Configuration > Templates page. Additionally, customer extension flow and fileds are also displayed on SYSTEM > Flows page.
Using Avalara Integration
The following scenario explains how to pay for an order in Elastic Path Composable Frontend and how you can commit tax and void tax using the Avalara integration.
-
Go to Elastic Path Composable Frontend. It should be integrated with your store in Commerce Manager.
-
Add a product to a cart. In Order Summary, you will see that tax has not been included in the order.
-
Click Checkout.
-
Enter your Contact Information and Shipping Address.
-
Select the Same as shipping address checkbox if your Billing Address is same as Shipping Address
-
Click Checkout Now.
In Order Summary, you can now see that the tax has been calculated based on the shipping address.
-
Enter your billing information and click Pay now to complete your transaction.
-
Copy Your order number from the Order Complete page.
-
In Commerce Manager, go to Store > Orders. All orders in the store are displayed.
-
On the All orders page, click on your order to view the tax details.
-
Log into your Avalara environment.
-
Go to Transactions and search for your order.
You can see the transaction details and tax summary, and the Document status shows Committed.
-
(Optional) If you cancel an order in Commerce Manger, the Document status in Avalara environment will change to Voided.
Demos
To learn how to configure and use the Avalara Integration, watch the following video: