Integrating with Pimberly
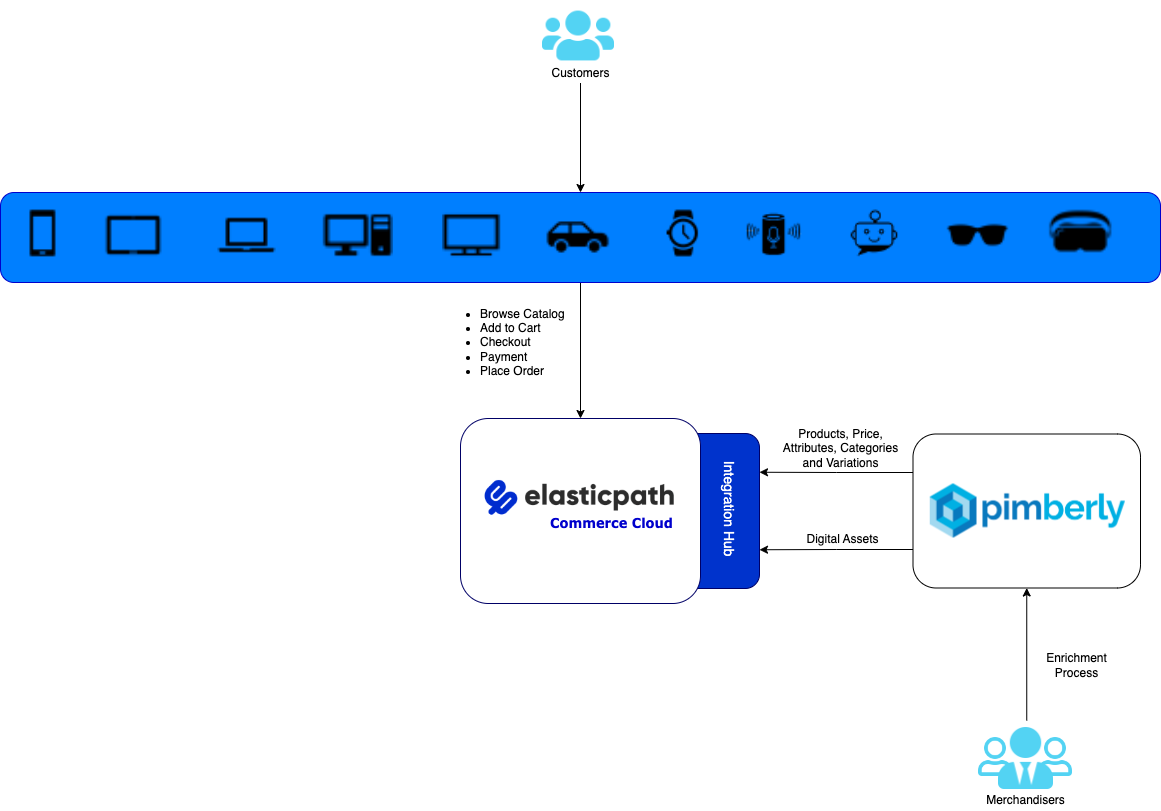
You can quickly and easily integrate Commerce with Pimberly using the Integrations Hub in Commerce Manager. Integrating Pimberly with Commerce means you can synchronize catalog data such as products, price, images, and categories between Commerce and Pimberly.
You can also migrate your catalog data related information to Commerce as this integration can load all the data from Pimberly.
When integrating with third-party providers, we recommend you use the closest region in the third-party service to reduce latency as much as possible. See Regions and URLs table.
Collecting your Setup Information
Collecting Pimberly Setup Information
Collect the following setup information from Pimberly.
| Option | Description |
|---|---|
| API Base URL | Your Pimberly API Base URL. Default value is https://sandbox.pimber.ly/api/v2.2. |
| API Key | Your Pimberly API Key. Login to your Pimberly account to retrieve your API Keys. |
| Webhook URL | Your Pimberly webhook URL. Default value is https://sandbox-api.pimberly.io. |
Collecting Commerce Manager Setup Information
To create a new application key, go to SYSTEM > Application Keys.
| Commerce API Key | Description |
|---|---|
| Token URL | Your Commerce API token URL. |
| Client ID | Your Commerce Client ID. |
| Client Secret | Your Commerce Client Secret. |
Synchronizing from Pimberly to Commerce
As part of the Pimberly Integration, changes in catalog data in Pimberly automatically updates catalog data in Commerce.
Prerequisites
- Ensure that you have collected your setup Information.
- Ensure that you have created a template for price book, hierarchies, templates, and Variations in Commerce Manager.
Procedure
-
In Commerce Manager, go to COMPOSER > Integrations Hub.
-
Under Product Information, click Pimberly.
-
Click Configure. The Pimberly integration guides you through the steps you need to follow to complete the integration.
-
Click Next. The Connection page is displayed.
-
On Connection page, do the following:
-
Complete the Commerce Connection credential details:
- Client-ID - Your Commerce Client ID.
- Client-Secret - Your Commerce Client Secret.
- Token URL - Your Commerce API Token URL
-
Click Connect. The authorization is successfully completed.
-
Complete the Pimberly Connection credential details:
- API Key - Your Pimberly API Key.
- API Base URL - Your Pimberly API Base URL. Default value is
https://sandbox.pimber.ly/api/v2.2 - Webhook URL - Your Pimberly Webhook URL. Default value is
https://sandbox-api.pimberly.io
-
-
Click Next. The Configuration page is displayed.
The Enable Webhook Setup toggle is always enabled by default to automatically enable webhook in Pimberly.
-
In the Value fields, under the Webhook Actions section, create and update actions are set by default.
You can set up your webhook actions depending on your requirements. For example, if you only want to publish a message when a product is updated, then delete create from the Value field.
-
(Optional) To add move values, click +Add value.
-
(Optional) If you want to trigger full sync, turn on the Enable Full Sync toggle. The full sync will be triggered as per the Full Sync Cron Job Time. It is disabled by default.
noteDefault value of Full Sync Cron Job Time is
0 0 31 12. You can set your own time to run the full sync periodically. -
Click Next. The Templates page is displayed.
-
Click Edit under the Product Template.
-
Update the Product Template to map the Commerce product templates and attributes to Pimberly. For example, suppose you want to import pimberly field
Feature-1andFeature-2attributes into Commerce Manager. You need to update the correspondingtemplateSlugandfieldSlugfields to represent attribute slug in Commerce.The following example shows how this should look in the Product Template.
    "attributes":[[
    {
        "templateSlug":"products(extension)",
        "templateAttributes": [
            [
                $merge([
                    ($.'Feature 1' ?
                        {
                            "fieldSlug":"feature1",
                            "type":"string",
                            "value":$.'Feature 1'
                        } : {}
                    )
                ]),
                $merge([
                    ($.'Feature 2' ?
                        {
                            "fieldSlug":"feature2",
                            "type":"string",
                            "value":$.'Feature 2'
                        } : {}
                    )
                ])
            ]  ~> $filter(function($v, $i, $a) {
                $v.value
            })
        ]
    }
]] ~> $filter(function($v, $i, $a) {
        $count($v.templateAttributes) > 0
})
-
Click Edit under the Node Template.
-
Update the name of the hierarchy created in Commerce in the
hierarchySlugfield.For example:
"hierarchySlug": "uk-hierarchy" -
Click Edit under Price Template.
-
Update the price book name of Commerce in
priceBookNamefield. For example, if the price book name isUKandIEPricebookin Commerce cloud, update the same in the Price Template.For example:
"priceBookName": "UKandIEPricebook" -
Click Edit under the Variation Template.
-
Update the variation template to map with the Commerce. This is similar to Product Template. If you make any changes in Product, you need to make similar changes in Variations as well.
-
Click Next. The Field Settings page is displayed.
-
In the Child Product Field, the default value is Pimberly is
Items. Update this field if you change this in Pimberly. -
In the Parent Product Field, the default value in Pimberly is
Parents. Update this field if you change this in Pimberly. -
In the Product Type Field, the default value in Pimberly is
Product Type. Update this field if you change this in Pimberly. -
In the Parent Product Type field, the default value in Pimberly is
Product. Update this field if you change this in Pimberly. -
In the SKU Product Type field, the default value in Pimberly is
SKU. Update this field if you change this in Pimberly. -
Click Finish. Your integration is enabled. The webhook will be triggered successfully, and you can see the trigger details in Commerce Manager.
Demos
Watch the following video to learn how to synchronize your catalog data from Pimberly to Commerce: