Configure Shopper Catalog Rules
If your store has more than one catalog and you want to manage when certain catalogs are displayed, add catalog rules to control when a catalog is displayed.
You cannot create catalog rules for an organization catalog in a store.
A catalog rule contains the catalog you want to set the rule for and how you want to display it in the storefront.
For example, you can display different catalogs based on:
- The shoppers identify. If the shopper is linked to an EPCC Account or Customer entity, the rules can be configured for specific shoppers.
- How a shopper accesses your store, such as through a mobile app or a web storefront. Your shopper site would supply a HTTP header in the
EP-Channelheader - The value would be a string such as website or mobile app. - Custom Shopper Contexts in your shopper site. You can display different catalogs to different shoppers and define custom criteria by creating tags. With tags, you can create region-specific tags so that the catalog displays only in the specified regions. Your shopper site would supply a HTTP header in the
EP-Context-Tag- The value would be a string such asclearance,gold tier. - You can also specify the time schedules when you want a catalog's content to display in the storefront; for example, a winter seasonal catalog appears for a specific time period and it might have different pricing from other catalogs. A catalog customized for a sale is created and published before the scheduled date.
Caution should be used when relying on Channels and Tags if the Shopper is calling the EPCC API directly from the shoppers browser/device. The user may be able to tamper with these headers to gain access to alternative catalogs. A Backend For Frontend would be a more secure way of implementing these options.
If you only have one catalog for all customers and channels, you need not set a catalog rule. However if you have multiple catalogs, perhaps including a preview catalog, you should explicitly create a rule specifying which is your default catalog.
If a catalog rule has no criteria defined, it is the default catalog rule and will be used if no more specific catalogs with matching criteria match the shopper context.
Example Resolution Path
Creating catalog rules
-
In the Merchandise > Catalogs.
-
Click Add Rule.
-
In the Name field, enter a name for the rule without any spaces.
-
(Optional) In the Description field, enter a description for the rule.
-
In the Catalog field, select a catalog that you want to set the rule for.
-
(Optional) In the Accounts field, select the account names of accounts eligible to view the catalog. When a user has logged in with the account, they see the configured catalog. If you leave this field empty, all accounts can view the catalog.
-
(Optional) In the Customer field, select the email address of the customers eligible to view the catalog. If you leave this field empty, all customers can view the catalog.
-
(Optional) In the Channels field, enter the channels in which this catalog can be displayed.
The channel that matches the channel specified in a catalog displays that catalog in the storefront. If you leave this field empty, all channels display the catalog. Ensure that you press enter after typing each channel name.
-
(Optional) To further restrict the eligibility criteria for this rule, in the Tags field, enter user-defined tag.
-
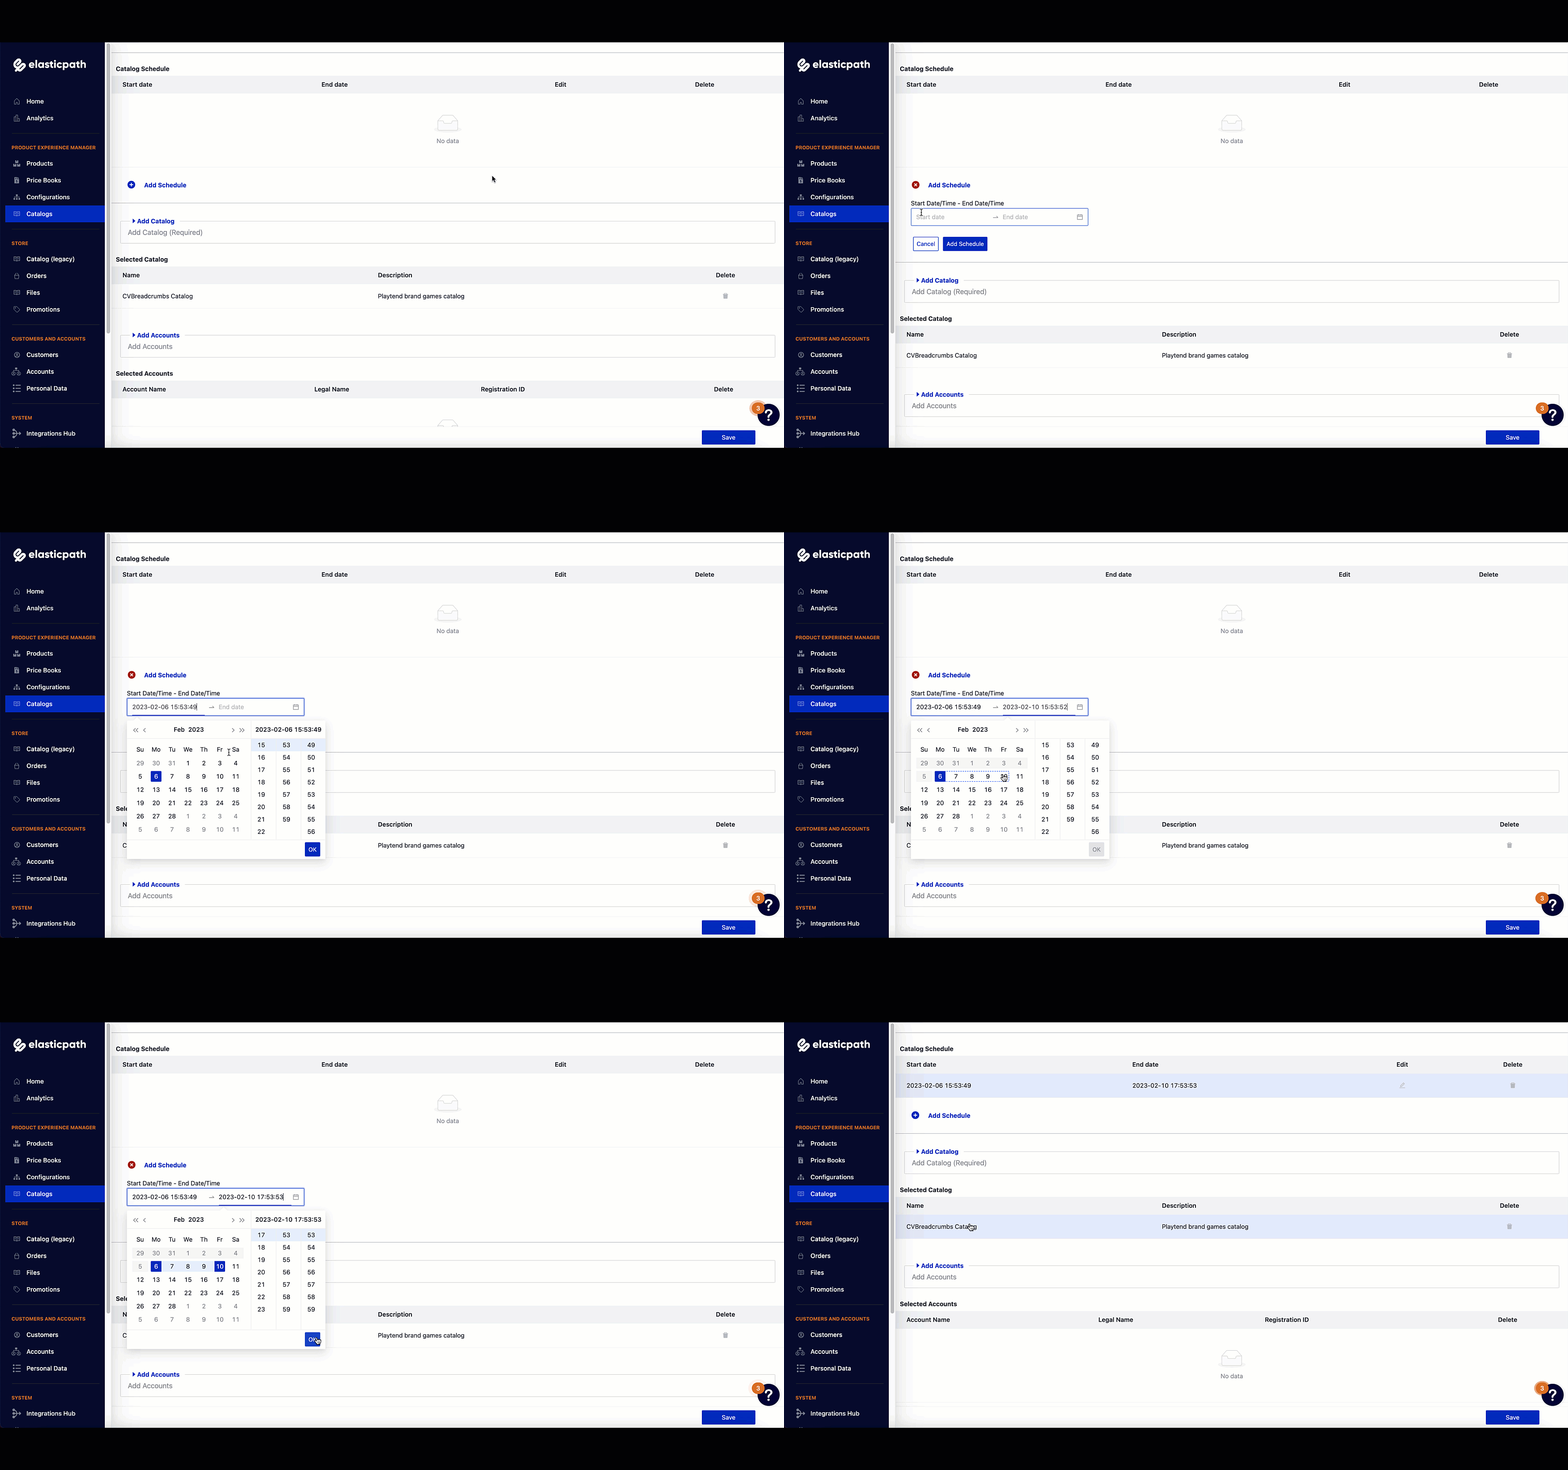
(Optional) To add a time schedule when you want the catalog to display, click Add schedule to catalog rules.
-
Click Save.
Add schedule to catalog rules
- Click the plus icon next to Add Schedule.
- Enter the start and the end date and time.
- Click OK.
- Click Add Schedule.

Commerce runs on Coordinated Universal Time (UTC) time and conforms to RFC 3339.
For detailed implementation steps, see Price Segmentation Guide
Next step
Publish the catalog to apply the rule to the store. For more information, see Publishing Catalogs.
Editing catalog rules
-
In the Merchandise > Catalogs page, click the Rules tab.
-
To edit a rule, do one of the following and update the rule as required:
- Double-click a rule.
- Click the ... icon in the catalog listing and click Edit.
-
Click Save.
Next step
Publish the catalog to apply the changes to the store. For more information, see Publishing Catalogs.
Deleting catalog rules
-
To delete a catalog rule, in the Rules page, do one of the following:
- Click the ... icon in the rule listing and click Delete.
- Select the checkbox in the rule listing and click Actions > Delete.
-
To delete more than one catalogs, select the checkbox in the rule listing of the rules that you want to delete and click Actions > Delete.
Next step
Publish the catalog to apply the changes to the store. For more information, see Publishing Catalogs.