Connecting your Cloudflare Domain
Subscription note
If you're not on a paying plan you will not receive SSL or Root Domain Redirection. Due to this, you'll only see one DNS record.
This document has a prerequisite
You'll need to already have completed the steps in Setting Up Custom Domain.
With the 1-3 records you have within your Studio settings page, you'll follow these steps.
Here's a run-down of how we'll reference these records in a human-friendly way throughout this document:
| Record Name | Record Type | Record Description |
|---|---|---|
| WWW Record | CNAME | This record has a HOST of "www" and is named the www record since it hosts/establishes the hosting of your domain. |
| Root Domain Record | A Record | This record has a HOST of either nothing (blank) or "@" depending on your host. Within GoDaddy, you'll use "@." |
| SSL Record | CNAME | This record has a HOST which begins with an underscore (_) you'll need to verify the HOST and VALUE are both correct. |
- Once logged into your Cloudflare dashboard, click the appropriate Cloudflare account for the domain you'd like to connect and click the DNSapp.
- The UI interface for adding DNS records appears under "DNS Records". This
graphic from Cloudflare
will help you navigate the input form:
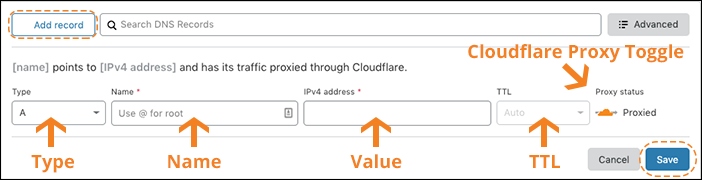
- Click the "Add Record" and select record type (WWW & SSL Record will be "CNAME", the Root Domain is "A Record").
- Input "Name" value (found in Studio records table)& "Target" (A Record), the "IPv4"("Value" in Studio records).
Troubleshooting
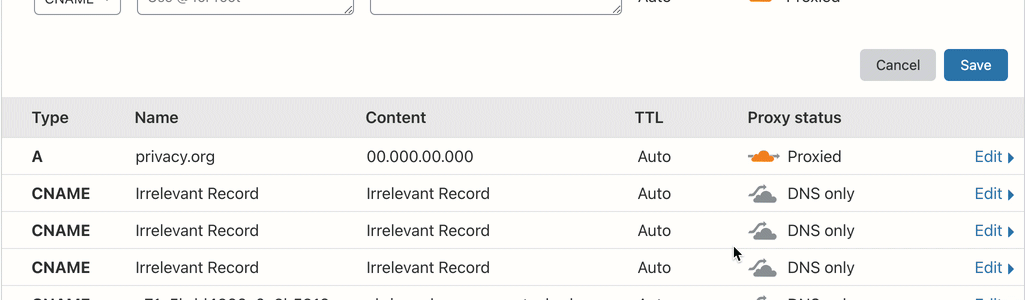
If showing "Pending" within Studio, this could be due to leaving proxying on (indicated by an orange cloud to the right
of the DNS record).
You can disable this by clicking "Edit >" then clicking "Proxied".
Please reference this document from Cloudflare and contact the Cloudflare support team if you have any issues.