Setting up A/B Test
Through Studio, you're able to run full A/B tests for the components that make up your webpages; in fact the process is very simple.
-
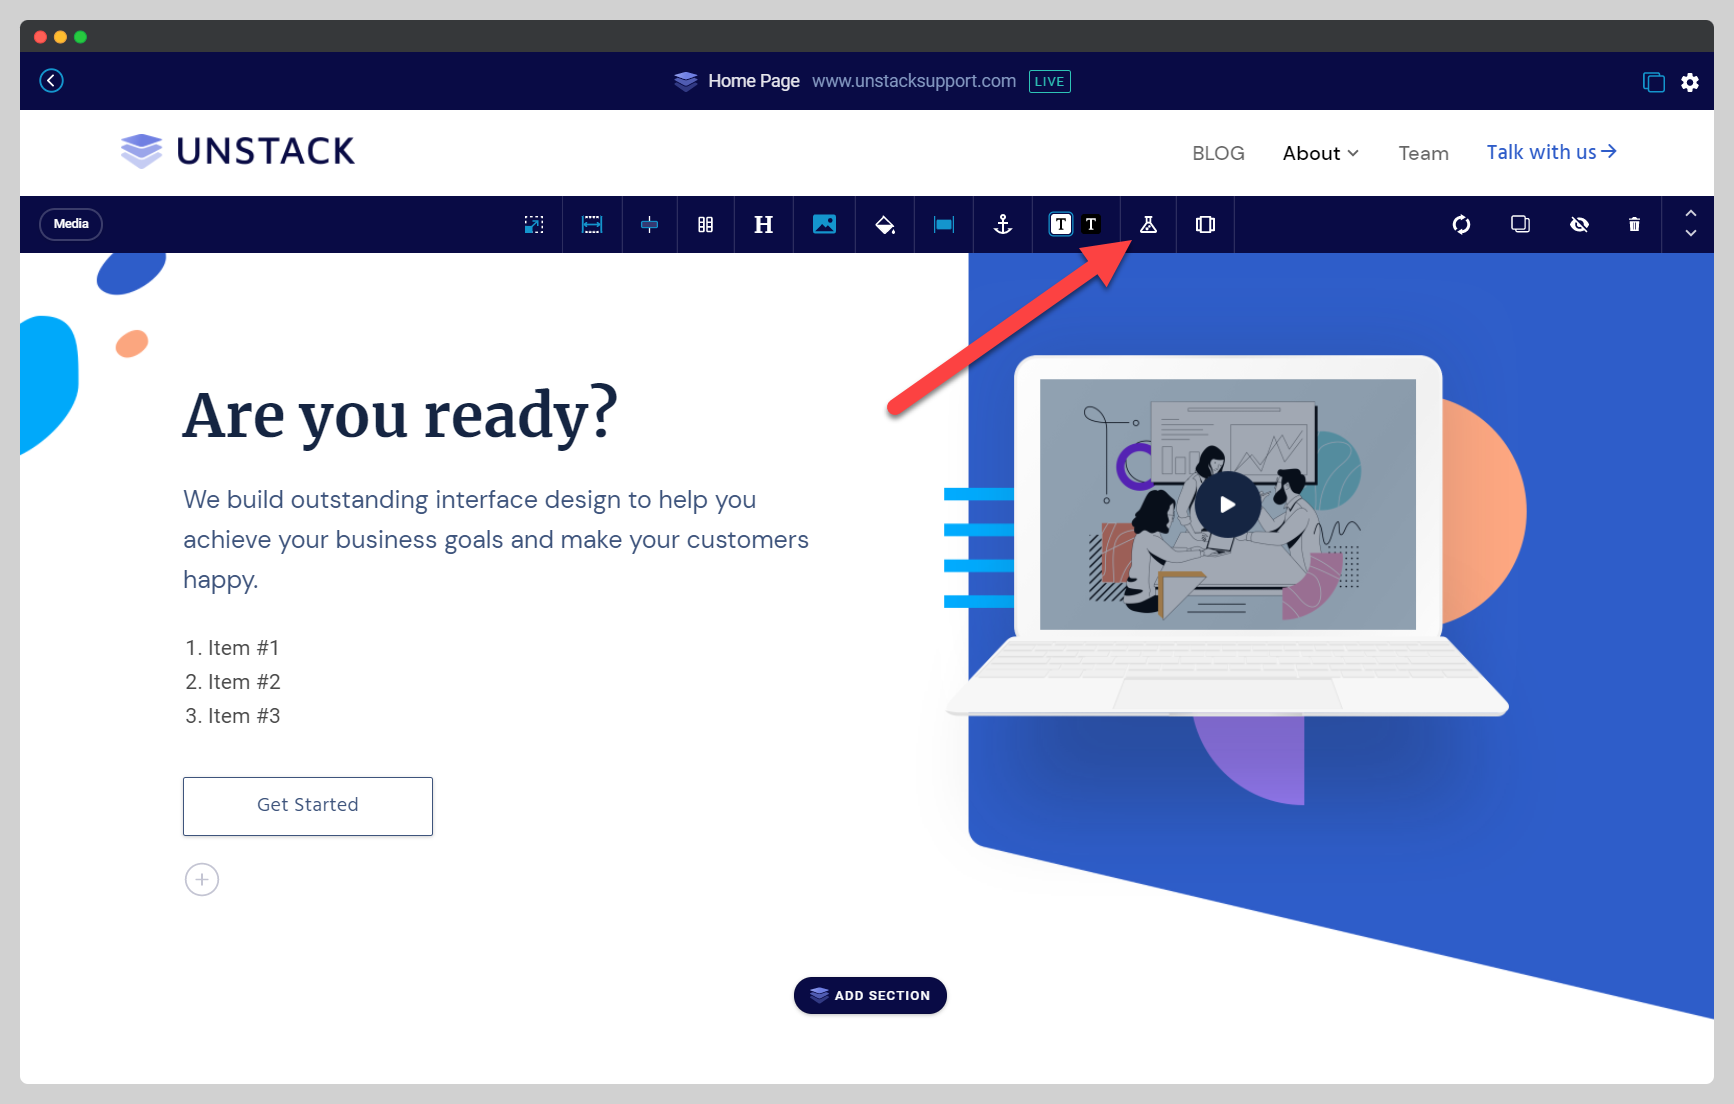
The first thing that needs to be done is to identify which component you want to to test. For the purposes of this walkthrough the component being A/B tested is the header-copy of a page's hero section.
To get the test started, click into the component, and then select the beaker icon from the component toolbar ( pictured below). Doing so enables A/B testing for this component.
-
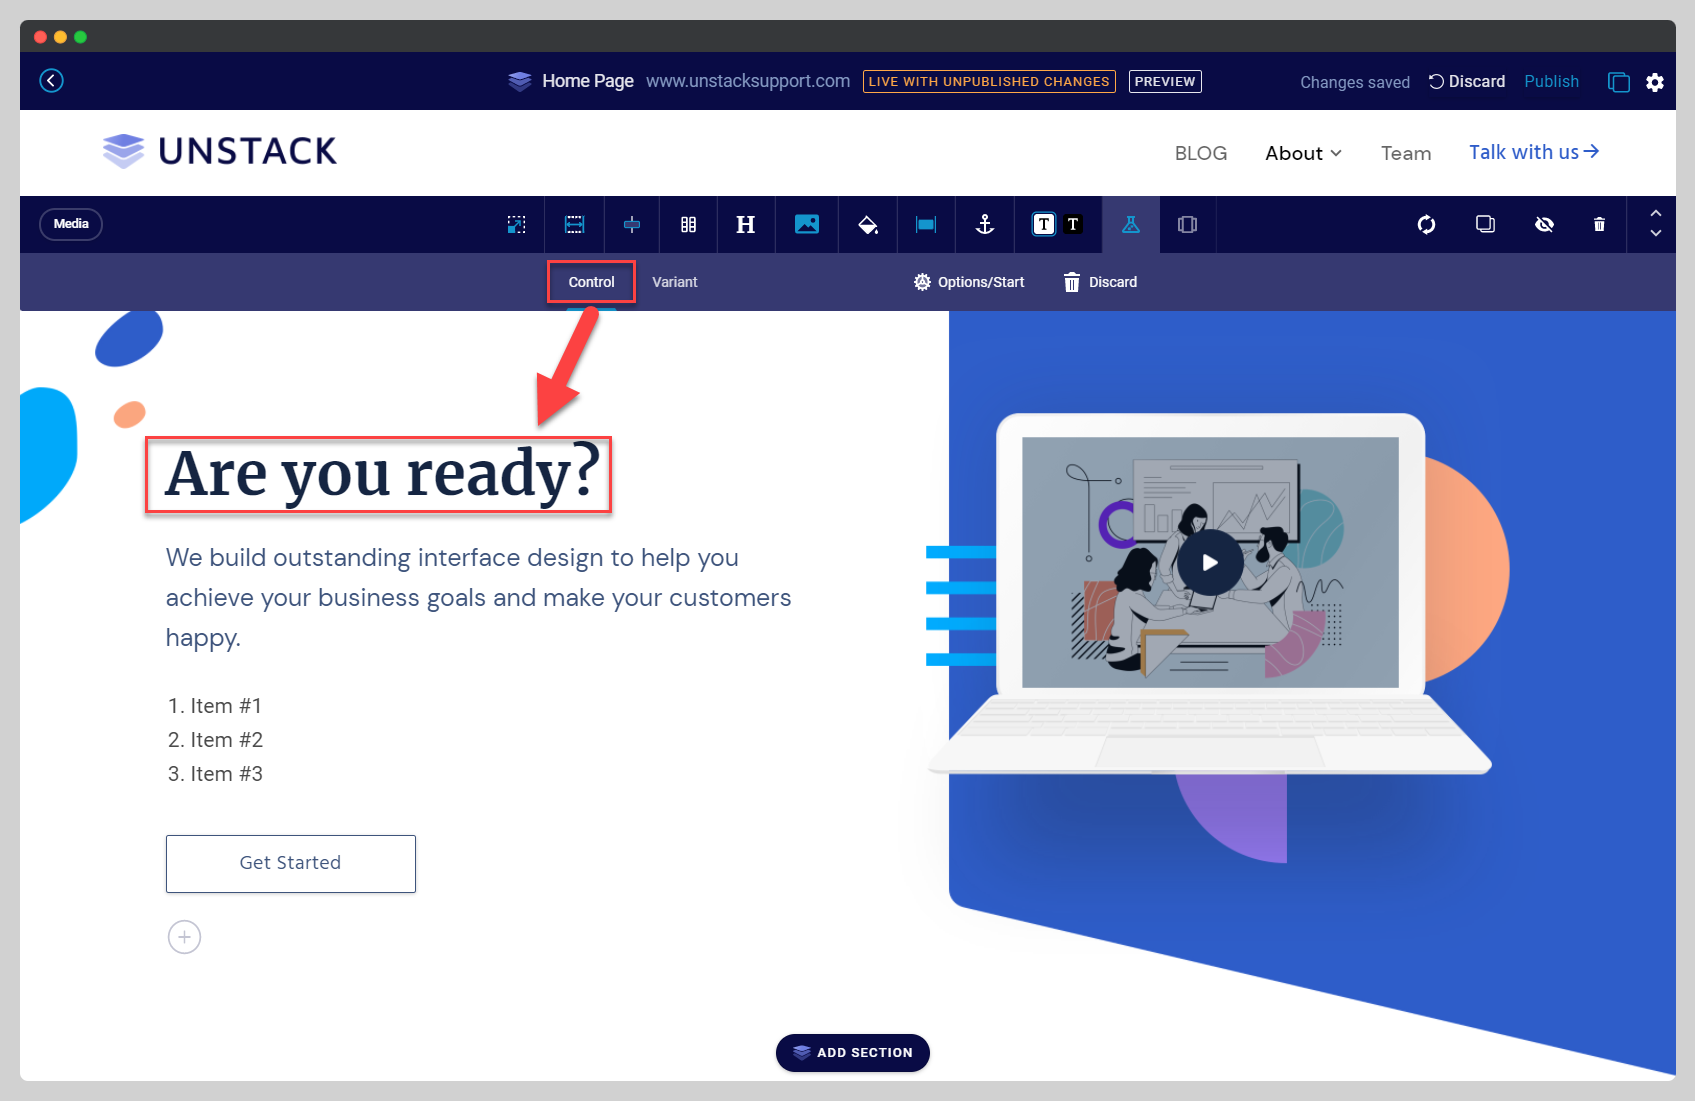
Once enabled, there will be a couple new options available in the toolbar:
- Control*
- Variant
- Options/Start
- Discard.
Think of this as the A in A/B Test. Generally speaking, this is the original version of the component that you're testing the Variant against.
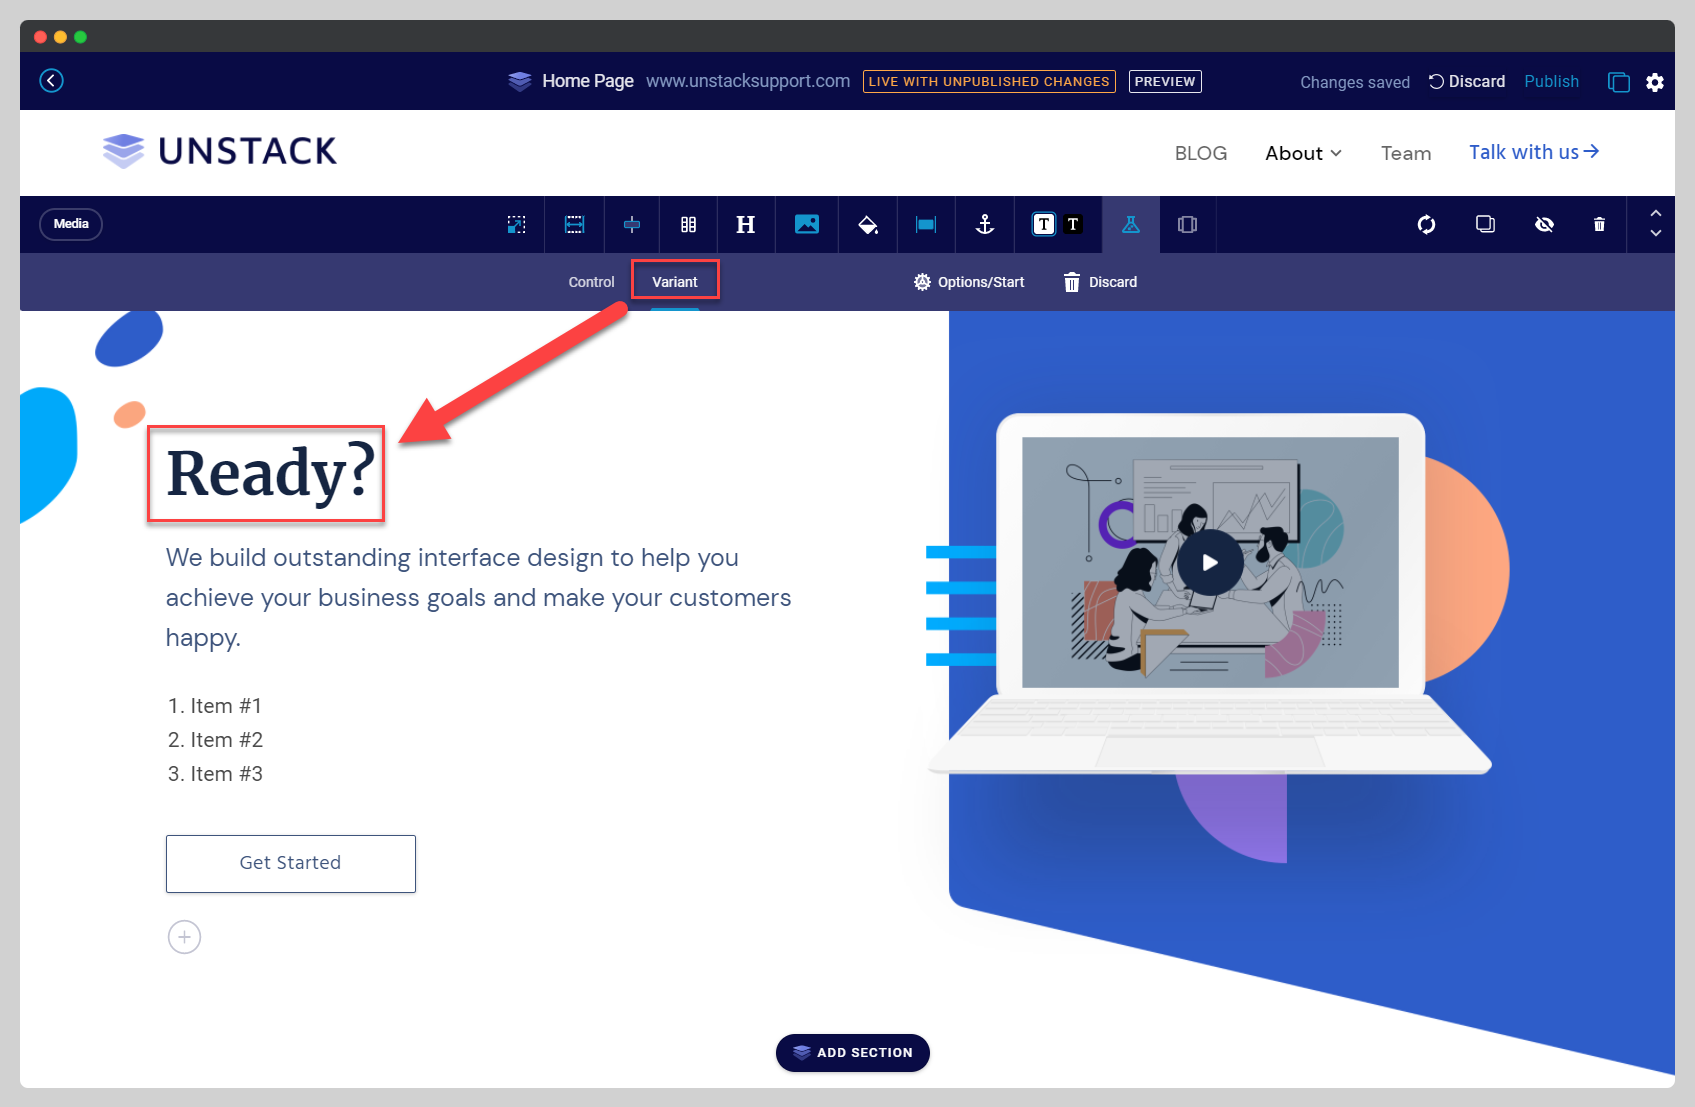
Think of this as the B in A/B Test*. Generally speaking, this is a Variant of the Control that's been changed.
In the below example, the header-text of the Variant has been adjusted to *"
Ready?"from the "Are you ready?" that was set in the Control.*
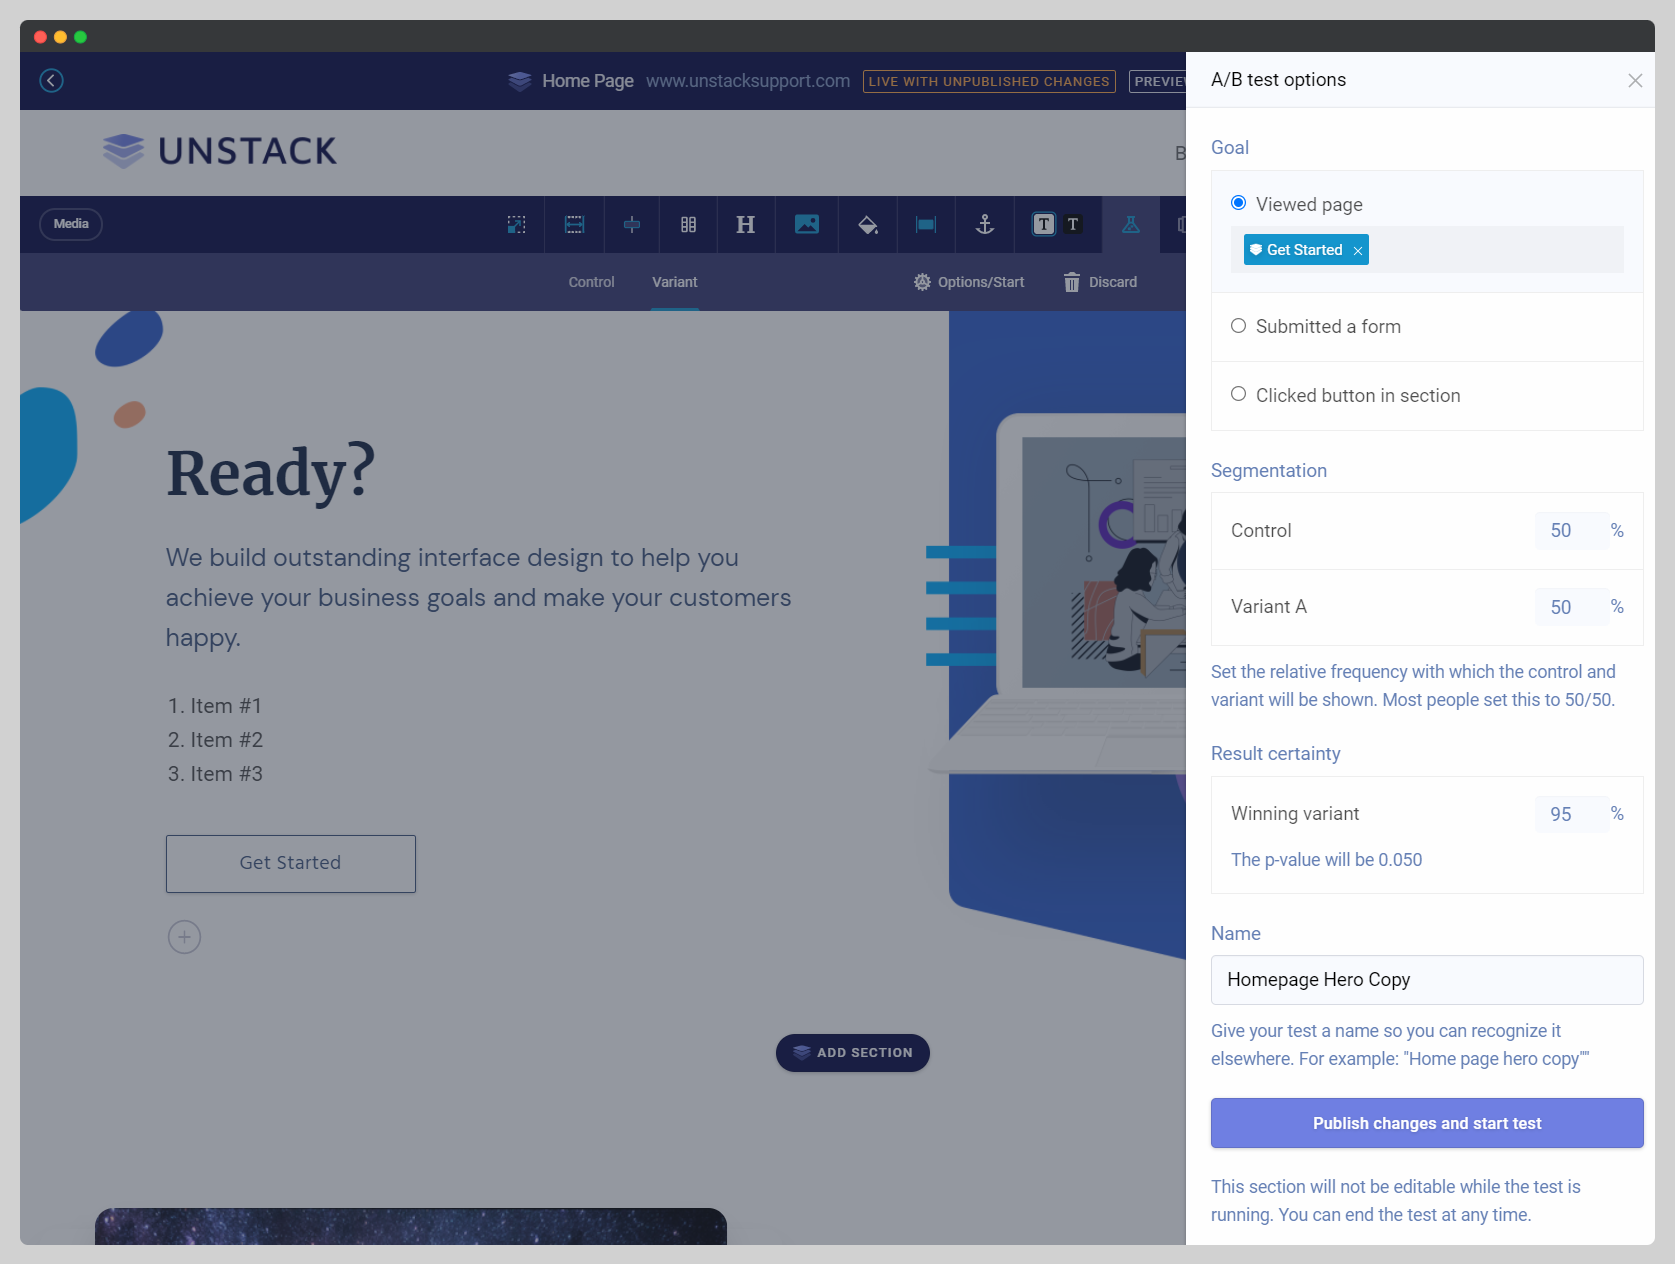
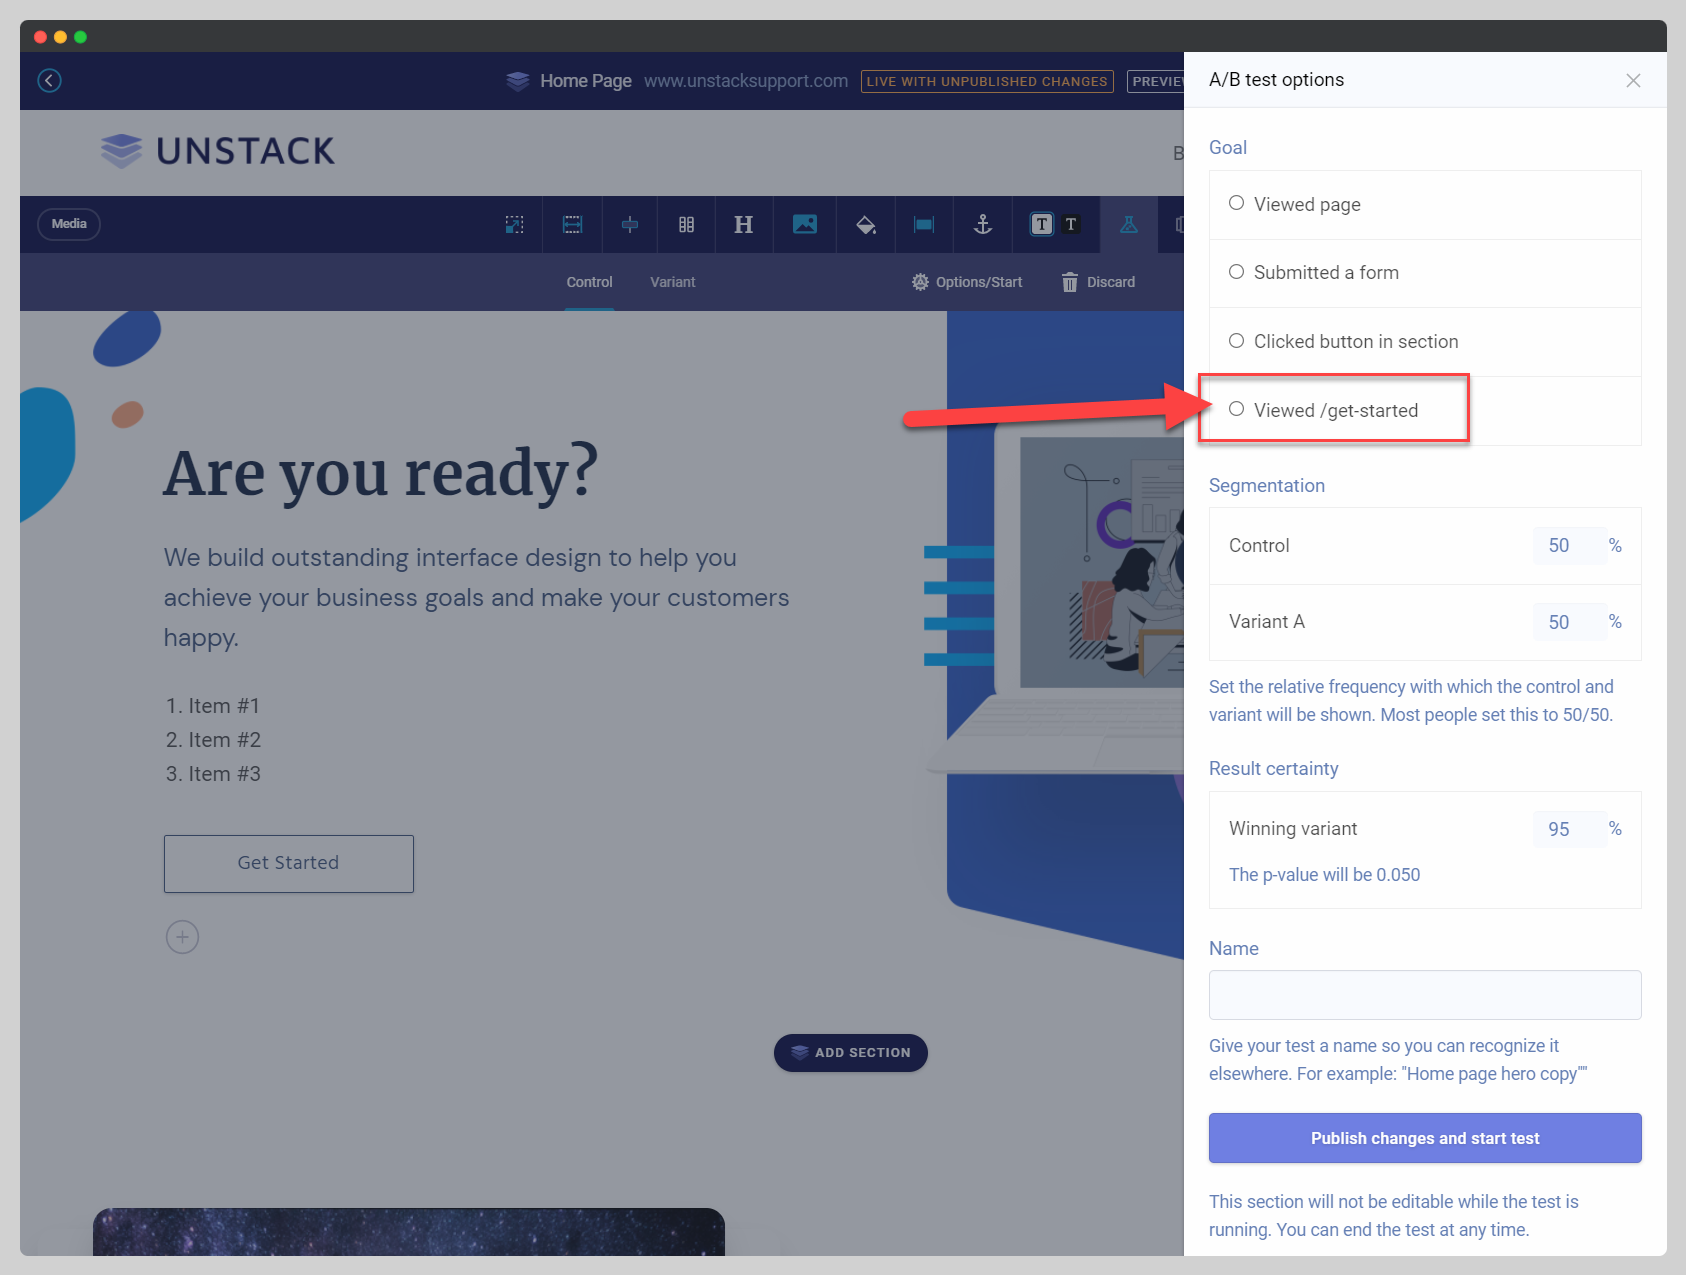
Selecting Options/Start opens up the A/B Test Options drawer from the right hand side of your screen. This section is where:
- the goal of the test is defined.
- a segmentation balance between the Control and Variant is established.
- a minimum result certainty percentage is configured.
- the test is named and published.
This option scraps the test you've started to create and disables A/B testing for this component.
-
Once you've settled on the difference being tested between the Control and the Variant, it's time to define a goal for the A/B Test. Without a defined goal, there's no way to measure the success of the test.
By default, there are three different types of goals you can choose from, although only one can be set:
- Page Views: For the purposes of this test, selecting this option allows views of another of your Studio pages to be considered a goal completion.
- Form Submissions: For this test, define which form submission on the site should be considered a goal completion. (Klaviyo or HubSpot)
- Button Clicks: For this test, track clicks to the action button/link in the component being test as goal completions.
- Added to Cart: For this test, track add to carts as goal completions. This is only available to subscribers of our eCommerce plans.
Saving a Goal
After you define a specific page view as a goal in one test, it's saved as a default goal and is available as a default option in the next test you set up.
As an example, the below image shows the goal from a previous A/B Test is now an available option in Goals section.
-
Segmentation allows you to define a balance between the Control and Variant. If you want to weigh the Control more heavily, you can just set the percentage for Control higher than that of the Variant. The same is true for those who want to weigh the Variant more heavily than the Control.
In other words, the higher the percentage, the higher chance that version has of showing up for a user.
By default, this setting is set to 50% for both options. For most people, this is going to be the recommended setting.
-
Next, you'll need to define when you feel comfortable letting Studio auto-determine the winner of a test. This is done by selecting a minimum Result Certainty percentage which is what we use to make that determination. In other words, this is where you define the point where it's clear that either the Control or Variant has prevailed over the other.
This confidence level increases as more users interact with the component being tested, and complete the previously-defined goal. Additionally, the length of the test plays a role in helping Studio define that confidence level.
How do we calculate A/B test results?
We use the Pearson Chi-Squared test for calculation of A/B test results. The p-value is the inverse of the confidence in the results. E.g. a p-value of 0.05 means 95% confidence (i.e. 1 out of 20 such tests would yield a false positive). You can set the target p-value lower if you want more stringent test results, although .05 is generally considered acceptable in the world of marketing for all but the largest scale tests.
You'll sometimes see ranges listed for Conversion Rate because of how the Chi-Squared test actually works.
In other words, if there were 10 clicks and 100 unique visitors, then that is obviously a conversion rate of 10%. However, the Chi-Squared test result would imply that based on the amount of data collected, the implied volatility is still high, and therefore shows a range since expecting a final result in the range of (as an example) 5.0% to 10.0% is reasonable.
Chi-Squared test results will not yield a winner until the ranges on both segments narrow with more data so as not to produce an overlap between them exceeding the target p-value.
-
At this point, all that's left to do is to give this test a name and hit "Publish changes and start test" to save your changes and push the test live.
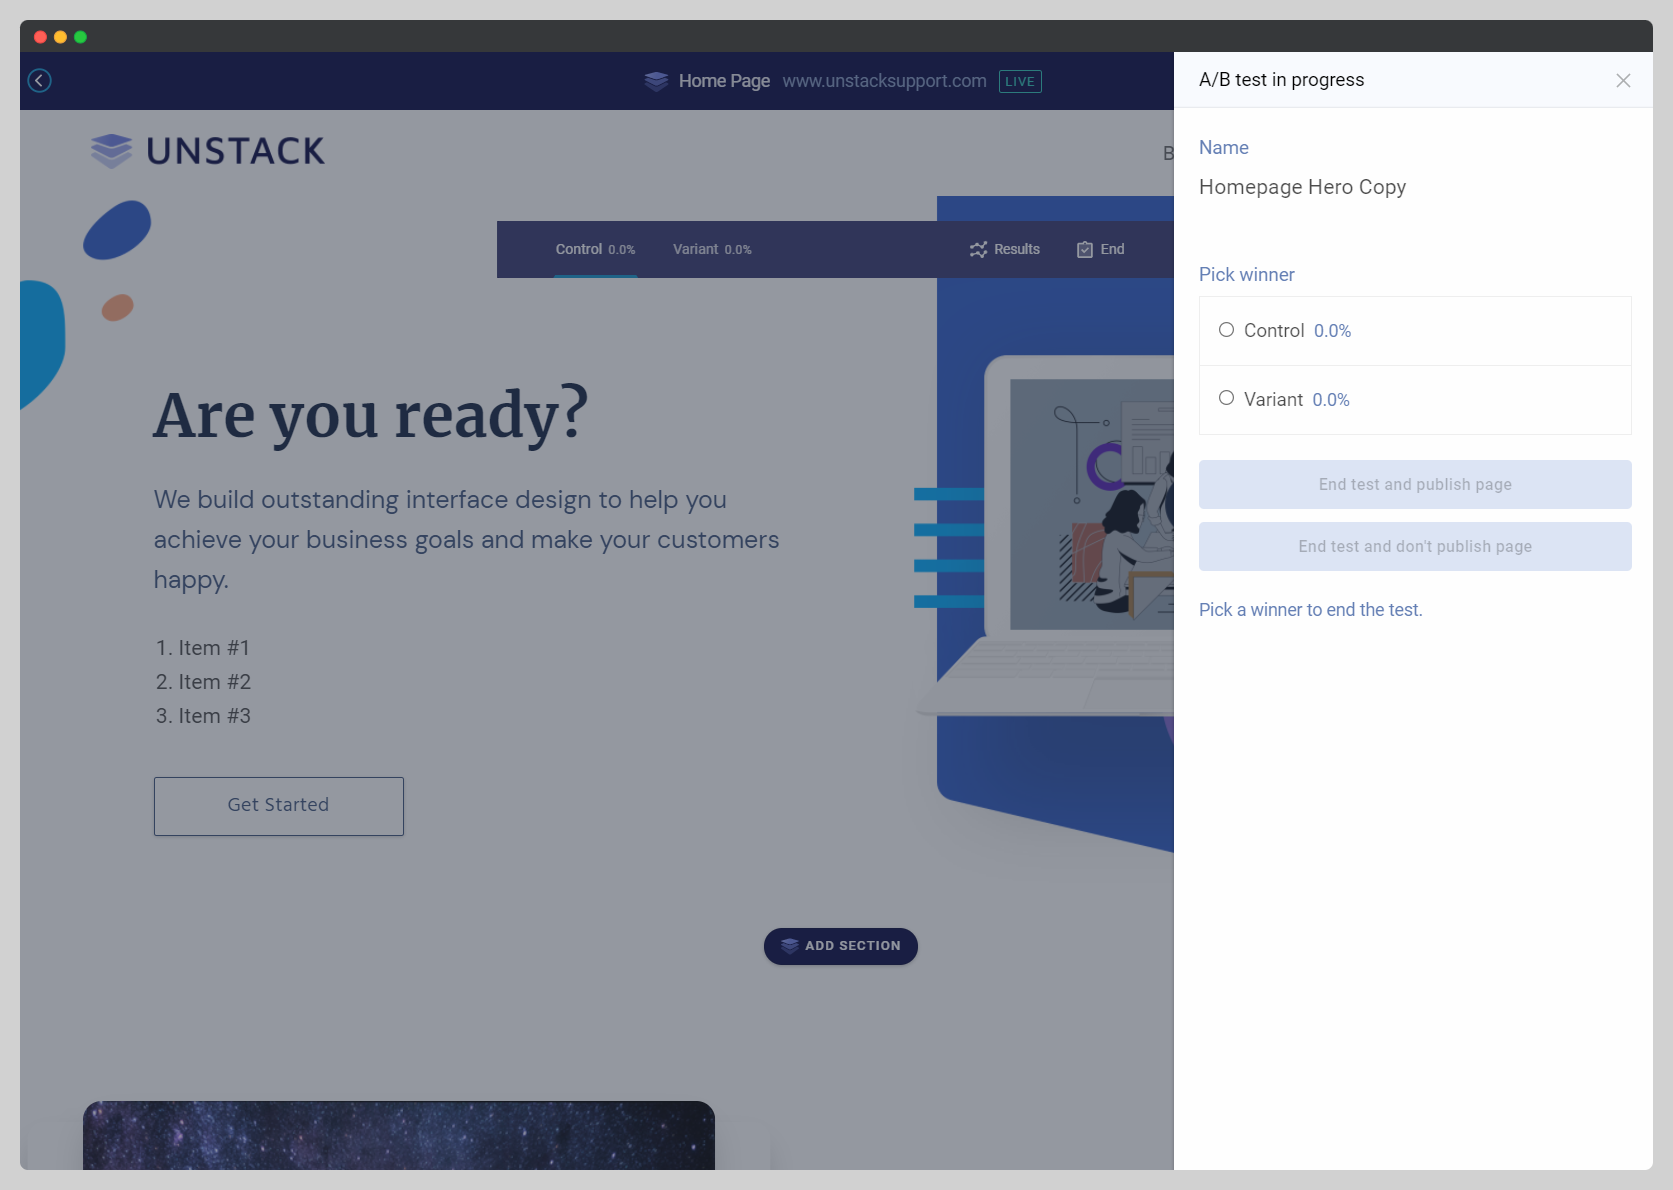
When giving it a name remember that you're going to be looking to this test for insights at a later date. Therefore, naming it something that's understandable to you at a glance will be paying it forward to your future self. For the above example I'd name the test something along the lines of "Homepage Hero Copy" so that down the line I'll remember exactly what's being tested and where.
-
Now that the test has begun, any time you open the page where this test is taking place in the editor, you'll see the below-pictured bar floating over the component.
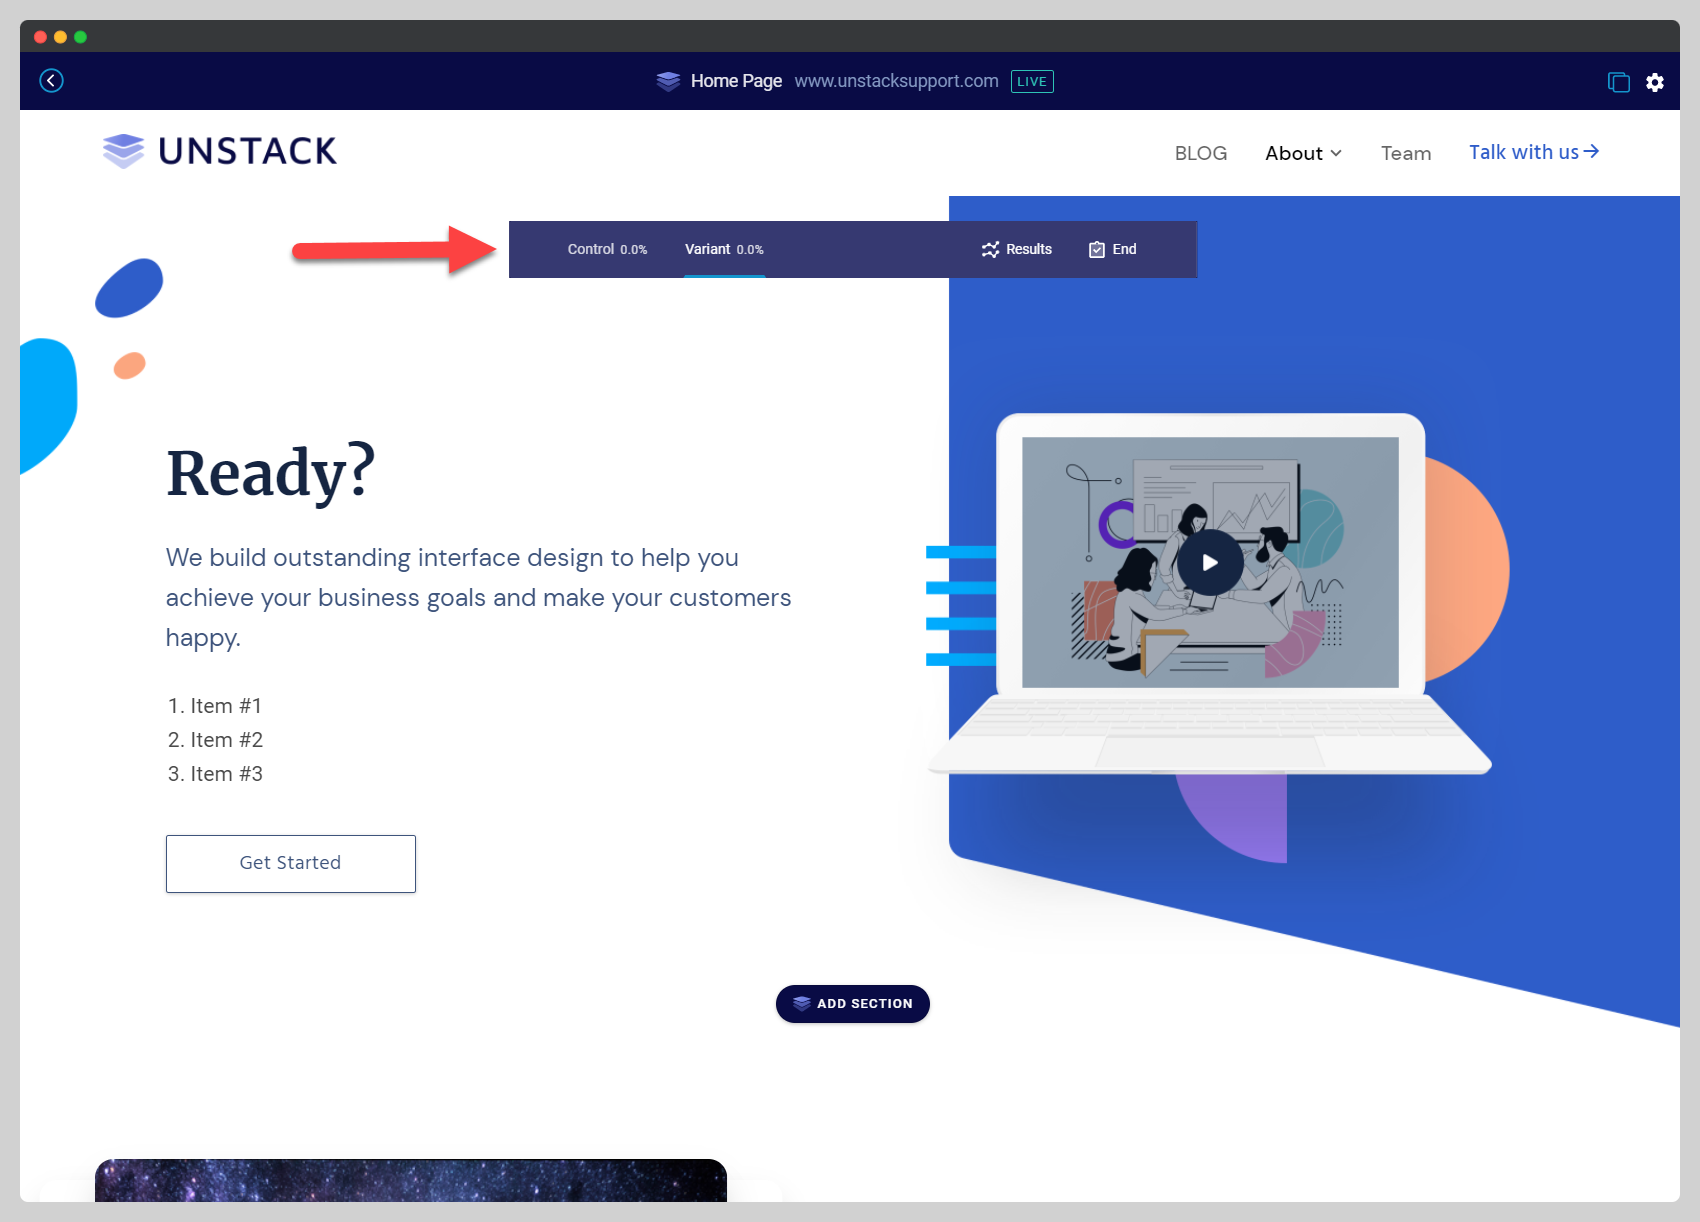
Keep in mind that while the test is ongoing, you're not able to edit the component. To end the test, select "end" from the right side of this floating toolbar. This will prompt you to choose a winner and to publish a new version of the page.
Now that your A/B Test has begun all that is left to do is wait. Once your A/B test has run, you are ready to understand your A/B results.