Integrating with Advanced Commerce (GrapheneHC)
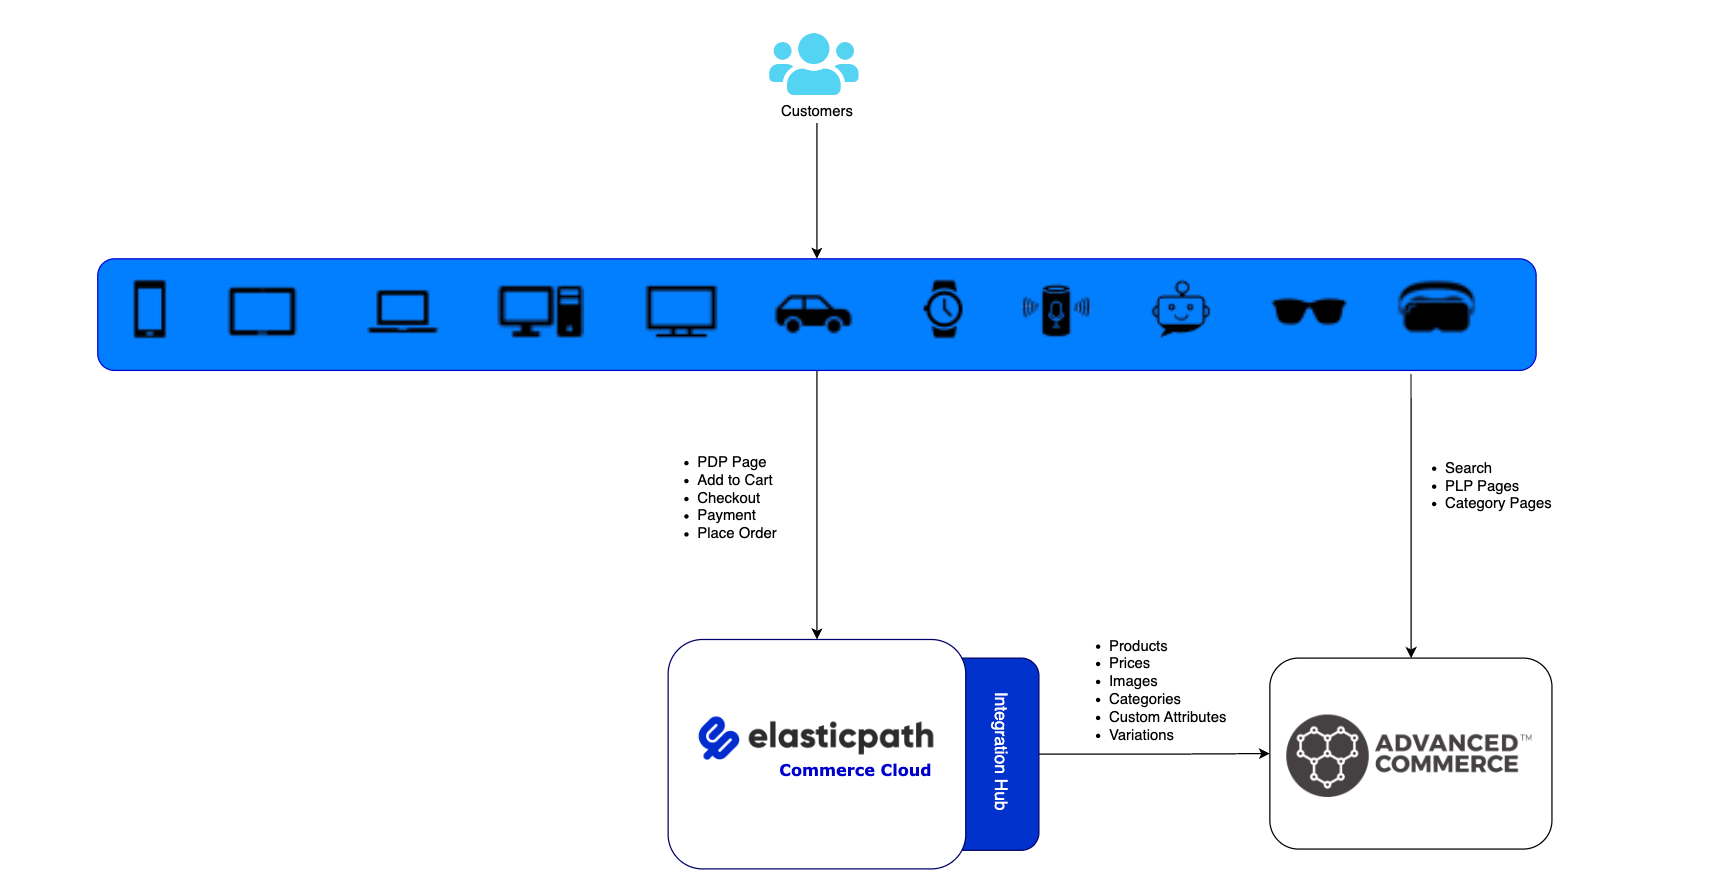
You can integrate Commerce with Advanced Commerce (GrapheneHC) using the Integrations Hub in Commerce Manager. This means you can synchronize Commerce data such as products, prices, images, categories, custom attributes, and variations with your Advanced Commerce (GrapheneHC) storefront, giving you advanced searching and merchandising capabilities.
The following diagram shows how Elastic Path data is sent to an Advanced Commerce (GrapheneHC) storefront.

When a catalog is published, the integration automatically sends the data from Commerce to an Advanced Commerce (GrapheneHC) storefront.
For more information, watch a video.
Advanced Commerce (GrapheneHC) Integration Templates
The Advanced Commerce (GrapheneHC) Integration uses templates to create the data from your Commerce store in your Advanced Commerce (GrapheneHC) storefront. The templates use JSONata as their query language.
Product Template
The Product Template creates/updates products in Advanced Commerce (GrapheneHC), including any configured locales. You can edit the template, depending on your requirements. The Product Template must conform to the Advanced Commerce products schema.
Prices are created/updated in all currencies, in addition to any sale prices you have configured for your products.
If you have multiple currencies, in prices, you must provide the catalog ID for each currency you created in Advanced Commerce (GrapheneHC). For example:
$key & "_" & $uppercase($product.meta.catalog_id)
See Prerequisites.
If you only have one currency, you can remove this and the catalog defaults to the language configured in the Product Template.
In features, you can configure the product attributes you want to display in your Advanced Commerce (GrapheneHC) storefront. The following example fetches product_weight and product_height from the products(dimensions) template.
"features": [
    {
        "hierarchy": [
            "weight",
            $number($product.attributes.extensions.$.'products(dimensions)'.$.'product-weight')
        ]
    },
    {
        "hierarchy": [
            "height",
            $number($product.attributes.extensions.$.'products(dimensions)'.$.'product-height')
        ]
    }
] ~> $filter(function($v, $i, $a) {
    $count($v.hierarchy) > 1
})
Category Template
The Category template creates/updates your hierarchies, nodes, and products associated with those nodes (including any configured locales) in Advanced Commerce (GrapheneHC). You can edit this template, depending on your requirements.
The Category template must conform to the Advanced Commerce categories schema.
Definition Template
The Definition template creates/updates Product Experience Manager variations and options in Advanced Commerce (GrapheneHC). You can edit the template, depending on your requirements. The Definitions template must conform to the Advanced Commerce definition schema.
Collecting Your Setup Information
Before you begin configuring your integration in Commerce Manager, you need to collect the necessary setup information from Advanced Commerce (GrapheneHC) and Commerce Manager.
Collecting Advanced Commerce (GrapheneHC) Setup Information
Collect the following setup information from Advanced Commerce (GrapheneHC).
| Option | Description |
|---|---|
| API Base URL | Your Advanced Commerce API Base URL, for example, https//{{domainKey}}.api-{{location}}.advancedcommerce.services. Contact your Advanced Commerce team. |
| API Key | Your Advanced Commerce API Key. |
| API Secret | Your Advanced Commerce Secret. |
Collecting Commerce Manager Setup Information
To create a new application key, go to SYSTEM > Application Keys.
| Commerce API Key | Description |
|---|---|
| Token URL | Your Commerce API Token URL. For example, https://useast.api.elasticpath.com/oauth/access_token. See Regions and URLs. |
| Client ID | Your Commerce Client ID. |
| Client Secret | Your Commerce Client Secret. |
When integrating with third-party providers, we recommend you use the closest region in the third-party service to reduce latency as much as possible. See Regions and URLs table.
Prerequisites
-
Ensure that you have collected your setup Information.
-
In Commerce Manager, ensure that you have created the data that you want to synchronize with Advanced Commerce (GrapheneHC).
-
In Advanced Commerce (GrapheneHC), ensure that you have created the following:
- The currencies available for the products in your Commerce store catalog. Create the currencies using your Commerce catalog ID. When the catalog ID is passed in the Product Template, Advanced Commerce (GrapheneHC) displays the prices in the currencies you have configured for your catalog.
- An Advanced Commerce (GrapheneHC) storefront for each Commerce catalog you want to publish. As part of the integration, you need to map your catalog to your Advanced Commerce (GrapheneHC) storefront ID. See Configuring the Integration.
- The languages available for the products in your Commerce catalog.
Configuring the Integration
Now that you've met the prerequisites, let's begin with configuring the integration.
- In Commerce Manager, go to COMPOSER > Integrations Hub.
- Under Search Integrations, click Advanced Commerce (GrapheneHC) Integration.
- Click Configure. The Advanced Commerce (GrapheneHC) integration guides you through the steps you need to follow to complete the integration.
- Click Next. The Connection page is displayed.
- On the Connection page, do the following:
- Complete the Commerce Connection credential details:
- Client-ID - Your Commerce Client ID.
- Client-Secret - Your Commerce Client Secret.
- Token URL - Your Commerce API Token URL
- Click Connect. The authorization is successfully completed.
- Complete the Advanced Commerce (GrapheneHC) Connection credentials:
- API Base URL - Your Advanced Commerce (GrapheneHC) API base URL.
- API Key - Your Advanced Commerce (GrapheneHC) API key.
- API Secret - Your Advanced Commerce (GrapheneHC) secret.
- Complete the Commerce Connection credential details:
- Click Edit for each template you want to edit. (#advanced-commerce-graphenehc-integration-templates).
- Click Next. The Catalog And Storefront Mapping page is displayed.
- From Elastic Path Catalog list, select the catalog you want to display in Advanced Commerce (GrapheneHC).
- From Advanced Commerce Storefront ID type the ID of the Advanced Commerce storefront where you want to display your catalog.
- Click Add to Catalog and Storefront Mapping to add as many catalogs as you want.
- Click Finish. Your integration is enabled.
Troubleshooting the Advanced Commerce (GrapheneHC) Integration
You can debug any issues in Executions. Click an execution to see the execution details. The Logs shows the output and any errors or warnings.
Select Retry to initiate an execution again.