Integrating with Braze
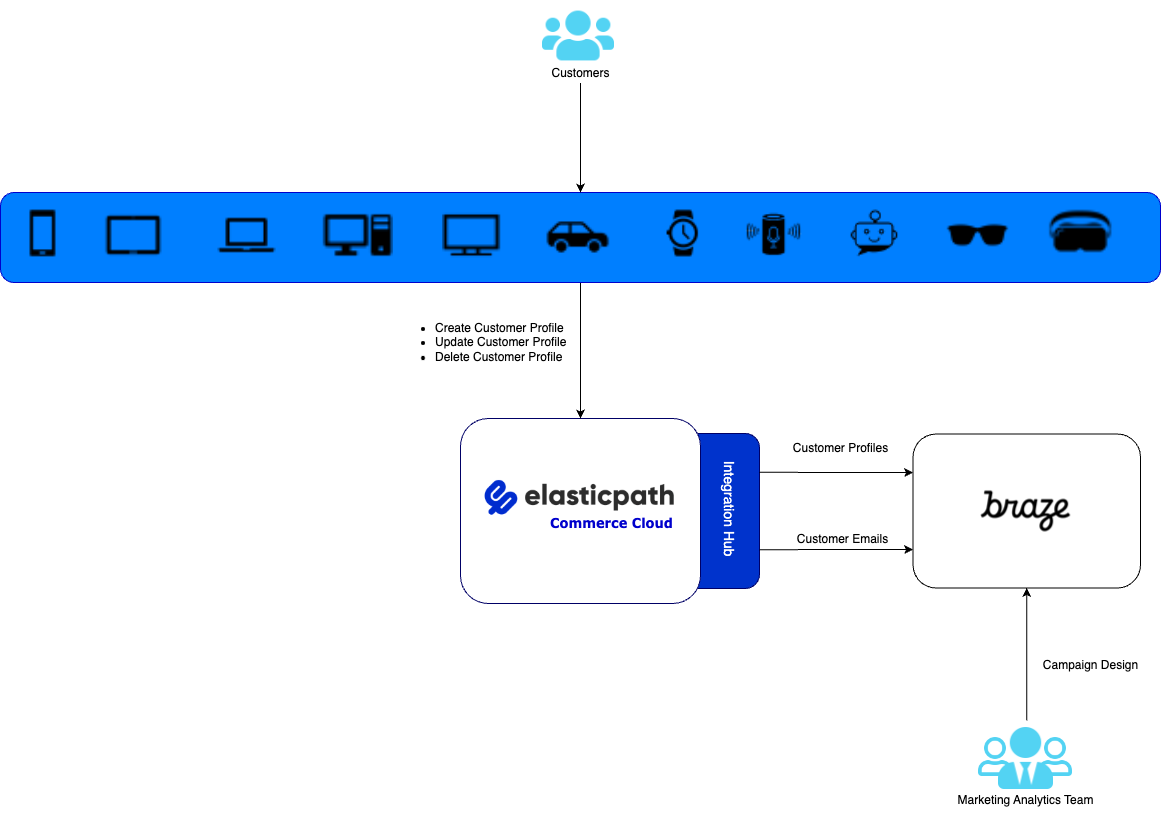
You can quickly and easily integrate Commerce with Braze using the Integrations Hub in Commerce Manager. Integrating with Braze allows you to send customer profile information of Commerce to the Braze platform. Additionally, this integration allows a user to declare how the data from Commerce is mapped to Braze endpoints.

When integrating with third party providers, we recommend you use the closest region in the third-party service to reduce latency as much as possible. See Regions and URLs table.
Prerequisites
-
Ensure that you have collected your Client-ID and Client-Secret from Commerce Manager. See Application Keys.
-
Ensure that you have received a URI from Braze to interact with the Braze services once you have registered as a Braze customer.
-
Ensure that you have created your Braze API Key. The following procedure describes how to create your API key:
-
Log into Braze.
-
Under SETTINGS, click Developer Console.
-
Go to API Settings tab.
-
Under Rest API Keys section, click +Create New API Key.
-
In the API Key Name field, enter a name for your API key.
-
To set minimum permissions for this integration, select users.track, users.delete, and email.status checkboxes.
-
Click Save API Key.
A list of your API keys will be displayed once you have saved your new API key. Copy your created API Key from the list.
-
Configuring Braze Integration
-
In Commerce Manager, go to COMPOSER > Integrations Hub.
-
Under Marketing & Communication, click Braze. The integration guides you through the steps you need to follow to complete the integration.
-
Click Configure. The Trigger details consist of some details about the integration.
-
Click Next. The Configuration page is displayed.
-
Enter the following details in Commerce Connection:
- Client-ID - Your Commerce Client ID.
- Client-Secret - Your Commerce Client Secret.
- Token URL - Your Commerce API Token URL.
Token URL for:
- EU -
https://useast.api.elasticpath.com/oauth/access_token - US -
https://useast.api.elasticpath.com/oauth/access_token
-
Click Connect. The authorization is successfully completed.
-
Enter your Braze API Key. See Prerequisites.
-
Enter your Braze URI.
-
Click Next.
In EPCC Customer Events, the User Track and Change Email Subscription Template checkboxes are selected by default for:
- EPCC Customer Created
- EPCC Customer Updated
- EPCC Customer Deleted
When these checkboxes are selected, any changes in the customer profile information in Commerce causes the webhook event to be created to change the customer profile information in Braze.
The transformation templates are implemented using the JSONata query language and you must must adhere to the JSONata standards. For example, you can use the following template if you want to concatenate the
external id,name, andemailusing a colon delimiter:{
"attributes": [{
"external_id": id,
"concatenated_info": $join([external_id,':',name,':',email])
}]
} -
Click Finish. Your integration is enabled.
The three new webhooks created will be displayed on the SYSTEM > Store Settings > Webhooks page.
Using Braze Integration
You can extend or modify your configuration once you have enabled the integration. The following scenario explains how to change your configuration details in your integration:
-
Log into Commerce Manager.
-
Go to CUSTOMERS and ACCOUNTS > Customers.
-
Create a new customer. See Creating Customers.
-
Go to COMPOSER > Integrations Hub > Executions to see that the new customer event has been initiated.
-
Extend your customer profile to add more customer-specific information and create new flows and fields. See creating Flows in Commerce Manger.
For example, create a new field know as
demo_attribute. -
Log into Braze and search for the new customer that you have created in Commerce Manager.
You can see the customer name in the Custom Attributes column.
-
Go to Summary > Reconfigure.
-
On the Customer Event Mapping page, modify your transformation template under EPCC Customer Updated section.
For example, to map
demo_attributein Braze, modify the User Track transformation template under EPCC Customer Updated section:{
"attributes":[{
"external_id": id,
"email": email,
"name": name,
"last_name": last_name,
"customer_status": status,
"demo_epcc_attr" : demo_attribute
]}
}The transformation templates are implemented using the JSONata query language and you must must adhere to the JSONata standards.
-
Click Finish to save your changes.
Demos
Watch the following video to learn how to integrate Commerce with Braze using the Integrations Hub in Commerce Manager: