Integrating with Postmark
You can quickly and easily integrate Commerce with Postmark using the Integrations Hub in Commerce Manager. Integration with Postmark enables you to send emails to single or multiple recipients.
The integration with Postmark supports custom events published by external event sources, in addition to the native Commerce event types. The Postmark event handler is implemented as part of the integration process; it accepts the Commerce event types and other custom events configured in external sources. For more information on custom events, see Publishing Custom Events in External Sources.
To be accepted by the event handler, the events must be in the specified JSON format. For more information on the JSON formatting, see Configuring Event-Mapping Configurations.
Postmark Email Template
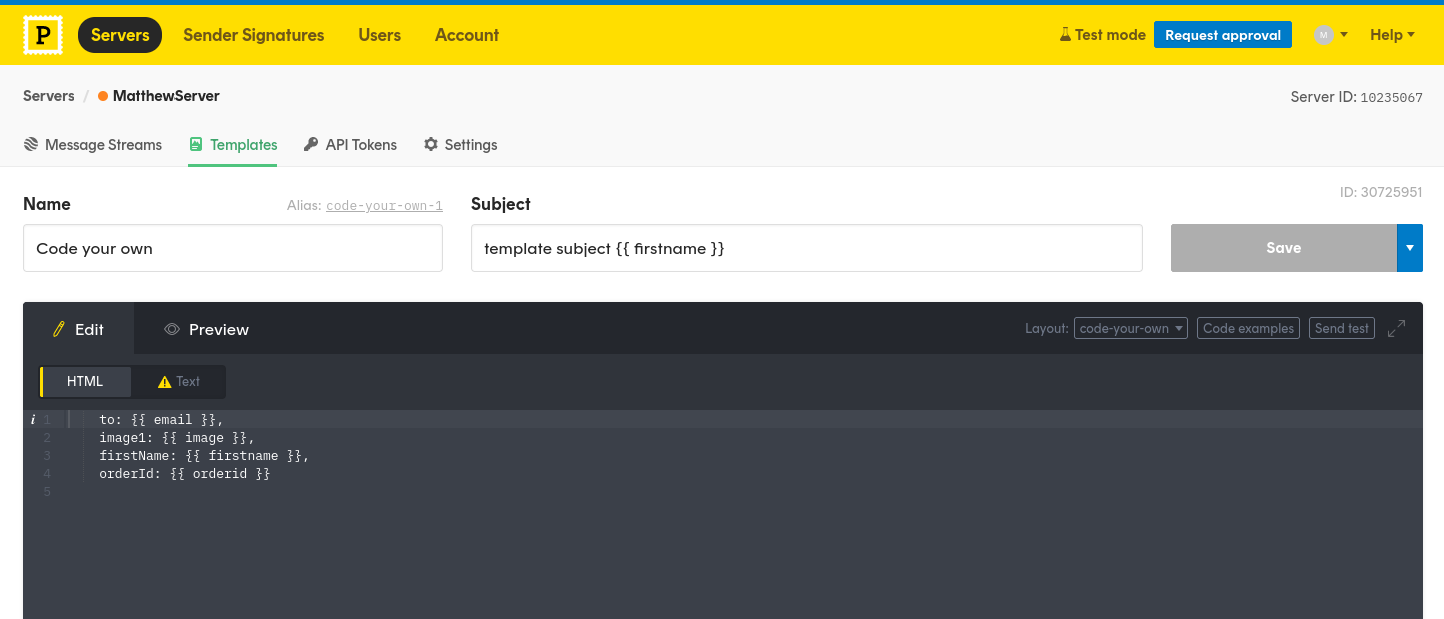
In Postmark, you can configure email templates that define the emails you want to send to your recipients. Each email template has an Alias name and ID that is used for identifying which template is used for sending emails to recipients. You can also specify a name and subject ID for each template.
The dynamic fields in a template, for example, first name and order ID, are mentioned within curly braces ({}) using the mustache format.
Attachments that you include in an email template are sent as documents attached with an email. You can also embed attachments in the email body.
How the Postmark Integration Works
This is how the Postman integration works:
-
Configure email templates in Postmark.
-
An Commerce developer configures the integration in Composable Commerce > Integrations Hub.
A new instance is created and the
Init Flowis executed. TheInit Flowvalidates whether the events received are correctly formatted. -
The integration creates or updates the webhooks configured in Commerce.
noteFor custom events, webhooks are not created in the Commerce because the events are published in external sources.
-
A secret key is also generated when you configure webhooks in Commerce. This secret_key is required for sending the events to Postmark.
-
When an event is triggered in the Commerce, the
Main Flowis executed.The
Main Flowis an asynchronous trigger that utilizes a set of event-mapping configurations. These configurations analyze the data received in Commerce Manager through events and generate appropriate values for a Postmark email template. The analysis is required to populate the dynamic values for the fields contained in the Postmark email template, for example, the first name of the email recipient and the order ID. -
Once the mapping is done and information for the Postmark email template is generated, the Postmark API sends the email to the recipients.
Configuring Event-Mapping Configurations
Mapping of information between Commerce Manager and Postmark is done through a combination of event names and JSON values. This combination of mapping key + values is referred to as event-mapping configurations. The configurations specify a set of parameters for an event, including both native Commerce events and custom events configured in external source. The primary information mapping is done with the event name.
When you are configuring the Postmark integration in Commerce Manager, you can specify these event-mapping configurations.
- Key: This is the event name that triggers the webhook events, for example,
order.paid,order.created. For more information on the complete list of Commerce events, see Observable Events. For custom events, the names must contain thecustom.prefix, for example,custom.contact.us. To know more about custom events, see Publishing Custom Events in External Sources. - Value: The values are JSON objects. They can either be a single JSON object or an array of JSON objects. Here is an example:
{
  "messagingProvider": {
    "templateId": "d-7fd1f0f905974f9abc9f8f44f883e0b5",
    "from": "customer-service@foo.com",
    "to": "$.payload.data.customer.email",
  },
  "dynamicFieldMapping": {
    "marketingImage": "http://example.com/static/value.png",
    "firstName": "$.payload.data.billing_address.first_name",
    "lastName": "$.payload.data.billing_address.last_name",
    "orderid": "$.payload.data.id",
    "orderTotal": "$.payload.data.meta.display_price.with_tax.formatted",
    "items": "$.payload.included.items[].{'name': name,'sku':sku, 'price': meta.display_price.with_tax.value.formatted}"
  },
  "metadata": {
    "fieldx": "fieldl value"
  },
  "attachments": []
}
The following example illustrates a sample event-mapping configuration that includes an array of JSON objects; this triggers two emails for a single event:
[
  {
    "messagingProvider": {
      "templateId": "d-5377hisuhf477h2hhbahd563gag5h",
      "from": "no-reply@foo.com",
      "to": "customer-service@foo.com",
    },
    "dynamicFieldMapping": {
      "marketingImage": "http://example.com/static/order-notification.png",
      "firstName": "$.payload.data.billing_address.first_name",
      "lastName": "$.payload.data.billing_address.last_name",
      "orderid": "$.payload.data.id",
      "orderTotal": "$.payload.data.meta.display_price.with_tax.formatted",
      "items": "$.payload.included.items[].{'name': name,'sku':sku, 'price': meta.display_price.with_tax.value.formatted}"
    },
    "metadata": {
      fieldx: "fieldl value"
    },
    "attachments": []
  },
  {
    "messagingProvider": {
      "templateId": "d-7fd1f0f905974f9abc9f8f44f883e0b5",
      "from": "customer-service@foo.com",
      "to": "$.payload.data.customer.email",
    },
    "dynamicFieldMapping": {
      "marketingImage": "http://example.com/static/thank-you.png",
      "firstName": "$.payload.data.billing_address.first_name",
      "lastName": "$.payload.data.billing_address.last_name",
      "orderid": "$.payload.data.id",
      "orderTotal": "$.payload.data.meta.display_price.with_tax.formatted",
      "items": "$.payload.included.items[].{'name': name,'sku':sku, 'price': meta.display_price.with_tax.value.formatted}"
    },
    "metadata": {
      metafield1: "fieldl value"
    },
    "attachments": []
  }
]
The Value field of Event-Mapping can contain the following sections and attributes:
-
messagingProvider: Themessagingprovidersection contains the following attributes:templateId: Unique identification number of the email template you have created in Postmark. You can also provide thealiasname of the template.from: Email address of the sender used in thefromfield in an email template.to: Email address of the recipient used in thetofield in an email template.allowMultipleRecipients: If the value is set totrue, an array of recipients are included in thetofield in an email template. If set tofalse, only a single recipient is included in the `to field.replyto: This is an optional attribute.- 'headers`: An optional attribute to include any custom header you would like to add to the emails you send.
trackOpens: An optional attribute that activates tracking of an email.tracklinks: An optional attribute that activates link tracking for any link included in the email body.messageStream: An optional attribute that specifies an ID used for sending the email messages. If no value is provided, the email message is set to default outbound transactional stream.
JSONata is the query language used for these attributes. JSONata provides JSON Path style queries and adds support for more advanced queries and even transformations.
-
dynamicFieldMapping: This section contains a combination of keys and values required to generate dynamic information for the email template, for example, order ID. -
metadata: This section contains a combination of keys and values required to generate metadata (additional) information for the email template. The information included in themetadatasection is stored against the transaction, so that the information can be later viewed from the sent logs. You can assign any name to this section. -
attachments: Each attachment section must contain the following attributes. The attributes are mapped to generate attachment details included in a Postmark email template. You can provide multiple attachments in an email.name: Name of the attached document.content: The content must be a base64 encoding of the attached document.contentID: This value is required if you have embedded the content ID of the attached document in the Postmark email template you have configured.contentType: This is the kind of content included in the attached document, before being base64 encoded, for example, image in JPEG format. Here is an example:
{
"triggered_by": "custom.contact-us",
"configuration": {
"secret_key": "ABC123ZY715XdZkAMrrsN410xSd99yir0WAECl7dij+M="
},
"payload": {
  "data": {
   "customer_email": "john.doe@example.com",
   "subject": "Question about Product ABC",
   "body": "Does it come in XS size?",
   recieved_at": "2022-09-09T12:34:38.679Z",
   "attachments": [{
    name: "attachmentName",
    content: "SGV5LCBpdCBqdXN0IGEgdGVzdCBzdHJpbmc=",
    contentID: "cid:1",
    contentType: "image/jpeg",
    }]
   }
  }
 }```
Generating Dynamic Information for Email Templates
The event-mapping configurations are analyzed to retrieve information for an email template. Here are few examples:
-
Single field mapping: The
Tofield in an email template denotes the email address of the recipients. The email address is obtained from thepayload.data.customer.emailvalue of an event-mapping configuration:"to": "$.payload.data.customer.email", -
Array value mapping: The 'items' field in an email template denotes either a table or a list of items, for example, contents of an order in an order notification. The values for the 'item' field are obtained from the
messagingprovidersection that generates an array of JSON objects:"items": "$.payload.included.items.{'name': name,'sku':sku, 'price': meta.display_price.with_tax.value.formatted}" -
Static value mapping: The following example illustrates a static mapping where no analysis is performed because the value does not start with
$. The information included in the event-mapping value is used in the email template without any mapping:"marketingImage": "http://example.com/static/value.png",
Prerequisites
You must complete the following before integrating the Commerce with Postmark:
- Here is an example of the Commerce event illustrating the JSON format followed as a minimum requirement:
{
  "id":"63d5b706-ee05-418c-a2bf-b34be26da9d4",
  "triggered_by":"order.created",
  "attempt":1,
  "configuration":{
  "url":"https://demo/demo",
  "secret_key":"deadbeefdeadbeef"
  },
  "integration":{
  "id":"204fe27e-17aa-4e26-b2a2-54d1ebe0bcd6",
  "integration_type":"webhook",
  "name":"Event Logger",
  "description":"Captures and stores all published events"
  }
  "payload": {
    "data": "{ ... }"
  }
  ...etc...
}
The triggered_by field is mandatory to identify the event and it is used while mapping the event with a set of event configurations. An appropriate value for the secret_key field is also required, else the event is rejected; the key is the SHA256 hash of the client_secret used in the integration connection parameters.
- Here is an example of an event published by other external sources illustrating the JSON format followed as a minimum requirement:
{
  "triggered_by":"custom.delivery-failed",
  "configuration":{
      "secret_key":"deadbeefdeadbeef"
  },
  "payload": {
    "data": { ... }
  }
}
The value in the triggered_by field must contain the custom. prefix, which is important for the correct operation of the Init Flow. The Init Flow is executed when you initiate the Postmark integration in the Integrations Hub of Commerce Manager.
-
You require the following information for integrating Postmark in the Integrations Hub of Commerce Manager:
- EPCC-Connection: The Commerce connection details.
- Postmark-API-Key: The
Postmark API Keygenerated in your Postmark account.
Configuring Postmark Integration
Once you have completed the Prerequisites, you are ready to configure the Postmark integration:
-
In Commerce Manager, under COMPOSER, click Integrations Hub.
-
Under Marketing & Communication, click Postmark Email.
-
Click Configure.
A window appears where you must configure the integration details.
-
In the Initial Configuration, click Next.
-
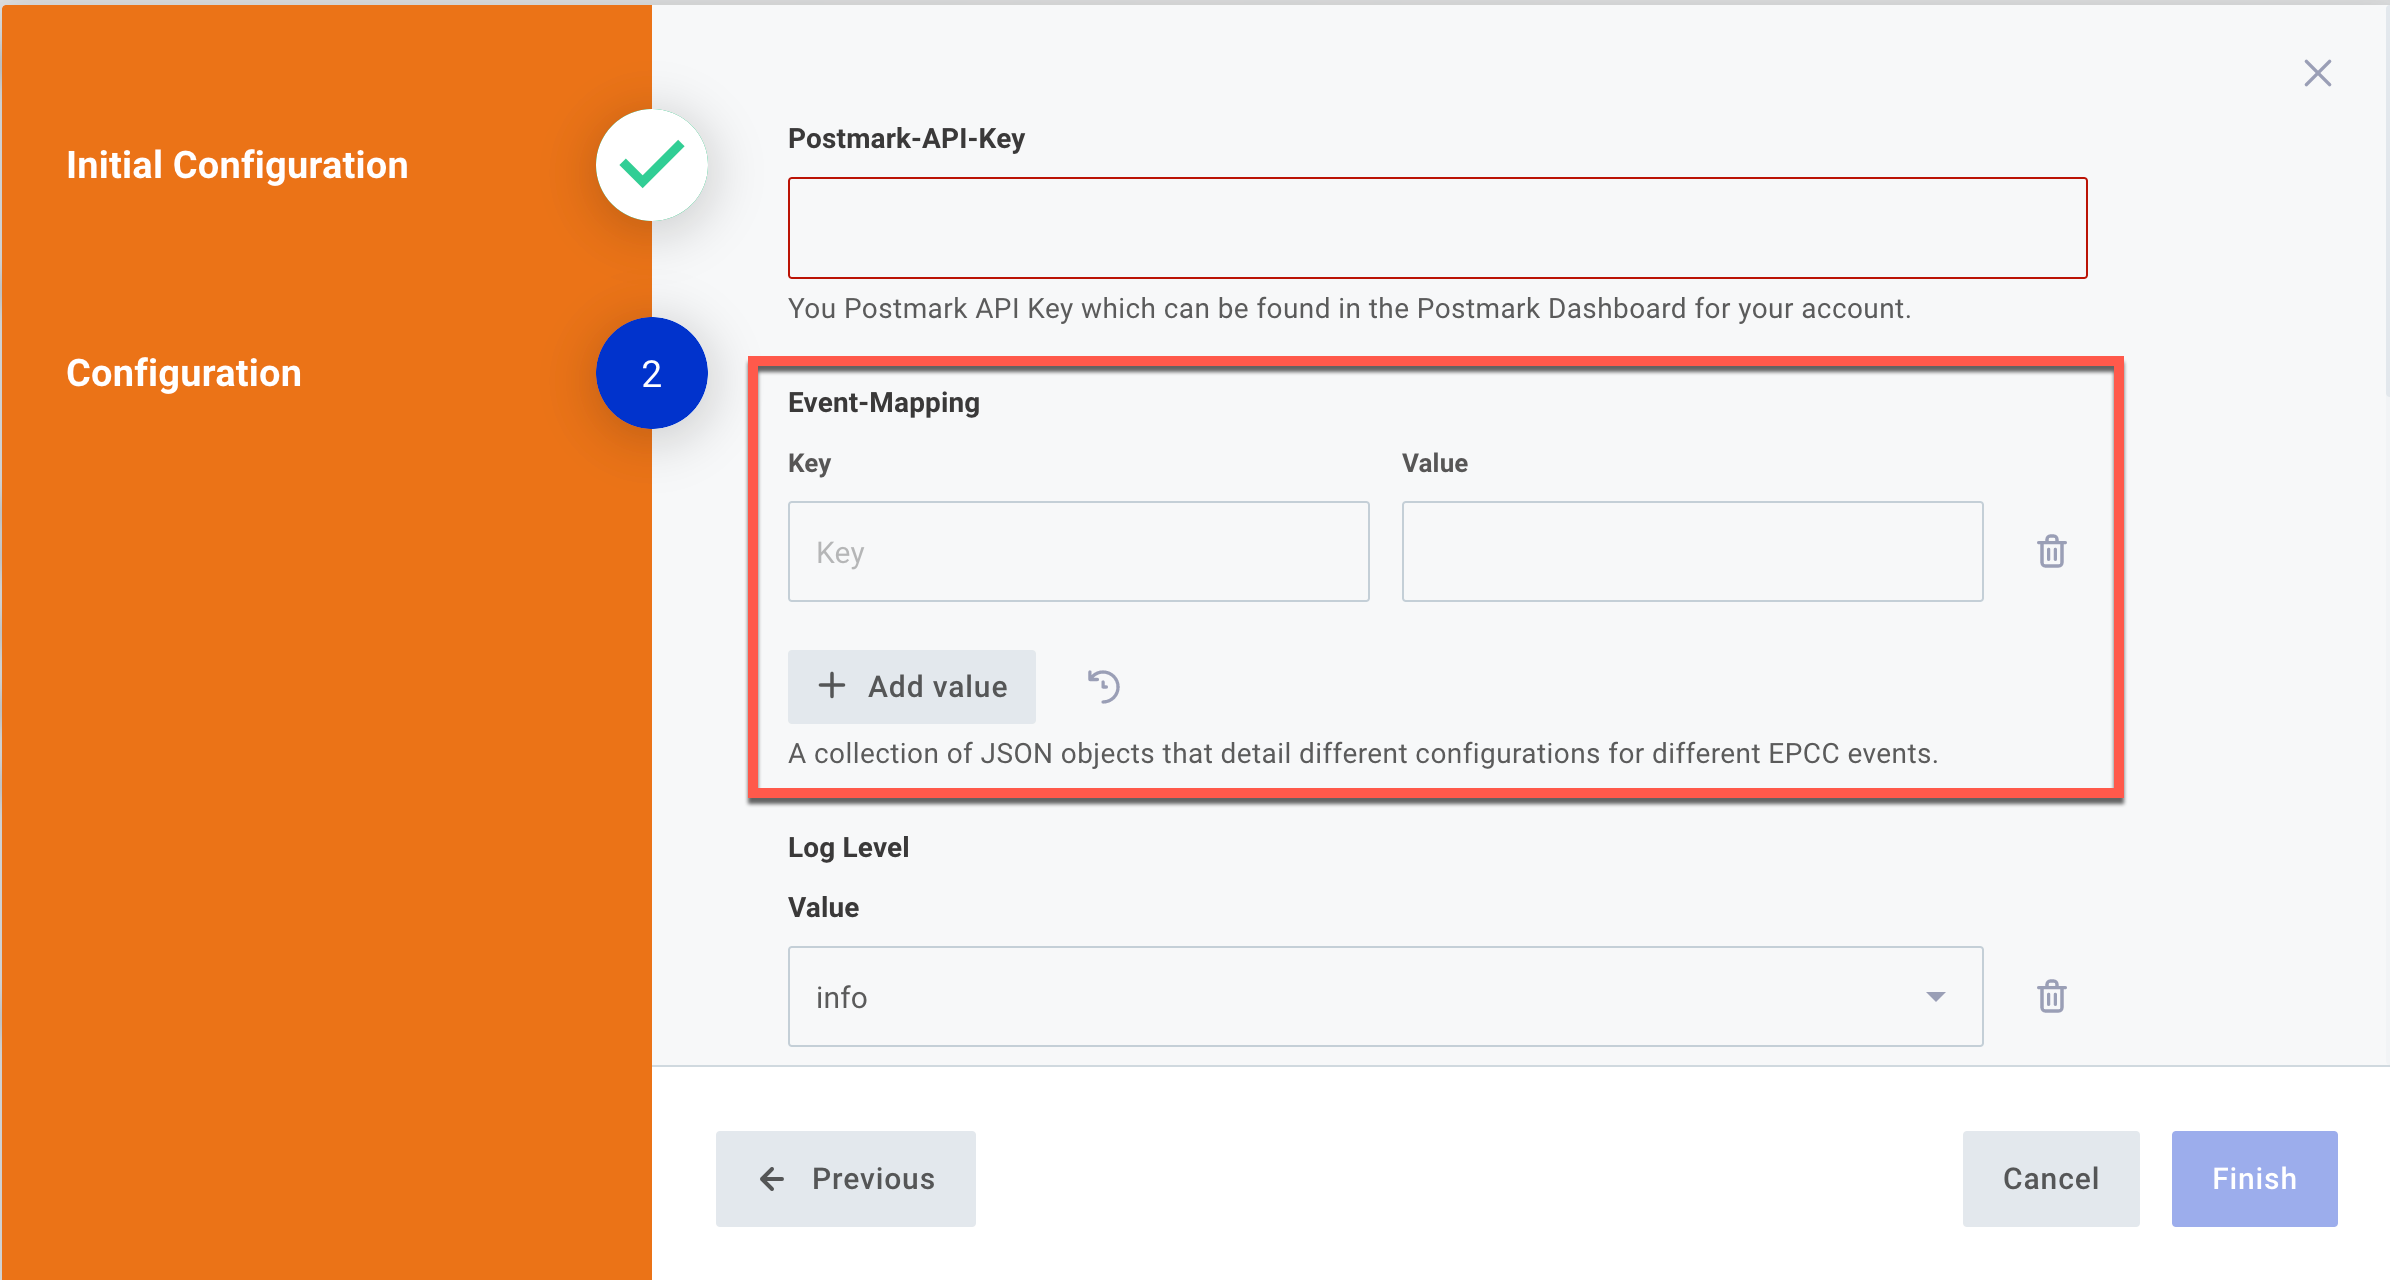
In the Configuration section, perform the following:
i. Enter the Postmark-API-Key.
For more information, see Prerequisites.
ii. In the Event-Mapping section, click Add Log Level Multiple Values.
- In the Key field, enter the event name for which you want to trigger the webhook.
- In the Value field, enter appropriate sections and attributes.
noteFor more information on Key and Value fields, see Configuring Event-Mapping Configurations.
iii. Optional step: in the Log Level, you can enter appropriate values for which you want to configure log entries. To add multiple values, click
 .note
.noteYou can configure additional details for monitoring. For example, enable Error on Fail, if you want to be notified when there is a a failure in sending emails to recipients through Postmark.
iv. In the EPCC Postmark Collection, click Connect.
Your connection details are successfully authorized.
-
Click Finish.
Verifying Postmark Integration
Perform the following to verify whether the Postmark integration is successful or not:
-
In Commerce Manager, under COMPOSER, click Integrations Hub.
-
Under Marketing & Communication, click Postmark Email.
-
Under Trigger Details, click the arrow next to Main Flow.
-
Copy the URL.
-
Go to Postman.
-
Paste the URL that you have copied from Commerce Manager.
-
Select the
POSTmethod. -
In the Body, enter the event details in JSON format:
- You must mention the event name in the triggered_by attribute.
- You must mention the secret_key under configuration.
noteTo generate the secret_key, log in to Commerce Manager > SYSTEM > Store Settings > Webhooks. Click the webhook event that you have configured while integrating with Postmark. Copy the Secret Key.
-
Send the request. The API response is successful and the recipient receives the intended email.
Publishing Custom Events in External Sources
You can create custom events in sources external to Commerce. The custom events must conform to the following guidelines:
-
Must include a top level
triggered_byattribute. -
Must include a top level
configurationattribute withsecret_keyincluded.cautionThe
secret_keyvalue is similar to the EPCC-Client-Secret key, but hashed with SHA256 and base64 encoded. You can obtain this value from a pre-existing webhook event configured in Commerce Manager > SYSTEM > Store Settings > Webhooks. The specific webhook event must be related to Postmark integration.If you dont have any events configured, then use the client secret ID used in your Commerce connection for your Postmark integration, sha256 hash it, and then base64 encode it.
-
Must include HTTP POST to trigger the webhooks for an integration. The webhook URL is visible either in the Integration configuration panel or in Commerce Manager > SYSTEM > Store Settings > Webhooks.
-
Include any data under
payload.dataas illustrated in the following example:
{
  "triggered_by": "custom.contact-us",
  "configuration": {
    "secret_key": "ABC123ZY715XdZkAMrrsN410xSd99yir0WAECl7dij+M="
  },
  "payload": {
    "data": {
      "customer_email": "john.doe@example.com",
      "subject": "Question about Product ABC",
      "body": "Does it come in XS size?",
      "recieved_at": "2022-09-09T12:34:38.679Z",
    }
  }
}
LoopbackFlow
You can use the LoopbackFlow**to test the event-mapping configurations, without involving Postman. This flow operates similarly toMain Flow`, without sending the event-mapping keys and values to Postmark.
You must send both the event name and the values containing the sections and their attributes:
{
 "event": {... },
 "config": [{"key": "order.created", "value": ""}]
}
The values must be sent in string format – first verify whether the JSON values are correctly formatted and then convert them to a string, using JSON String Converter.
The following example illustrates a response you will receive in LoopBackFlow:
[
   {
       "ErrorCode": 0,
       "Message": "loopback OK",
       "SubmittedAt": "null",
       "MessageID": "0 from batch of 2 ",
       "Template": {
           "To": "joe.bloggs@elasticpath.com",
           "From": "joe.bloggs@elasticpath.com",
           "TemplateId": 30725951,
           "TemplateModel": {
               "image1": "https://localhost/product-a.jpg",
               "firstName": "Ron",
               "orderid": "45936d34-7ce7-48fd-9673-eae9b434dd5e"
           },
           "Metadata": {
               "metaField1": "value for metaField1"
           }
       },
       "EventConfiguration": {
           "messagingProviderHydrated": {
               "from": "joe.bloggs@elasticpath.com",
               "templateId": 30725951,
               "to": [
                   "joe.bloggs@elasticpath.com",
                   "joe.bloggs@elasticpath.com"
               ],
               "allowMultipleRecipients": true
           },
           "dynamicFieldMappingHydrated": {
               "image1": "https://localhost/product-a.jpg",
               "firstName": "Ron",
               "orderid": "45936d34-7ce7-48fd-9673-eae9b434dd5e"
           },
           "metadataHydrated": {
               "metaField1": "value for metaField1"
           }
       }
   },
   {
       "ErrorCode": 0,
       "Message": "loopback OK",
       "SubmittedAt": "null",
       "MessageID": "1 from batch of 2 ",
       "Template": {
           "To": "joe.bloggs@elasticpath.com",
           "From": "joe.bloggs@elasticpath.com",
           "TemplateId": 30725951,
           "TemplateModel": {
               "image1": "https://localhost/product-a.jpg",
               "firstName": "Ron",
               "orderid": "45936d34-7ce7-48fd-9673-eae9b434dd5e"
           },
           "Metadata": {
               "metaField1": "value for metaField1"
           }
       },
       "EventConfiguration": {
           "messagingProviderHydrated": {
               "from": "joe.bloggs@elasticpath.com",
               "templateId": 30725951,
               "to": [
                   "joe.bloggs@elasticpath.com",
                   "joe.bloggs@elasticpath.com"
               ],
               "allowMultipleRecipients": true
           },
           "dynamicFieldMappingHydrated": {
               "image1": "https://localhost/product-a.jpg",
               "firstName": "Ron",
               "orderid": "45936d34-7ce7-48fd-9673-eae9b434dd5e"
           },
           "metadataHydrated": {
               "metaField1": "value for metaField1"
           }
       }
   }
]
Mapper Flow
You can use the Mapper Flow when you want to verify whether an event included in the Postmark integration is generating correct information for a Postmark email template.
The following example illustrates a sample response that you will receive in Mapper flow:
[
   {
       "messagingProviderHydrated": {
           "from": "joe.bloggs@elasticpath.com",
           "templateId": 30725951,
           "to": [
               "joe.bloggs@elasticpath.com",
               "joe.bloggs@elasticpath.com"
           ],
           "allowMultipleRecipients": true
       },
       "dynamicFieldMappingHydrated": {
           "image1": "https://localhost/product-a.jpg",
           "firstName": "Ron",
           "orderid": "45936d34-7ce7-48fd-9673-eae9b434dd5e"
       },
       "metaDataHydrated": {
           "metaField1": "value for metaField1"
       }
   }
]
Demos
Watch the following video to learn how to integrate Commerce with Postmark using the Integrations Hub in Commerce Manager: