Implement a Manual Gateway
Payment gateways provide access to external payment provider services. Commerce natively supports a set of popular payment gateways. If you already have a payment provider that you want to continue to use, you can add the payment gateway manually. Similarly, you can add custom payment options based on your business processes, such as cash on delivery. You can implement as many manual gateways as you want, but you can enable only one at a time.
Configure your store to use Manual Gateway to process payments if the order total is zero or the payment is through non-supported payment providers.
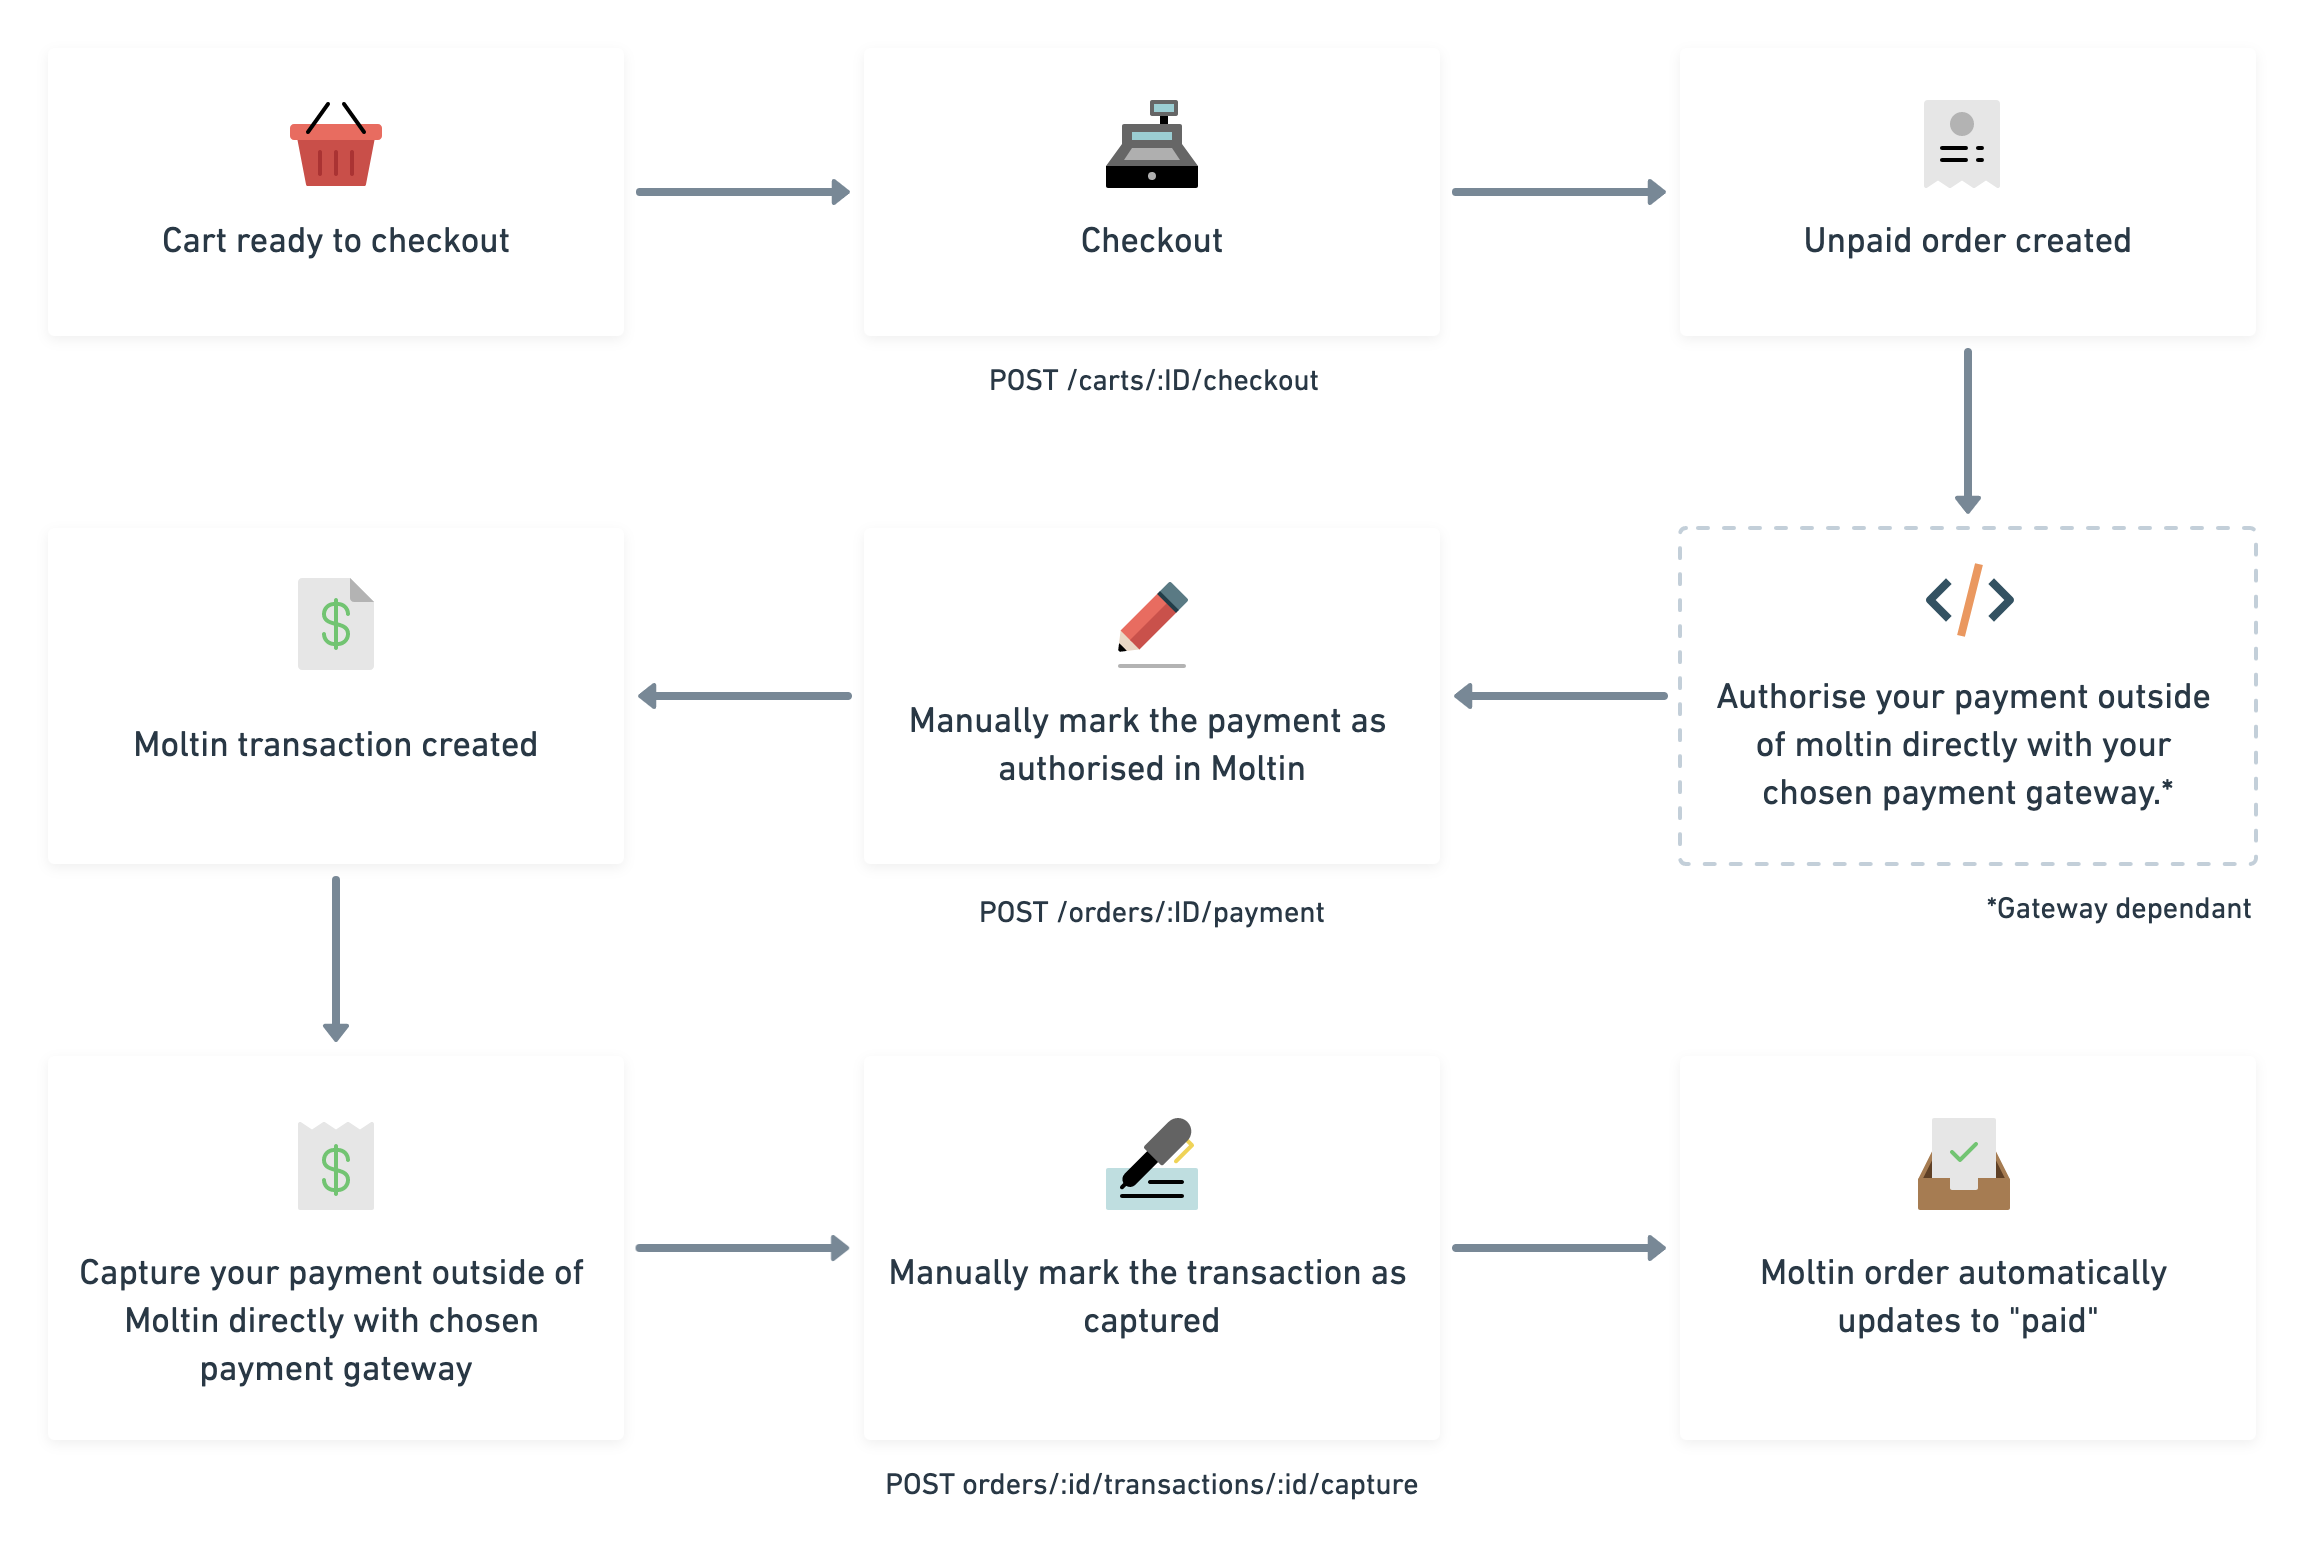
The following image shows the workflow from unpaid order to paid order using a manual gateway.

Prerequisites
If you want to follow along, you need the following items:
- A Composable Commerce account.
- The Client ID and Client Secret of your store.
- A third-party payment provider integration.
- An access token.
Step-by-step walkthrough
This walkthrough uses a generic example. For instructions about how to use your chosen gateway provider, see your provider’s documentation and configure your code accordingly.
- Configure the manual gateway.
- Check out a cart and make a payment.
- Authorize and capture payment.
- Manage your stock.
Enable and configure the manual gateway
By default, all payment methods (gateways) are disabled. Enable the payment gateway using either Commerce Manager or the API.
Enable in your Commerce Manager
- In Commerce Manager, go to Settings > Gateways. The main Gateways page appears with a list of all supported gateways.
- Click the edit icon beside Manual gateway, and select the Enabled checkbox.
- Click Save. You return to the Gateways screen. The Manual gateway entry is enabled.
Enable through the API
Configure the manual gateway by using the /gateways/manual endpoint.
curl -X PUT https://useast.api.elasticpath.com/v2/gateways/manual \
     -H "Content-Type: application/json" \
     -H "Authorization: Bearer XXX" \
     -d $'{
        "data": {
           "type": "gateway",
           "enabled": true
        }
     }'
Use the manual gateway
In this section, you will check out the cart and pay for the order.
Your stock will be managed for you when you authorize or capture the payment, but if you are managing your own stock you will need to do that when you see the appropriate event.
Cart checkout
This is the point where the customer’s information is attached to the order and the payment gateway. You will need to specify manual as your gateway.
curl -X POST https://useast.api.elasticpath.com/v2/carts/:reference/checkout \
  -H 'authorization: Bearer XXX' \
  -H 'content-type: application/json' \
  -d '{
    "data": {
      "customer": {
        "name": "Billy",
        "email": "billy@billy.com"
      },
      "billing_address": {
        "first_name": "Jack",
        "last_name": "Macdowall",
        "company_name": "Macdowalls",
        "line_1": "1225 Invention Avenue",
        "line_2": "Birmingham",
        "postcode": "B21 9AF",
        "county": "West Midlands",
        "country": "UK"
      },
      "shipping_address": {
        "first_name": "Otis",
        "last_name": "Sedmak",
        "company_name": "Sedmak & Co.",
        "line_1": "1251, Rexmere Ave",
        "line_2": "Farmingville, Suffolk",
        "postcode": "11738",
        "county": "New York",
        "country": "US",
        "instructions": "Leave in porch"
      }
    }
}'
Pay for order
After the billing and shipping details have been provided, the order is then processed by a third-party integration that you've configured as your payment gateway. This transaction is processed outside of the Composable Commerce API environment, and if successful returns an empty 200 OK response.
The request details differ per provider, and this is typically the type of authentication required by the vendor.
After the order is paid for successfully, the state endpoint should say approved. In Composable Commerce, use the API to authorize the payment, or optionally, capture it.
Authorize and capture the payment
The transaction needs to be authorized and captured manually through Composable Commerce. To capture a manual payment, you must capture the individual transaction. You can do this through Commerce Manager or the API.
We recommend capturing payments several hours to days after the authorization to mitigate risks of fraud and chargebacks. When you sell digital goods that are delivered immediately, we recommend using a single purchase call instead of separate authorize and capture calls.
Authorize payment
curl -X POST https://useast.api.elasticpath.com/v2/orders/:orderId/payments \
     -H "Content-Type: application/json" \
     -H "Authorization: Bearer XXXX" \
     -d $'{
       "data": {
         "gateway": "manual",
         "method": "authorize"
       }
     }'
Capture payment
You need Client Credentials for this step.
curl -X POST https://useast.api.elasticpath.com/v2/orders/:orderId/transactions/:transaction_id/capture \
     -H "Authorization: Bearer XXXX"
You can get a list of all the transactions for an order by calling the following:
curl -X GET https://useast.api.elasticpath.com/v2/orders/:orderId/transactions \
     -H "Authorization: Bearer XXXX"